Cuando se va a iniciar la configuración de una máquina x86 desde cero, deben tomarse en consideración las siguientes cuestiones:
¿Que uso le vamos a dar al equipo?
¿Soporta BIOS UEFI?
¿Va a estar dedicada a un solo sistema Operativo, o se pretende alojar múltiples S.Os?
¿Que gestor de arranque se quiere utilizar?.
¿Como asignar el espacio en disco?.
En mi último portátil para pruebas, preparé una tabla de particiones GPT con tamaños homogéneos y a continuación instalé GRUB2 como bootloader independiente. Esta configuración me permite una gran flexibilidad a la hora de asignar espacio de almacenamiento y aísla los diferentes S.Os instalados.
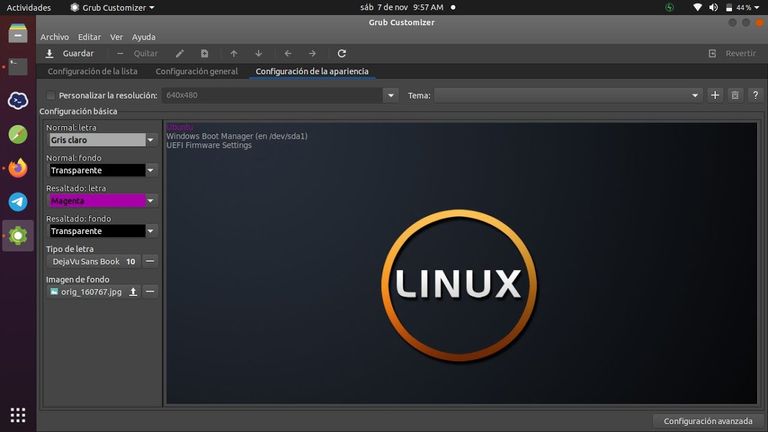
La elección de GRUB2 casi resulta obvia, es el bootloader por defecto de una gran cantidad de distribuciones Linux, gestiona prácticamente todos los sistemas de archivos, puedes arrancar directamente casi todos los S.Os, o bien, encadenar otro bootloader que arranque el S.O -esta es mi opción preferida-.

When you are going to start configuring an x86 machine from scratch, the following questions should be taken into consideration:
What use are we going to give to the equipment?
Does BIOS support UEFI?
Will it be dedicated to a single operating system, or is it intended to host multiple OSes?
What boot loader do you want to use?
How to allocate disk space?
On my last test laptop, I prepared a GPT partition table with homogeneous sizes and then installed GRUB2 as a standalone bootloader. This configuration allows me great flexibility when allocating storage space and isolates the different installed OSes.
The choice of GRUB2 is almost obvious, it is the default bootloader for a large number of Linux distributions, it manages practically all file systems, you can directly boot almost all the OSes, or chain another bootloader that boots the OS - This is my preferred option.
Vamos a revisar el proceso de puesta en marcha que he realizado.
Selecciona una Distribución.
Para comenzar es necesario disponer de una imagen iso de vuestra distribución linux favorita que lleve GRUB2 -casi todas- En mi caso yo me decanto por ArchLinux
Revisa la BIOS.
Otra cuestión que hay que considerar es si el ordenador que se pretende configurar tiene una BIOS clásica o UEFI. Es conveniente antes de comenzar a instalar familiarizarse con la BIOS y tener claras las características de la misma.
Asegúrate de disponer de la última actualización de firmware, las BIOS UEFI están plagadas de problemas.
Para instalar la versión de GRUB2 que arranca en modo UEFI es necesario iniciar Linux desde un bootloader en modo UEFI, por tanto hay que verificar que el arranque UEFI está habilitado en BIOS y que desde el menú de arranque se detecta correctamente en el medio de instalación -CD o USB- la ubicación por defecto del bootloader
EFI/BOOT/bootx64.efi.
Para comprobar que el kernel de linux está iniciado con soporte UEFI se ejecuta:
-# modprobe efivars
-# ls -la /sys/firmware/efi/vars
Si no existe el directorio, Linux no ha arrancado en modo UEFI.
En mi caso he descartado el modo UEFI por los bugs encontrados en la BIOS de mi portátil y la falta de actualizaciones en la web.
Tampoco me resulta problemática esta renuncia: pues en mi caso el interés en emplear el modo UEFI radica en poder arrancar desde el disco con particiones GPT, cosa que puedo hacer con GRUB2 sin necesidad de emplear el modo UEFI.
Definiendo las Particiones.
Una vez arrancado Linux e iniciado una shell procedemos a generar las particiones GPT; para ello puede utilizarse parted o gdisk, personalmente yo utilizo gdisk.
Para definir la tabla de particiones he seguido los siguientes criterios:
Generar todas las particiones antes de empezar a instalar los S.Os.
Asignar una partición por S.O, donde situamos los directorios estándar , y si es preciso, utilizar particiones adicionales para datos.
Utilizar particiones de tamaño homogéneo, para S.O y datos. Caso aparte son las particiones “especiales” que procuro situar al principio o al final del disco.
Alinear las particiones en limites de 4 KB. En la actualidad los discos utilizan sectores físicos de 4 KB aunque a nivel lógico aún se representan a los S.O como sectores de 512 bytes.
Dejar “burbujas” de 128 MB de tamaño, como espacio sin asignar, entre las particiones dedicadas a S.O y/o datos.
Para un estudio en mayor detalle de como generar particiones GPT recomiendo este sitio.
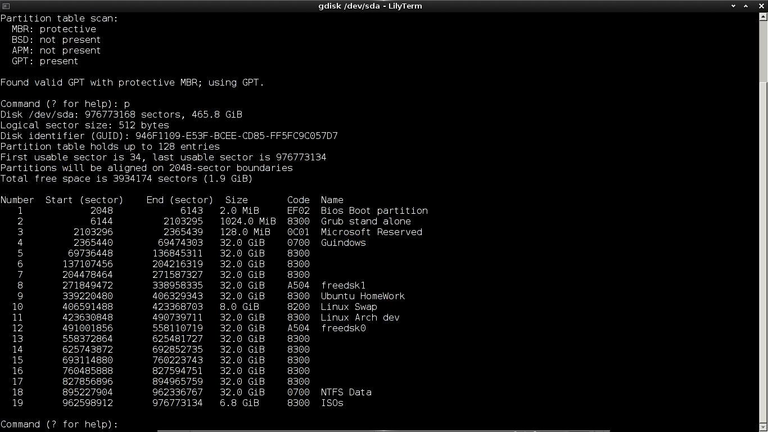
Yo utilizo este esquema de particiones:
Let's review the start-up process that I have carried out.
Select a Distribution.
To begin, it is necessary to have an iso image of your favorite Linux distribution that has GRUB2 - almost all of them - In my case I opt for ArchLinux
Check the BIOS.
Another issue to consider is whether the computer you intend to configure has a classic or UEFI BIOS. It is advisable before starting to install to familiarize yourself with the BIOS and be clear about its characteristics.
Make sure you have the latest firmware update, UEFI BIOSes are plagued with problems.
To install the version of GRUB2 that boots in UEFI mode, it is necessary to start Linux from a bootloader in UEFI mode, therefore you must verify that UEFI boot is enabled in the BIOS and that from the boot menu it is correctly detected on the installation media -CD or USB- the default bootloader location
EFI/BOOT/bootx64.efi.
To check that the Linux kernel is booted with UEFI support, run:
modprobe efvars
ls -la /sys/firmware/efi/vars
If the directory does not exist, Linux has not booted in UEFI mode.
In my case I have ruled out UEFI mode due to the bugs found in the BIOS of my laptop and the lack of updates on the web.
This renunciation is not problematic for me either: because in my case the interest in using UEFI mode lies in being able to boot from the disk with GPT partitions, something I can do with GRUB2 without having to use UEFI mode.
Defining Partitions.
Once Linux is started and a shell is started, we proceed to generate the GPT partitions; For this you can use parted or gdisk, personally I use gdisk.
To define the partition table I have followed the following criteria:
Generate all partitions before starting to install the OS.
Assign a partition per OS, where we place the standard directories, and if necessary, use additional partitions for data.
Use partitions of homogeneous size, for OS and data. A separate case are the “special” partitions that I try to place at the beginning or end of the disk.
Align partitions on 4 KB boundaries. Currently, disks use 4 KB physical sectors, although at a logical level the OS are still represented as 512-byte sectors.
Leave “bubbles” of 128 MB in size, as unallocated space, between the partitions dedicated to OS and/or data.
For a more detailed study of how to generate GPT partitions I recommend this site.
I use this partition scheme:
| Blogs, Sitios Web y Redes Sociales / Blogs, Webs & Social Networks | Plataformas de Contenidos/ Contents Platforms |
|---|---|
| Mi Blog / My Blog | Los Apuntes de Tux |
| Mi Blog / My Blog | El Mundo de Ubuntu |
| Mi Blog / My Blog | Nel Regno di Linux |
| Mi Blog / My Blog | Linuxlandit & The Conqueror Worm |
| Mi Blog / My Blog | Pianeta Ubuntu |
| Mi Blog / My Blog | Re Ubuntu |
| Mi Blog / My Blog | Nel Regno di Ubuntu |
| Red Social Twitter / Twitter Social Network | @hugorep |

| Blurt Official | Blurt.one | BeBlurt | Blurt Buzz |
|---|---|---|---|
 |  |  |  |

 |  |  |  |
|---|
Upvoted. Thank You for sending some of your rewards to @null. Read my last posts to make sure that BLURT burning is profitable for you. Before using this bot please make sure your account has at least 100 BP. Get more BLURT:
@ mariuszkarowski/how-to-get-automatic-upvote-from-my-accounts@ blurtbooster/blurt-booster-introduction-rules-and-guidelines-1699999662965@ nalexadre/blurt-nexus-creating-an-affiliate-account-1700008765859@ kryptodenno - win BLURT POWER delegationNote: This bot will not vote on AI-generated content
It is a pleasure for us to share our best wishes and congratulations. You have been given a virtual hug by the curation account @newvisionlife and manually curation by @OneRay.
Life never ends and there are new ways to see it. Tell us yours in our community
Es un placer para nosotros compartir nuestros mejores deseos y felicitaciones. Usted ha recibido un abrazo virtual de la cuenta de curación @newvisionlife y curado manualmente por @OneRay
La vida nunca termina y hay nuevas formas de verla. Cuéntanos la tuya en nuestra comunidad