El siguiente es un tutorial para todos aquellos interesados en aprender esta útil herramienta, es bueno saber programar en ambientes web o por lo menos hacer un pequeño tutorial de php o asp, antes de intentar las siguientes recomendaciones.
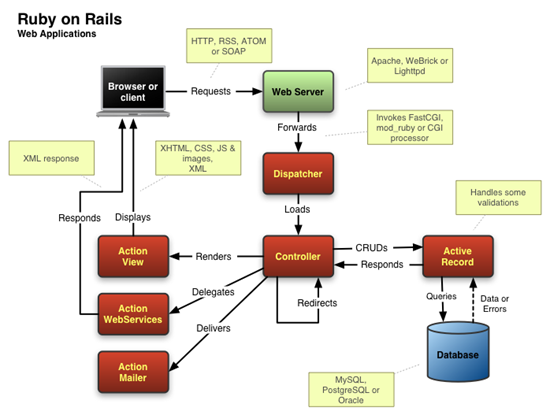
Lo primero es indicar que Ruby es un lenguaje de programación que facilita la creación de scripts para servidor o inclusive para el desarrollo web. Rails es un framework web basado en el paradigma mvc (modelo, vista, controlador).
La arquitectura MVC tiene varias acepciones, pero la más popular o aplicable a Ruby on Rails es la siguiente:
Modelo: Es la parte que se relaciona directamente con la base de datos, contiene la lógica de negocios de la aplicación.
Controlador: Es donde la aplicación responde a eventos como crear, guardar, eliminar datos y sirve de puente entre la vista y el modelo.
Vista: Este contiene la presentación, es donde va alojado todo el html. La vista es la encargada de interactuar directamente con el usuario.
Instalación.
Tienes dos opciones:
La primera es usar el manejador de paquetes que contenga la distribución que uses para instalar Ruby 2.0.0 y rubygems, una vez instalados estos dos paquetes desde terminal escribes "gem install rails" para instalar el framework.
La segunda es usar RVM.
Abre una ventana de terminal y escribes lo siguiente:
bash < <(curl -s https://rvm.beginrescueend.com/install/rvm)
luego:
echo '[[ -s "$HOME/.rvm/scripts/rvm" ]] && . "$HOME/.rvm/scripts/rvm" # Load RVM function' >> ~/.bash_profile
finalmente:
source .bash_profile
Instalas ruby de la siguiente forma:
rvm install 2.0.0
Lo habilitas:
rvm use 2.0.0
Rails se instala igual que si fueses usado el manejador de paquetes:
gem install rails
Una vez todo instalado correctamente procedemos a crear nuestra primera aplicación web con el siguiente comando: rails new blog, blog es el nombre de la aplicación, se creará entonces una nueva carpeta con los siguiente archivos:
ruby-5f063c0de539ec15ee4f91192bdb0897
README
Rakefile
config.ru
.gitignore
Gemfile
app
app/assets/images/rails.png
app/assets/javascripts/application.js
app/assets/stylesheets/application.css
app/controllers/application_controller.rb
app/helpers/application_helper.rb
app/mailers
app/models
app/views/layouts/application.html.erb
app/mailers/.gitkeep
app/models/.gitkeep
config
config/routes.rb
config/application.rb
config/environment.rb
config/environments
config/environments/development.rb
config/environments/production.rb
config/environments/test.rb
config/initializers
config/initializers/backtrace_silencers.rb
config/initializers/inflections.rb
config/initializers/mime_types.rb
config/initializers/secret_token.rb
config/initializers/session_store.rb
config/initializers/wrap_parameters.rb
config/locales
config/locales/en.yml
config/boot.rb
config/database.yml
db
db/seeds.rb
doc
doc/README_FOR_APP
lib
lib/tasks
lib/tasks/.gitkeep
lib/assets
lib/assets/.gitkeep
log
log/.gitkeep
public
public/404.html
public/422.html
public/500.html
public/favicon.ico
public/index.html
public/robots.txt
script
script/rails
test/fixtures
test/fixtures/.gitkeep
test/functional
test/functional/.gitkeep
test/integration
test/integration/.gitkeep
test/unit
test/unit/.gitkeep
test/performance/browsing_test.rb
test/test_helper.rb
tmp/cache
tmp/cache/assets
vendor/assets/stylesheets
vendor/assets/stylesheets/.gitkeep
vendor/plugins
vendor/plugins/.gitkeep
Una vez este proceso haya concluido podemos ingresar a la carpeta de blog: cd blog y ejecutar el siguiente comando que crea una plantilla de trabajo con los archivos y el código básico para trabajar:
rails generate scaffold Post nombre:string titulo:string contenido:text
Lo que hace es crear una serie de archivos que nos permitirán manipular nuevos posts.
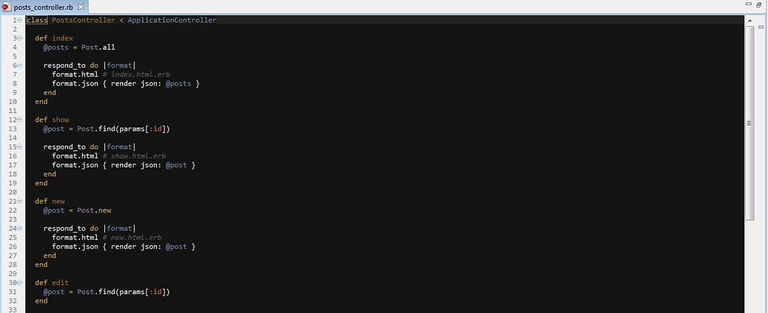
Podemos observar en la carpeta app -> controllers nuestro nuevo controlador: posts_controller
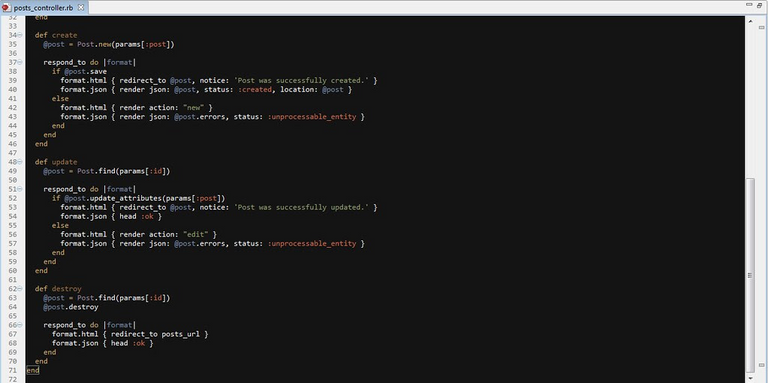
Es una clase que hereda de ApplicationController y contiene los principales eventos, el primero de ellos es index, donde mostrará todos los posts. Post es el modelo y all es el método que devuelve todos los resultados, es similar a escribir "select * from posts", esto lo almacena en una variable que comparte con la vista @posts y luego dos formatos de respuesta, uno para la vista en html y el otro en json.
El método show hace una busqueda por el parametro id, esto seria similar a: "select * from posts where posts.id = $_GET['id']".
Vistas.
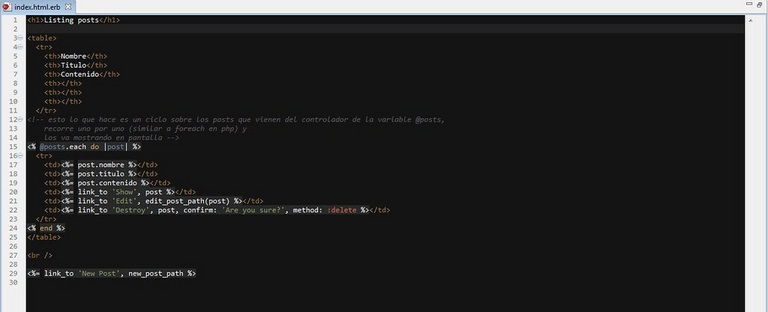
Las vistas se encuentran en app -> views -> posts, por ejemplo index.html.erb muestra lo siguiente:
De esta manera tenemos una aplicación muy básica hecha en Ruby on Rails.

The following is a tutorial for all those interested in learning this useful tool, it is good to know how to program in web environments or at least do a short PHP or ASP tutorial, before trying the following recommendations.
The first thing is to indicate that Ruby is a programming language that facilitates the creation of scripts for servers or even for web development. Rails is a web framework based on the mvc (model, view, controller) paradigm.
The MVC architecture has several meanings, but the most popular or applicable to Ruby on Rails is the following:
Model: It is the part that is directly related to the database, it contains the business logic of the application.
Controller: It is where the application responds to events such as creating, saving, deleting data and serves as a bridge between the view and the model.
View: This contains the presentation, it is where all the html is hosted. The view is responsible for interacting directly with the user.
ruby-on-rails
Facility.
You have two options:
The first is to use the package manager that contains the distribution you use to install Ruby 2.0.0 and rubygems. Once these two packages are installed from the terminal, type "gem install rails" to install the framework.
The second is to use RVM.
Open a terminal window and type the following:
bash < <(curl -s https://rvm.beginrescueend.com/install/rvm)
then:
echo '[[ -s "$HOME/.rvm/scripts/rvm" ]] && . "$HOME/.rvm/scripts/rvm" # Load RVM function' >> ~/.bash_profile
finally:
source .bash_profile
You install ruby in the following way:
rvm install 2.0.0
You enable it:
rvm use 2.0.0
Rails is installed the same as if you were using the package manager:
gem install rails
Once everything is installed correctly, we proceed to create our first web application with the following command: rails new blog, blog is the name of the application, a new folder will then be created with the following files:
ruby-5f063c0de539ec15ee4f91192bdb0897

README
Rakefile
config.ru
.gitignore
Gemfile
app
app/assets/images/rails.png
app/assets/javascripts/application.js
app/assets/stylesheets/application.css
app/controllers/application_controller.rb
app/helpers/application_helper.rb
app/mailers
app/models
app/views/layouts/application.html.erb
app/mailers/.gitkeep
app/models/.gitkeep
config
config/routes.rb
config/application.rb
config/environment.rb
config/environments
config/environments/development.rb
config/environments/production.rb
config/environments/test.rb
config/initializers
config/initializers/backtrace_silencers.rb
config/initializers/inflections.rb
config/initializers/mime_types.rb
config/initializers/secret_token.rb
config/initializers/session_store.rb
config/initializers/wrap_parameters.rb
config/local
config/locales/en.yml
config/boot.rb
config/database.yml
db
db/seeds.rb
doc
doc/README_FOR_APP
lib
lib/tasks
lib/tasks/.gitkeep
lib/assets
lib/assets/.gitkeep
log
log/.gitkeep
public
public/404.html
public/422.html
public/500.html
public/favicon.ico
public/index.html
public/robots.txt
script
script/rails
test/fixtures
test/fixtures/.gitkeep
test/functional
test/functional/.gitkeep
test/integration
test/integration/.gitkeep
test/unit
test/unit/.gitkeep
test/performance/browsing_test.rb
test/test_helper.rb
tmp/cache
tmp/cache/assets
vendor/assets/stylesheets
vendor/assets/stylesheets/.gitkeep
vendor/plugins
vendor/plugins/.gitkeep
Once this process has finished, we can enter the blog folder: cd blog and execute the following command that creates a working template with the files and the basic code to work with:
rails generate scaffold Post name:string title:string content:text
What it does is create a series of files that will allow us to manipulate new posts.
We can see in the app -> controllers folder our new controller: posts_controller
It is a class that inherits from ApplicationController and contains the main events, the first of which is index, where it will show all the posts. Post is the model and all is the method that returns all the results, it is similar to writing "select * from posts", this stores it in a variable that it shares with the @posts view and then two response formats, one for the view in html and the other in json.
The show method does a search by the id parameter, this would be similar to: "select * from posts where posts.id = $_GET['id']".
Views.
The views are found in app -> views -> posts, for example index.html.erb shows the following:
This way we have a very basic application made in Ruby on Rails.
How to program in Ruby on Rails, an open source framework for applications.
- Este tema ha sido tratado en los blogs que enuncio al final del post, reproduciéndolo en forma parcial y/o total. Todos los blogs que se enumeran son de mi propiedad.
- This topic has been discussed in the blogs that I list at the end of the post, reproducing it in part and/or in full. All blogs listed are owned by me.
Capturas de pantallas / Screenshots:
Descargas / Download.
| Blogs, Sitios Web y Redes Sociales / Blogs, Webs & Social Networks | Plataformas de Contenidos/ Contents Platforms |
|---|---|
| Mi Blog / My Blog | Los Apuntes de Tux |
| Mi Blog / My Blog | El Mundo de Ubuntu |
| Mi Blog / My Blog | Nel Regno di Linux |
| Mi Blog / My Blog | Linuxlandit & The Conqueror Worm |
| Mi Blog / My Blog | Pianeta Ubuntu |
| Mi Blog / My Blog | Re Ubuntu |
| Mi Blog / My Blog | Nel Regno di Ubuntu |
| Red Social Twitter / Twitter Social Network | @hugorep |

| Blurt Official | Blurt.one | BeBlurt | Blurt Buzz |
|---|---|---|---|
 |  |  |  |


Gracias por tu apoyo @habloespanolweb3.