Como ya les había mencionado en el primer post OBS Studio es para mi el mejor programa para grabar videos, gameplays, capturas de pantallas, exposición de temas , video reacciones y una infinidad de usos que le puedes dar sabiendo lo básico.
Welcome back to my blog friends, we continue with the OBS Studio tutorial that I hope will encourage more people to make videos and multimedia creations, that is the purpose of this series of publications.
As I had already mentioned in the first post OBS Studio is for me the best program to record videos, gameplays, screenshots, exposure of topics, video reactions and a myriad of uses that you can give knowing the basics.
Es de código abierto y lo puedes descargar gratis en su ultima versión desde su pagina oficial corre en Mac, linux y windows así que no hay problema de compatibilidad y es muy amigable al uso, solo hay que estar familiarizado con sus diferentes funciones.
El día de hoy explicaré como hacer una captura de pantalla para grabar cualquier cosa que quieran compartir, desde un video de YouTube hasta algún chart en algún Exchange o talvez tu primer gameplay los limites son muy extensos.
It is open source and you can download the latest version for free from their official website it runs on Mac, linux and windows so there is no compatibility problem and it is very user friendly, you just need to be familiar with its different functions.
Today I will explain how to make a screenshot to record anything you want to share, from a YouTube video to an Exchange chart or maybe your first gameplay, the limits are very extensive.
Siguiendo con lo explicado en el anterior tutorial y usando mi colección de escenas de prueba les explicaré como hacemos una captura de pantalla. Esto es muy sencillo solo hay que seguir los pasos al pie de la letra y no va haber falla.
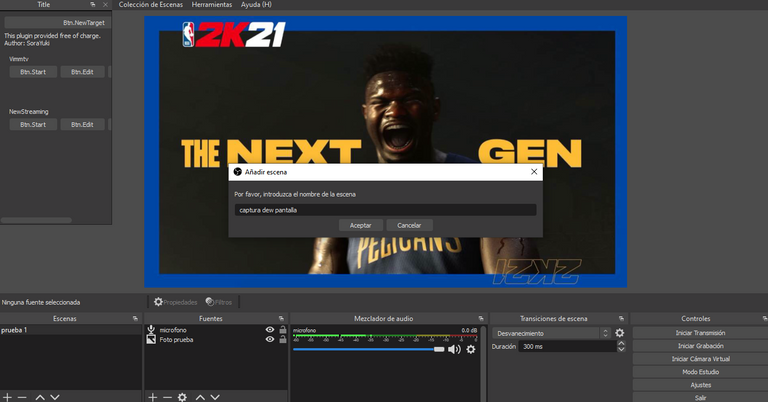
Agregaré una nueva escena para nombrarla como "captura de pantalla" para no confundirnos con las diferentes escenas que tengamos en nuestro OBS, esto lo hacemos dándole al signo de + en el recuadro de escenas nos saldrá un recuadro que nos da la opción de ponerle nombre y ahí le pondremos el nombre deseado en este caso "captura de pantalla" y luego le damos a aceptar.
Continuing with what was explained in the previous tutorial and using my collection of test scenes I will explain how to make a screenshot. This is very simple just follow the steps to the letter and there will be no failure.
I will add a new scene to name it as "screenshot" to not confuse us with the different scenes that we have in our OBS, we do this by giving the sign of + in the box of scenes we will get a box that gives us the option to name it and there we will put the desired name in this case "screenshot" and then we give it to accept.
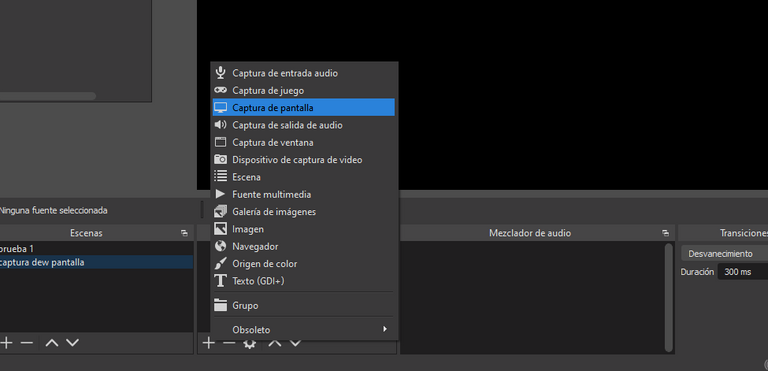
Después de esto lo que sigue es poner las fuentes que tendrá esta escena, en primera nos iremos al recuadro de fuentes y le damos click al botón de + ahí nos saldrá la opción de elegir que fuente agregar elegimos captura de pantalla y la nombramos como queramos para que no se nos confunda con las demás fuentes.
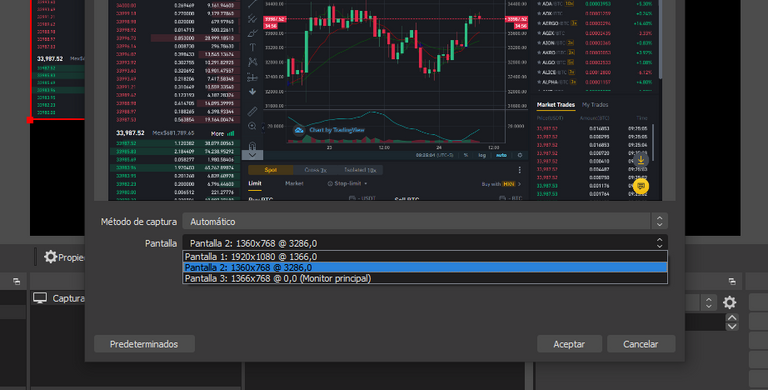
Luego de darle aceptar en automático nos selecciona nuestra pantalla principal, en el caso de tener varias pantallas debemos elegir cual queremos compartir en nuestra escena en el recuadro que dice "pantalla" elegimos que monitor capturaremos y después le damos aceptar.
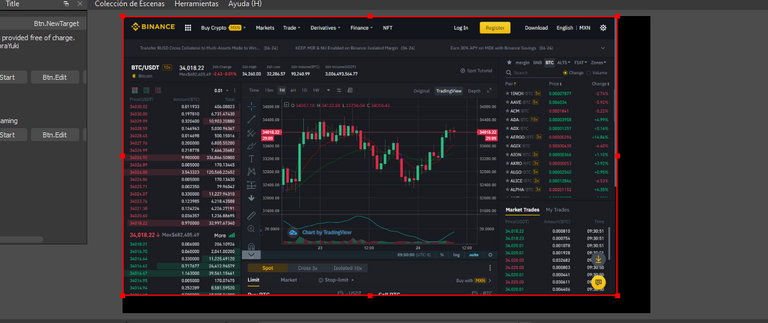
Nos saldrá en nuestro lienzo la pantalla elegida pero desajustada, la ajustamos moviendo los limites rojos hasta que cubra completamente el espacio que se va a capturar.
After this what follows is to put the sources that will have this scene, in first we will go to the sources box and we click on the + button there we will have the option to choose which source to add, we choose screen capture and we name it as we want so that it is not confused with the other sources.
After clicking on accept we automatically select our main screen, in the case of having several screens we must choose which one we want to share in our scene in the box that says "screen" we choose which monitor we will capture and then click on accept.
We will see in our canvas the chosen screen but not adjusted, we adjust it by moving the red limits until it completely covers the space to be captured.
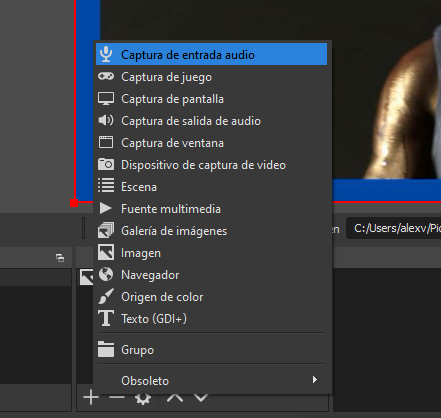
Después de esto agregaremos una fuente de sonido, para esto nos regresamos a el apartado de fuentes le damos a la tecla de + pero esta vez elegimos captura de entrada de audio debe estar de primero.
After this we will add a sound source, for this we return to the section of sources we give the + key but this time we choose audio input capture must be first.
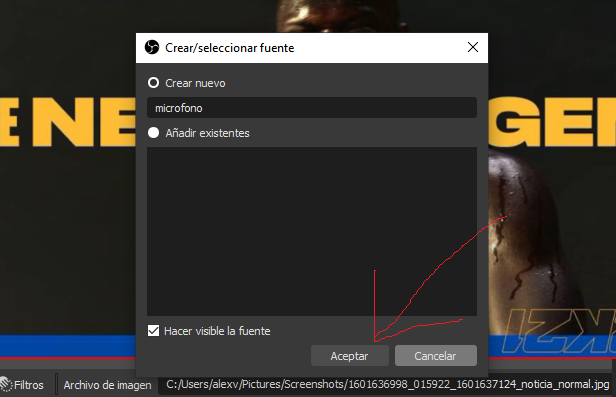
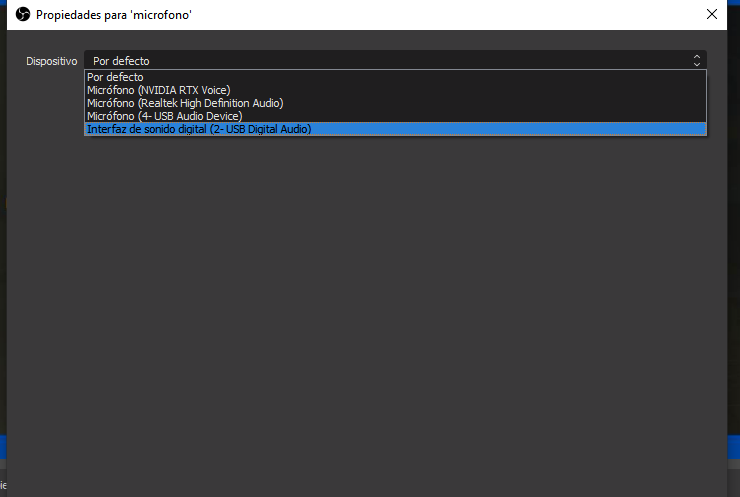
Tienes que elegir entre todos los micrófonos que tenga tu PC activados en ese momento, también hay forma de obtener un sonido mas limpio con los filtros y parámetros que se le pueden ajustar a al micrófono, pero eso ya lo trataremos en otro post.
You have to choose between all the microphones that your PC has activated at that time, there is also a way to get a cleaner sound with filters and parameters that can be adjusted to the microphone, but that will be discussed in another post.
Después de todo este procedimiento ya puedes apretar el botón donde dice iniciar grabación y por defecto los videos que grabes se irán a tu carpeta de videos, así de sencillo, cuando quieras terminar de grabar solamente le das al botón de detener grabación y listo.
After all this procedure you can press the button where it says start recording and by default the videos you record will go to your video folder, it's that simple, when you want to finish recording just press the stop recording button and that's it.
Te dejo el link al primer tutorial por si te ha gustado este o te has perdido en alguno de los pasos, en el primero lo que hicimos fue capturar una imagen y poner nuestra voz para comentar una imagen o fuente multimedia, aparte de conocer los diferentes componentes del programa.
Es todo por mi parte amigos espero que sea de utilidad esta información y no dejen de estar pendientes para próximos posts de este tema, para cualquier duda pueden mencionarla en los comentarios o ponerse en contacto conmigo en cualquiera de mis redes sociales que estén bien les deseo mucho éxito.
I leave you the link to the first tutorial in case you liked this one or you got lost in any of the steps, in the first one what we did was to capture an image and put our voice to comment an image or multimedia source, apart from knowing the different components of the program.
That's all for my part friends I hope this information is useful and do not fail to be pending for future posts on this topic, for any questions you can mention it in the comments or contact me on any of my social networks to be well I wish you much success.
Transleted with DeepL (Free Version)

Congratulations! This post has been upvoted by the @blurtcurator communal account,
You can request a vote every 12 hours from the #getupvote channel in the official Blurt Discord.Don't wait to join ,lots of good stuff happening there.
Thank you for using my upvote tool 🙂

Your post has been upvoted (1.27 %)
Delegate more BP for better support and daily BLURT reward 😉
@tomoyan
https://blurtblock.herokuapp.com/blurt/upvote