Colored paper stars are a fun and easy craft that can be used for decorations, gifts, or just as a relaxing activity. Whether you want to make origami lucky stars, 3D paper stars, or hanging stars, this guide will take you through the steps in detail!
Materials You’ll Need
✔ Colored paper or origami paper (you can also use wrapping paper, scrapbooking paper, or old magazine pages)
✔ Scissors or paper cutter
✔ Ruler
✔ Glue or tape (for 3D stars)
✔ Pencil or pen
✔ String or thread (if making hanging stars)
✔ Glitter, stickers, or markers (optional for decoration)
Method 1: Origami Lucky Stars (Tiny 3D Stars) 🌠
Step 1: Cut the Paper Into Strips
- Use origami paper or colored paper and cut it into strips about 1 cm wide and 20-25 cm long (for small stars) or 2 cm wide and 30 cm long (for bigger stars).
- You can use different colors or even patterned paper to make them look more vibrant!
Step 2: Make a Knot
- Take one strip and tie a loose knot near one end.
- Gently pull the knot tight and flatten it into a pentagon shape.
- Tuck the short end of the strip into the pentagon.
Step 3: Wrap the Strip Around
- Start wrapping the long end around the pentagon, following its shape.
- Continue wrapping until you reach the end.
- Tuck the final bit of the strip inside the folds.
Step 4: Puff Up the Star
- Hold the pentagon between your fingers and use your thumbnail to gently press in the sides.
- The star should puff up and become 3D!
- Repeat with different colors to make a collection of lucky stars!
⭐ Tip: Use metallic paper or pastel colors for a soft, dreamy look!
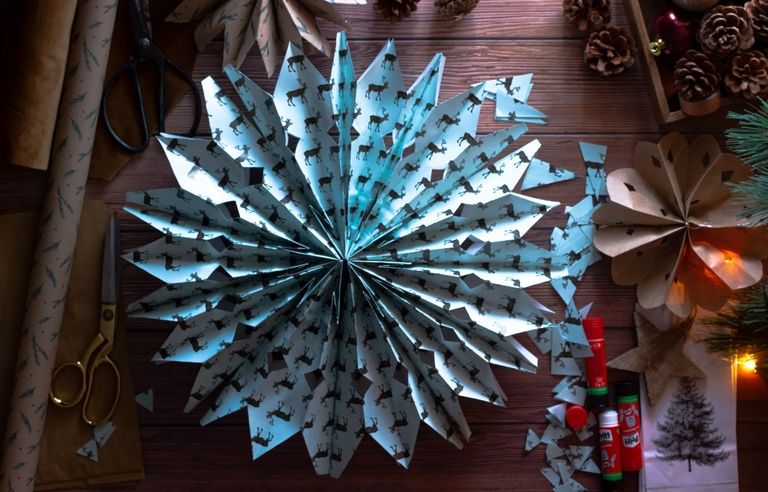
Method 2: 3D Folded Paper Stars (Flat 3D Stars) ⭐
Step 1: Cut a Square Piece of Paper
- Use a square piece of colored paper (15 cm x 15 cm is a good size).
- If you want a gradient effect, use ombre or watercolor paper.
Step 2: Fold the Star Shape
- Fold the paper in half horizontally and vertically, then unfold.
- Fold it diagonally both ways and unfold.
- Fold one diagonal inwards to create a triangle shape.
Step 3: Make the Star Points
- Take one edge of the triangle and fold it to the center crease.
- Repeat this for all three corners, making a smaller pentagon shape.
- Flip the paper over and fold the corners outward to form points.
- Press all the creases well, then unfold to see your 3D star!
⭐ Tip: Add some glitter or metallic paint to give it a festive shimmer!
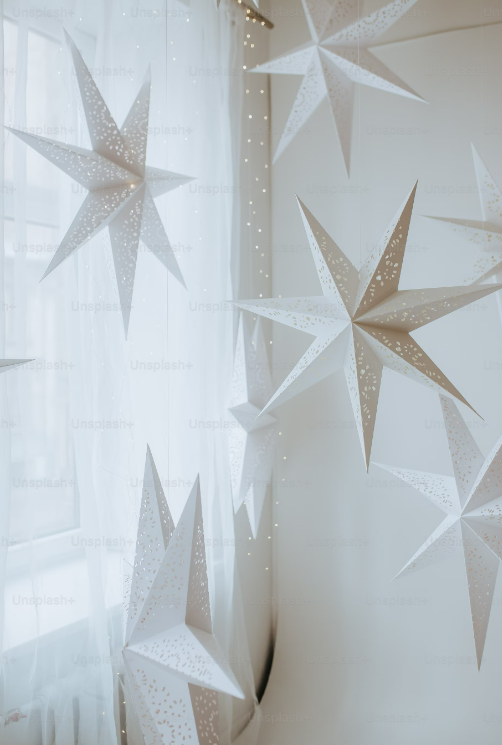
Method 3: Large Hanging Paper Stars (Perfect for Decorations) 🌟
Step 1: Cut 5 or 6 Identical Star Shapes
- Draw a 5-pointed star on colored cardstock or patterned paper.
- Cut out 5-6 identical stars using scissors or a craft knife.
Step 2: Fold Each Star in Half
- Fold each star down the middle, so they have a raised center.
- This gives the star a 3D look when assembled.
Step 3: Glue or Tape the Stars Together
- Take two folded stars and glue one half of each star together.
- Continue adding more stars until you form a 3D shape.
Step 4: Add a String for Hanging
- Before closing the last side, insert a string or ribbon at the top.
- Secure it with glue or tape, then attach the final star piece.
⭐ Tip: Use gold, silver, or glitter paper for an elegant Christmas or party decoration!
Creative Decoration Ideas for Paper Stars 🎨✨
🌈 Use different colors – Make a rainbow set of stars!
🎨 Draw on patterns – Use markers, paint, or stickers.
💎 Add glitter or sequins – Give them a sparkling effect.
🎀 Hang them on a string – Create a garland or mobile.
📦 Put lucky stars in a jar – Great for gifts and wishes!