CryptoPie - Booten von der SSD ohne SD-Karte - CryptoPie - booting from SSD without SD card
Hallo zusammen,
das war etwas schwerer als gedacht, ich kann schon mal vorwegsagen, das war nicht einfach. Wenn wir die SSD behandel wie eine SD-Karte beim flashen, geht das gar nicht. Dann kommt der Fehler "firstboot.service". Also musste ich einen anderen Weg finden. Diese Anleitung macht es dir möglich das Booten von der SSD, ohne SD-Karte.
that was a bit harder than expected, I can already say in advance, that was not easy. If we treat the SSD like a SD card when flashing, it doesn't work at all. Then the error "firstboot.service" comes. So I had to find another way. This tutorial makes it possible to boot from the SSD without an SD card.
Grundvoraussetzung / Basic requirement
- Raspberry PI 4 mit aktuellem EEPROM (Link hier )
- 2 SD-Karten
- 1 externe SSD Festplatte (oder Adapter) /muß größer sein als die Quell SD-Karte
- Raspberry Pi OS
- balena Etcher (Link hier )
- Tastatur und Maus am Raspberry Pi
- HDMI Verbindung zum Monitor
- Raspberry PI 4 with current EEPROM (link here )
- 2 SD cards
- 1 external SSD hard disk (or adapter) /must be larger than the source SD card
- Raspberry Pi OS
- balena Etcher (link here )
- Keyboard and mouse on the Raspberry Pi
- HDMI connection to the monitor
Neuinstallation / New installation
Hier bitte die Anleitung von @dotwin1981 nutzen, bis zum Schritt 4. Schritt 5 noch nicht ausführen. Die SD-Karte sollt fertig entpackt und geschrieben sein, ohne Fehler. Mit "Strg+C" sollte Ihr herausgegangen sein. Jetzt fahren wir den Raspberry herunter.
sudo shutdown -r now
Here please use the instruction of @dotwin1981, up to step 4. Do not execute step 5 yet. The SD card should be finished unpacking and writing, with no errors.
With "Ctrl+C" you should be out. Now we shutdown the Raspberry.
sudo shutdown -r now
SD-Karte auf SSD Festplatte klonen / Clone SD card to SSD hard disk
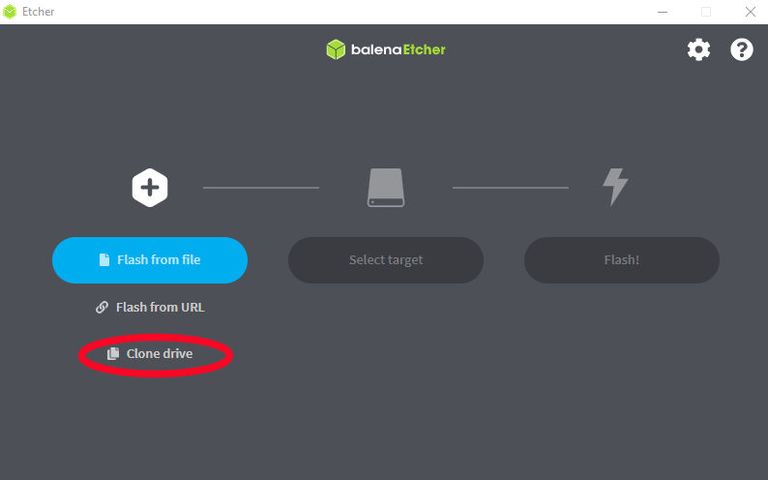
An diesem Punkt könnten auch die bereits bestehende System mit einsteigen. Mit Balena Etcher können wir auch klonen. Quelllaufwerk ist die SD-Karte und ziel Laufwerk ist die SSD. Es kann etwas dauern, bei mir waren es ca.30 min.
! Achtung, die SSD Festplatte muss größer sein als die SD-Karte!
At this point, the already existing systems could also get in on the action. With Balena Etcher we can also clone. Source drive is the SD card and target drive is the SSD. It may take some time, for me it was about.30 min.
! Attention, the SSD drive must be larger than the SD card!
Arbeiten mit der Raspberry Pi OS
Jetzt brauchen wir die Raspberry Pi OS, ich habe die Desktopversion und empfohlener Software genommen. Einfach mit Balena Etcher auf eine SD-Karte flashen. Nun schließen wir die externe Festplatte an dem USB 3.0, des Raspberry PI an, bitte nutzt den oben Anschluss. Jetzt muss nur noch die SD-Karte, mit der OS, eingesteckt werden, dann kann der Raspbeery Pi gestartet werden. Ist der Raspberry hochgefahren müssen wir bei den Einstellung das Passwort ändern von "raspberry" auf ein eigenes Passwort, das ist nachher wichtig!
Now we need the Raspberry Pi OS, I took the desktop version and recommended software. Just flash it to an SD card with Balena Etcher. Now we connect the external hard drive to the USB 3.0, of the Raspberry PI, please use the top connector. Now only the SD card, with the OS, must be inserted, then the Raspbeery Pi can be started. If the Raspberry is booted, we must change the password in the settings from "raspberry" to your own password, this is important later!
Partition der SSD Festplatte vergrößern / Enlarge SSD hard disk partition
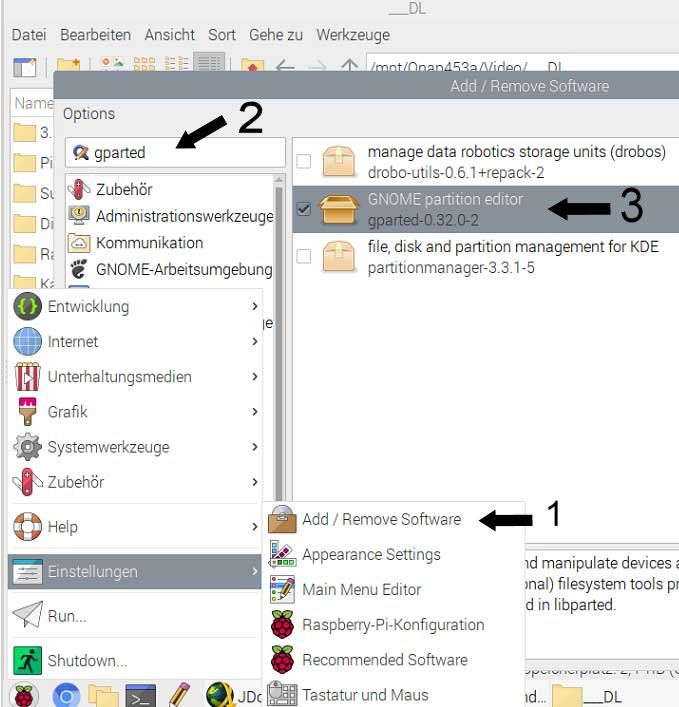
Bei dem klonen wurde alles kopiert auch die Größe der Partition. Das heißt zum Beispiel bei einer 128 GB SD-Karte ist bei einer 500 GB großen SSD Festplatte auch die Partition nur 128 GB groß. Hier für Installieren wir "gparted", einfach die Reihenfolge auf dem Bild folgen. Wir bestätigen das ganze mit OK, dann wird das Passwort vom der Raspberry OS abgefragt. (das haben wir nach dem Neustart geändert)
During the cloning, everything was copied, including the size of the partition. That means for example with a 128 GB SD card, with a 500 GB SSD hard disk the partition is also only 128 GB large. Here for we install "gparted", simply the order on the picture follow. We confirm the whole thing with OK, then the password is requested from the Raspberry OS. (we changed this after the restart)
Beispielbild
Wenn alles installiert ist starten wir das Programm, über den Menüreiter der Himbeer es ist leicht zu finden.
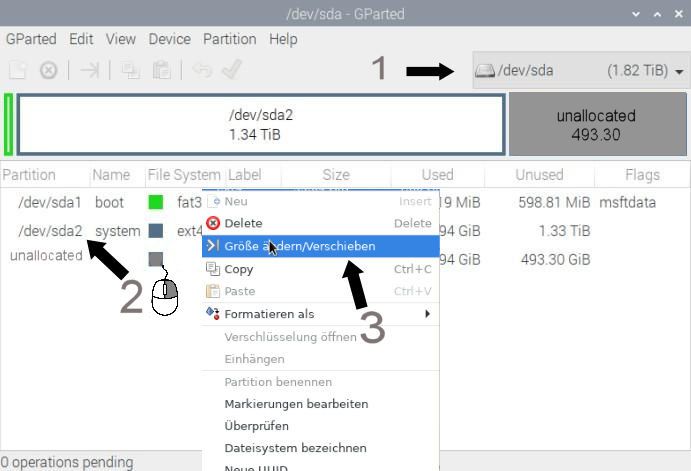
Nun stellen wir oben rechts die SSD Festplatte ein (1). Dann klicken wir, in der liste /dev/sda2 (2), mit der rechten Maustaste an. Dann wählen wir Größe ändern/Verschieben (3).
When everything is installed we start the program, via the menu tab of the Raspberry it is easy to find.
Now we set the SSD hard disk in the upper right corner (1). Then we click, in the list /dev/sda2 (2), with the right mouse button. Then we select Resize/Move (3).
Beispiel Bild
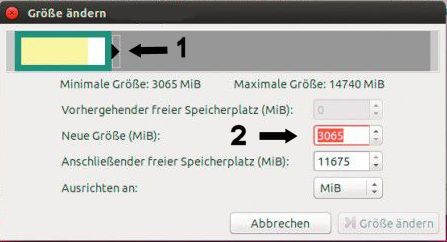
Jetzt öffnet sich ein weiteres Fenster, da können wir die Größe mit der Maus ändern (1) oder wir geben bei „Neue Größe“ (2) die maximale Größe ein. Dann auf den Button „Größe ändern“ klicken.
Now another window opens, there we can change the size with the mouse (1) or we enter the maximum size at "New size" (2). Then click on the button "Change size".
Beispiel Bild
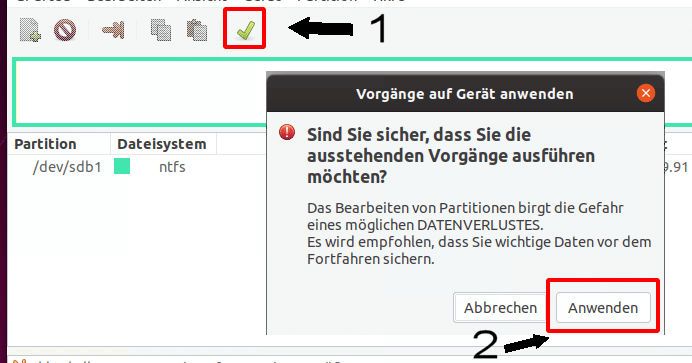
Zum Abschließen klicken wir auf dem grünen Harken (1) und dann auf Anwenden (2). Es kann sein, dass bei der Anwendung es zu Datenverlust kommen kann. Bei mir ging alles gut, also auf eigene Gefahr!
To finish, we click on the green tick (1) and then on Apply (2). It is possible that during the application there may be data loss. For me everything went well, so at your own risk!
Beispiel Bild
Jetzt sollte die SSD Festplatte ihre volle Größe haben.
Now the SSD hard disk should have its full size.
Umschreiben von Datein / Rewrite files
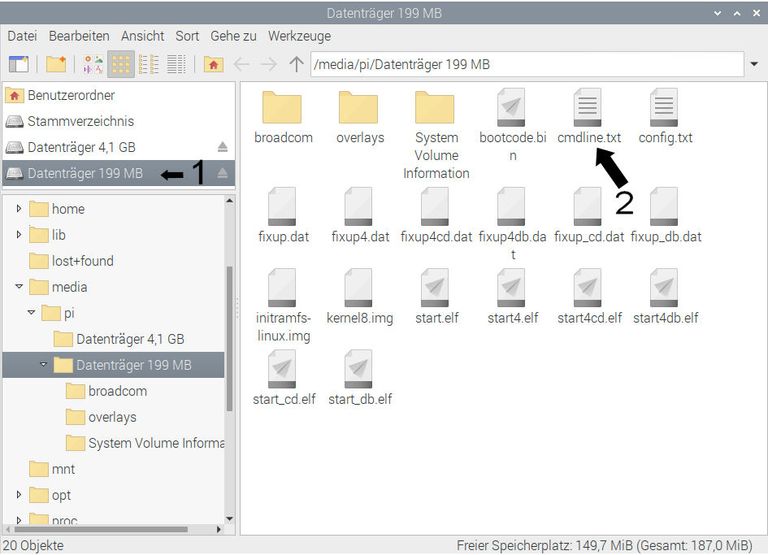
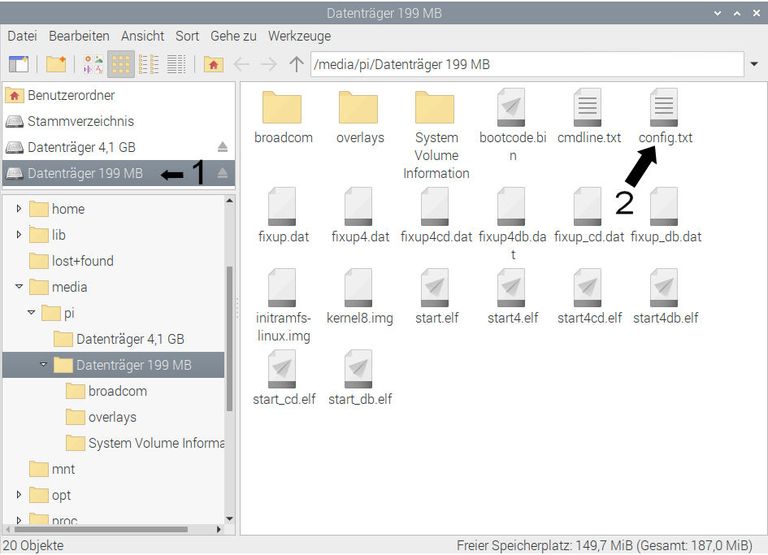
Hier nutzen den Dateimanager der OS, und öffnen den Datenträger mit 199 MB (1), hier suchen wir uns die cmdline.txt und öffnen sie mit Geany. (Datei mit der rechten Maustaste anklicken und dann auf "Öffnen mit" klicken)
Here we use the file manager of the OS, and open the disk with 199 MB (1), here we look for the cmdline.txt and open it with Geany. (right-click on the file and then click on "Open with")
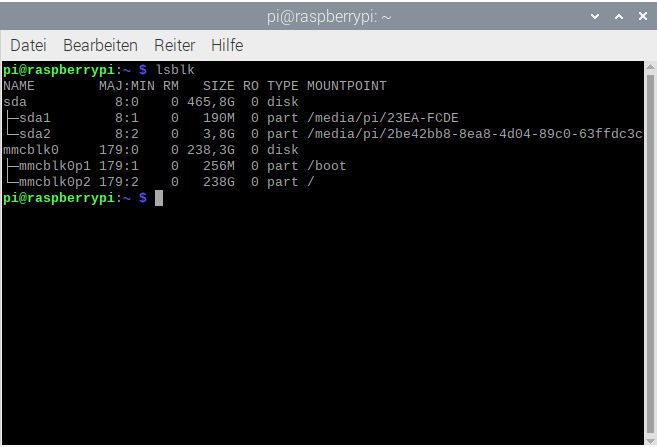
Jetzt müssen wir noch ein Terminal öffnen, um sicher zugehen welche Laufwerksbezeichnung wir haben. Dafür geben wir folgenden Befehl ein.
lsblk
Wir sehen auf dem Bild das meine Laufwerksbezeichnung "sda" ist. "sda1" ist das bootlaufwerk und "sda2" ist die ext4 Partition.
Now we need to open a terminal to make sure what drive label we have. For this we enter the following command.
lsblk
We see on the picture that my drive label is "sda". "sda1" is the boot drive and "sda2" is the ext4 partition.
Kommen wir zurück zu Geany und der cmdline.txt. Hier müssen wir das "mmcblk0p2" in "sda2" umschreiben. Sollte dein Laufwerksbezeichung nicht "sda2" heißen trage bitte deine Bezeichnug ein, es muß zum Schluß die "2" stehen. Datei speichern.
Let's go back to Geany and the cmdline.txt. Here we have to change the "mmcblk0p2" to "sda2". If your drive name is not "sda2" please enter your name, there must be the "2" at the end. Save file.
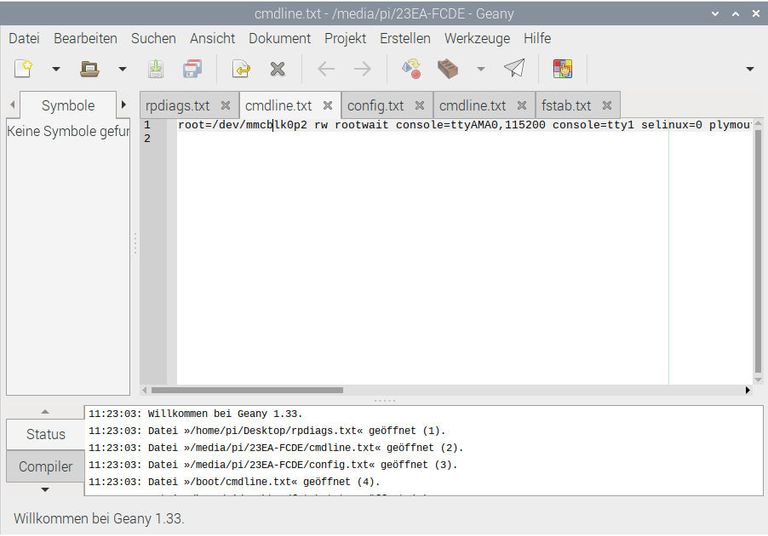
Zurück zum Dateimanager, jetzt öffnen wir auf demselben Datenträger die Datei „config.txt“ und bearbeiten sie mit Geany.
Back to the file manager, now we open the file "config.txt" on the same disk and edit it with Geany.
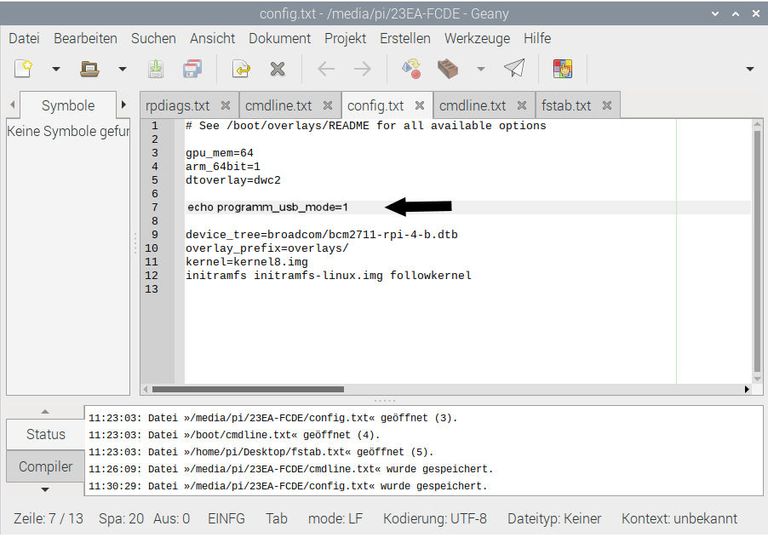
Wir gehen auf die Zeile 6 und drücken 2 x Enter, somit ist die Zeile 7 frei und wir gehen mit dem Cursor dort hin. Dort tragen wir folgenden Befehl ein.
echo program_usb_boot_mode=1
Speichern und es bleibt nur noch eine Datei übrig.
We go to line 6 and press 2 x Enter, thus line 7 is free and we go there with the cursor. There we enter the following command.
echo program_usb_boot_mode=1
Save and there is only one file left.
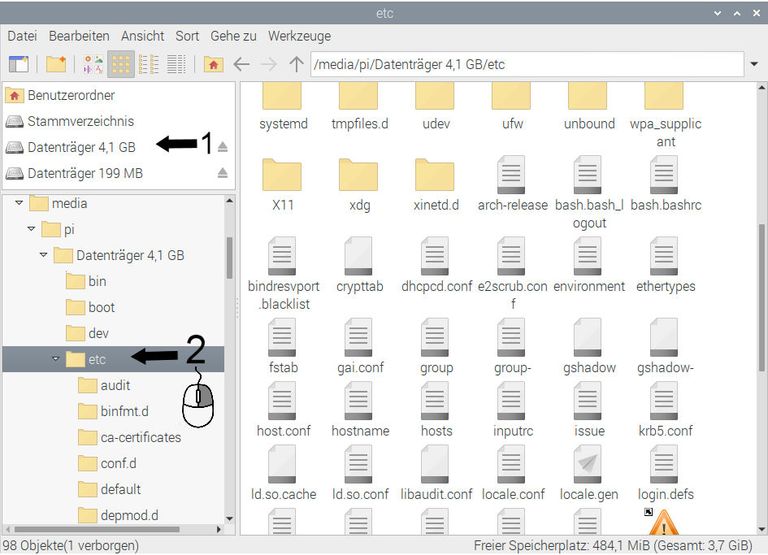
Die letzte Datei befindet sich auf der anderen Partition von der SSD Festplatte. Wir nutzen wieder den Dateimanager und klicken auf dem anderen Datenträger. Dort suchen wir uns den Ordner "etc" und klicken mit der rechen Maustaste darauf. Hier wählen wir im Terminal öffnen.
The last file is on the other partition from the SSD disk. We use the file manager again and click on the other disk. There we look for the folder "etc" and click on it with the right mouse button. Here we select open in the terminal.
Im Terminal müssen wir uns zum "root" machen. Sonst können wir die Datei nicht bearbeiten. Wir geben ein:
sudo su
Jetzt sind wir "root" und können die Datei bearbeiten.
nano fstab
Here we choose open in terminal. In the terminal we have to make ourselves "root". Otherwise we cannot edit the file. We type:
sudo su.
Now we are "root" and can edit the file.
nano fstab
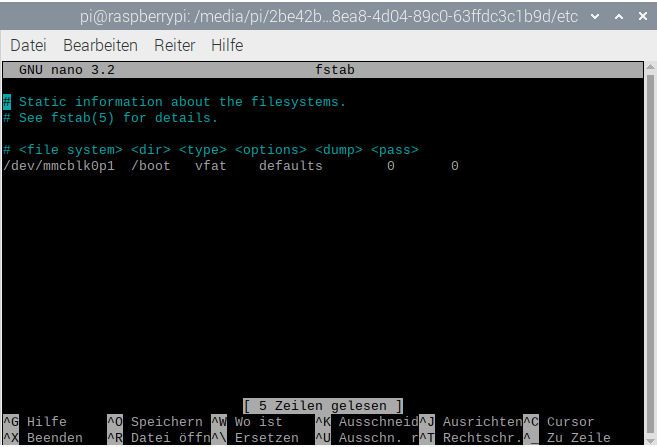
Nun gehen wir mit den Pfeiltasten zu "mmcblk0p1" und ändern sie in "sda1". Wenn bei dir eine andere Laufwerksbezeichung steht dann trage sie da ein, es muss am Ende ein "1" stehen.
dann nur noch
strg + O
enter
strg + X
Now we go with the arrow keys to "mmcblk0p1" and change it to "sda1". If you have a different drive name then enter it there, there must be a "1" at the end.
then only
ctrl + O
enter
ctrl + X
Somit sind wir fertig und können den Raspberry jetzt Herunterfahren. Die SD-Karte kann entfernt werden und wir starten den Raspberry. Wenn alles geklappt hat, bootet der Raspberry von der SSD Festplatte ohne SD-Karte. Wenn der Bootvorgang abgeschlossen ist, kann mit der Anleitung von @dotwin1981 fortgefahren werden, wenn es eine Neuinstallation ist.
Bei dem bestehen System sollte jetzt alles wie gewohnt laufen, das habe ich nicht getestet und somit ist es eine Vermutung von mir.
Now we are done and can shutdown the Raspberry. The SD card can be removed and we start the Raspberry. If everything worked, the Raspberry boots from the SSD hard disk without SD card. When the boot is complete, we can continue with the instruction from @dotwin1981 if it is a new installation.
With the existing system everything should now run as usual, I have not tested this and so it is a guess on my part.
Ich hoffe es hilft euch weiter. Ich wünsche euch noch einen schönen Abend und viel Spass mit dem Raspberry PI.
Euer
Hornet on Tour
I hope it helps you. Have a nice evening and have fun with the Raspberry PI.
Your
Hornet on Tour

Sehr gute Anleitung :)
Vielen Dank
Thanks for the tip. It will help me alot
That is my hope that this guide will help further, I am very glad.
Te invitamos a votar por @blurthispano como Witness
Ah ok. Das ist gar nicht mal so schwer.
Glaube mit den Infos kann ich auch ein Image basteln zum neu flashen, was nach der Mod (RasPi Bootbar von USB) direkt die Ersteinrichtung auf der SSD machen kann.
Dienstag sollte ich ne 1TB SSD und ein SATA / USB Adapter bekommen, dann werde ich das mal austesten. :)
Gracias por compartir tu publicación en #Blurt. Tu esfuerzo significa mucho para nosotros; por eso has recibido un voto positivo.
Te invito a votar por @blurtlatam como Testigo / Witness
Congratulations! This post has been upvoted by the @blurtcurator communal account,
You can request a vote every 12 hours from the #getupvote channel in the official Blurt Discord.Don't wait to join ,lots of good stuff happening there.
Congratulations, your post has been curated by @dsc-r2cornell. You can use the tag #R2cornell. Also, find us on Discord
Felicitaciones, su publicación ha sido votada por @ dsc-r2cornell. Puedes usar el tag #R2cornell. También, nos puedes encontrar en Discord