The English version of the manual is below the German version.
Vorwort
Dieser Post ist ein Update zum letzten, in dem ich schon eine Komplette Anleitung geschrieben hatte. Inzwischen habe ich das Image ein bisschen überarbeitet, dass sich ein paar Sachen geändert haben. Es haben sich auch einige kleine Fehler eingeschlichen, daher gibt es jetzt noch einmal die Komplette Anleitung in der Korrigierten Version. Zudem wird es in Zukunft immer wieder neue Images geben, da ich einige Sachen noch vereinfachen möchte. Also immer wieder mal bei mir reinschauen. 😊
Achtung an die, die bereits einen RasPi als Witness nutzen. Bitte vergesst nicht, eueren Witness zu deaktivieren, bevor ihr den RasPi neu Flasht. Denn dieser Prozess dauert mindestens 2,5 Stunden. In der Zeit würdet ihr nur Blöcke Missen!
EDIT:
Ich habe das Image noch mal überarbeitet, daher passe ich die Anleitung jetzt noch mal an, da sich ein paar Sachen geändert haben. Änderungen sind als Zitat markiert.
Was wird benötigt?
- Ein Raspberry Pi 4 (RasPi 3 gehlt leider doch nicht)
- Eine 32 GB Micro SD-Karte (64 GB oder mehr ist besser)
- Ein Kartenleser für den PC
- Das RasPi Image: Download
- Das Programm Etcher zum Beschreiben der SD-Karte: Download
Schritt 1: Das beschreiben der SD-Karte
- Nach dem Download und der Installation von Etcher starten wir das Programm und stecken den Kartenleser samt der SD-Karte am PC ein.
- Im Programm wählen wir dann beim Punkt "Flash from File" die eben Heruntergeladene Datei "CryptoPie_Dotwin1981_2021-05-15.img.xz" aus.
- In der Mitte sollte schon die SD-Karte erkannt worden sein, wenn nicht klickt man auf "Select Target" und wählt das Laufwerk mit der SD-Karte aus.
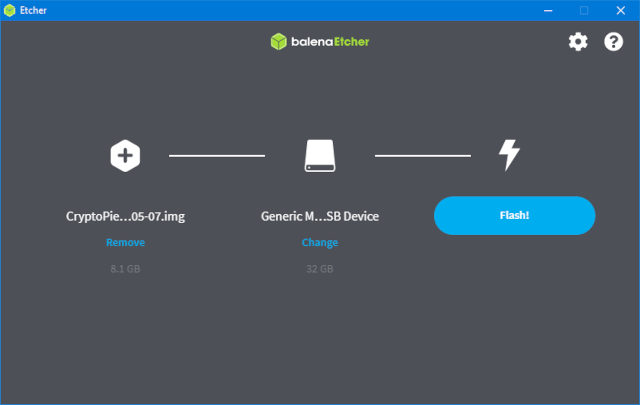
- Wenn es dann so ausschaut wie auf dem Bild, kann man auf "Flash!" klicken und das Beschreiben der SD-Karte beginnt. Dies kann einige Minuten dauern.
ACHTUNG:
Alle vorherigen Daten auf der SD-Karte gehen dabei verloren!
Schritt 2: Der erste Login auf den RasPi
- Sobald Etcher mit dem Beschreiben der SD-Karte fertig ist, können wir den Kartenleser abziehen und die SD-Karte in den RasPi stecken und diesen mit Strom versorgen.
- Nach kurzer Zeit schon, können wir die Windows Eingabeaufforderung starten. Dazu klicken wir mit der rechten Maustaste auf das Windows-Logo in der Taskleiste und klicken auf "Eingabeaufforderung". Siehe Bild:

- Hier geben wir nun den Befehl ein:
ssh root@cryptopie
Bei der ersten Verbindung kann es vorkommen, dass Windows noch eine Bestätigung will, ob man wirklich sicher ist, dass man die Verbindung aufbauen will. Dies bestätigt man mit der Eingabe von "yes".

- Nun soll man ein Kennwort eingeben. Dieses ist "root" (klein geschrieben ohne Anführungszeichen). Dieses ändern wir aber gleich ab!
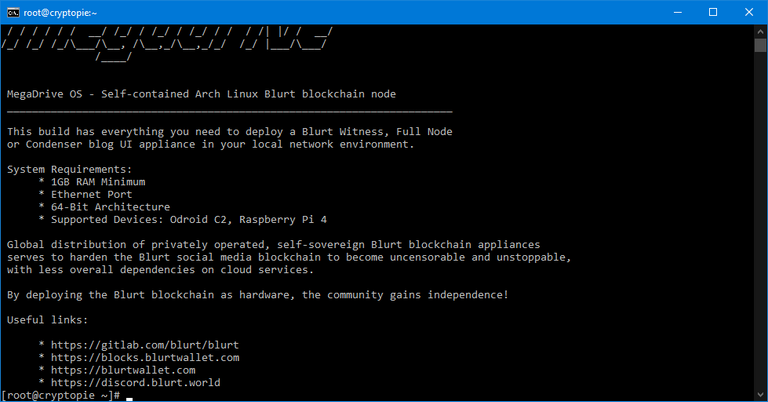
Schritt 3: Kennwort ändern
Nachdem wir nun auf den RasPi eingeloggt sind, sollten wir erst einmal das Kennwort ändern.
- Dazu geben wir den Befehl ein.
passwd - Nun möchte er ein neues Kennwort haben. Dies müsst ihr dann auch ein zweites Mal als Bestätigung eingeben. Die Kennworteingabe wird auf dem Bildschirm nicht angezeigt, aber jeder Tastendruck zählt.

Schritt 4: Warten, warten und warten
Ab jetzt arbeitet der RasPi der geänderte Script ab. Ich könnte jetzt erklären, wass genau passiert, aber das tut hier nichts zur Sache. Daher können wir nur warten.
Nach ca. 45 Minuten sollte das Backup File Entpackt sein und die Synchronisation sollte laufen. Dies können wir mit dem Befehl top überprüfen. Wenn dort ganz oben der Prozess "blurtd" steht ist es soweit.

Schritt 5: Fortschritt der Synchronisation
Den aktuellen Stand der Synchronisation könnt ihr mit folgendem Befehl abfragen:
docker logs blurtd -f
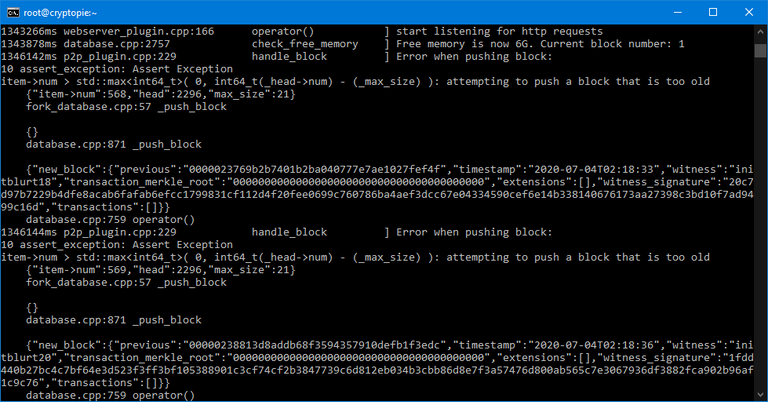
Die meisten Daten sind schon über das zuvor kopierte Backup auf euerem RasPi, aber die letzten paar Tage müssen Live Synchronisiert werden. Während dieses Prozesses werden sehr viele "Block to old" Errors kommen.
Hier aber nicht erschrecken! Seit ein paar Wochen kommen diese Errors, diese sind aber nach Aussage von @nerdtopiade und @jacobgadikian unbedenklich. Es bremst die Synchronisation nur ein wenig aus.
Vielleicht ist das Problem bis zu euerer Installation der Blurt Node auch schon behoben worden.
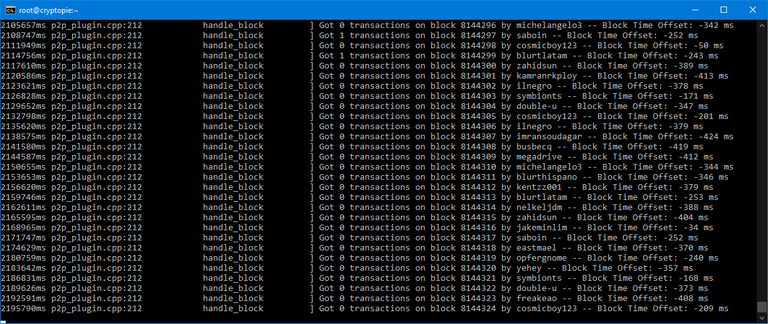
Wenn dann die Synchronisation fertig ist, läuft euere eigene Blurt Node fleißig vor sich hin. Das schaut dann so aus:
Nun werden wir ein Witness (Optional)
Für den Abschnitt geht der Dank an @michelangelo3. Ich habe mich da an seinem Beitrag bedient.
Hier muss man eigentlich nur noch einiges an Befehlen eingeben und sich Keys notieren.
- Wechsel auf die Bash des Blurtd-Containers
docker exec -it blurtd bash - Ins Verzeichnis blurtd wechseln
cd /blurtd - Wallet aufrufen
cli_wallet
Es kommt die Meldung
"Please use the set_password method to initialize a new wallet before continuing".
Jetzt denkt ihr euch ein tolles Passwort aus. Sonderzeichen sind nicht gestattet wie z.B. Ausrufezeichen.
- set_password gefolgt vom gewünschten Passwort
set_password yourpassword - Wallet entsperren
unlock yourpassword - Neue Schlüssel generieren
suggest_brain_key
Die nun generierten Keys speicherst dir gut ab. Diese wirst du gleich noch brauchen.
wif_priv_key = dein eben generierter privater Witness-Key
import_key wif_priv_keypriv_activ_key = dein privater AktivKey (Vom Account der Witness werden soll)
import_key priv_activ_key"strg+d" drücken um die Wallet zu beenden
"exit" eingeben um zurück auf die Bash des Pi zu gelangen
Jetzt öffnen wir die config.ini um die Witness Daten einzutragen.
nano /var/lib/docker/volumes/blurtd/_data/config.ini
Hier müssen wir mit der Pfeil nach unten Taste sehr weit nach unten, bis wir die passenden Stellen finden.
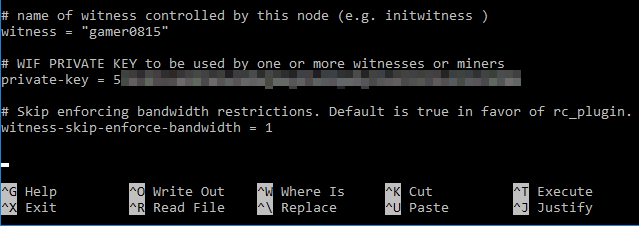
- Witness-Account und privaten Witness-Key in der config.ini eintragen.
witness = Euer Account-Name (ohne @) den ihr als witness nutzen wollt.
private-key = Der vorhin erstellte Brain wif_priv_key.
Wichtig: Witness-Account in “Anführungszeichen” setzten, # am Zeilenbeginn entfernen.
Sollte wie auf dem Bild aussehen, nur eben mit eueren Namen und Key!
Mit STRG+o und Enter speichern
Mit STRG+x Editor schließen.
Änderungen nach blurtd schreiben und Container neu starten
docker restart blurtd
Kontrolle mit docker logs blurtd -f ob alles korrekt läuft
Wir Aktivieren den Witness (Optional)
Wenn der Witness Account soweit angelegt ist, müssen wir den jetzt nur noch im Blurt Netzwerk Aktivieren.
- Wechsel auf die Bash des Blurtd-Containers
docker exec -it blurtd bash - Ins Verzeichnis blurtd wechseln
cd /blurtd - Wallet aufrufen
cli_wallet - Wallet entsperren
unlock yourpassword - WITNESS_PUBLIC_KEY = dein Witness public Key, beginnt i.d.R. mit BLT… Und klar, gamer0815 muss mit deinem Accountnamen und die Blog-URL durch deine eigene ersetzt werden!
update_witness "gamer0815" "https://blurtter.com/@gamer0815" "WITNESS_PUBLIC_KEY" {"account_creation_fee":"10.000 BLURT","maximum_block_size":65536} true
- Mit STRG+d Wallet beenden
- Mit "exit" zurück auf die Bash des Pi
Geschafft!
Zusätzliche Einstellungen (UFW Firewall)
Die UFW (Firewall) des RasPi's ist in der Grundinstallation nicht aktiv. Daher ist zu empfehlen, diese einzurichten und zu aktivieren. (Hierfür geht ein Danke an @saboin und @yehey)
Wer das Neuste Image von mir nutzt (ab dem 13.05.2021) braucht nur den Befehl
bash ufw.sheingeben und hat alles erledigt.
Alle die eine ältere Version nutzen müssen folgendes machen:
Jede Zeile einzeln eingeben!
ufw reset
ufw allow ssh
ufw allow 1776
ufw default deny
ufw default allow outgoing
ufw reload
ufw enable
Zukünftige Hardforks (Neues Skript)
Ich habe auch ein neues Skript eingefügt, welches ab der Version vom 13.05.2021 mit drin ist. Dieses führt das Update durch, welches nötig ist, wenn es einen Hardfork gegeben hat.
Dieses Skript startet ihr mitbash update.sh.
Das war es auch schon. :)
Prologue
This post is an update to the last one, in which I had already written a complete tutorial. In the meantime I have revised the image a bit, that a few things have changed. There are also some small errors, so there is now again the complete tutorial in the corrected version. In the future there will be new images, because I want to simplify some things. So look in again and again with me. 😊
Attention to those who already use a RasPi as Witness. Please do not forget to deactivate your Witness before you reflash the RasPi. Because this process takes at least 2.5 hours. In the time you would only miss blocks!
EDIT:
I have reworked the image again, so I'm adjusting the instructions again now, because a few things have changed. Changes are marked as a quote.
What is needed?
- A Raspberry Pi 4 (RasPi 3 does not work after all)
- A 32 GB Micro SD card (64 GB or more is better)
- A card reader for the PC
- The RasPi image: Download
- The program Etcher to write to the SD card: Download
Step 1: Writing to the SD card
- After downloading and installing Etcher, we start the program and plug the card reader and SD card into the PC.
- In the program we select the just downloaded file "CryptoPie_Dotwin1981_BC-2021-05-07.img.xz" at the point "Flash from File".
- In the middle the SD card should already have been recognized, if not click on "Select Target" and select the drive with the SD card.

- If it then looks like in the picture, you can click on "Flash!" and the writing of the SD card begins. This can take a few minutes.
CAUTION:
All previous data on the SD card will be lost!
Step 2: The first login to the RasPi.
- Once Etcher is done writing to the SD card, we can unplug the card reader and plug the SD card into the RasPi and power it up.
- After a short time, we can start the Windows command prompt. To do this, we right click on the Windows logo in the taskbar and click on "Command Prompt". See image:

- Now here we enter the command:
ssh root@cryptopie
The first time you connect, Windows may ask you to confirm that you are sure you want to connect. You confirm this by entering "yes".

- Now you have to enter a password. This is "root" (written in small letters without quotes). But we will change this in a moment!

Step 3: Change password
Now that we are logged in to the RasPi, we should first change the password.
- For this we enter the command.
passwd - Now it wants to have a new password. This you have to enter a second time as confirmation. The password entry is not shown on the screen, but every keystroke counts.

Step 4: Wait, wait and wait
From now on the RasPi processes the changed script. I could explain now, what exactly happens, but that does not matter here. Therefore we can only wait.
After about 45 minutes the backup file should be unpacked and the synchronization should run. We can check this with the command top. If there is the process "blurtd" at the top it is done.

Step 5: Progress of the synchronization
You can check the current state of the synchronization with the following command:
docker logs blurtd -f
Most of the data is already on your RasPi via the previously copied backup, but the last few days need to be live synced. During this process there will be a lot of "Block to old" errors.
But don't be scared! Since a few weeks these Errors come, these are however according to statement of @nerdtopiade and @jacobgadikian harmless. It just slows down the synchronization a bit.

Maybe by the time you install Blurt Node, the problem will have been fixed as well.
When the synchronization is done, your own Blurt Node will be running. It will look like this:

Now we will create a Witness (Optional)
Thanks go to @michelangelo3 for the section. I have used his contribution.
Here you actually only have to enter some commands and write down keys.
- Switch to the bash of the blurtd container
docker exec -it blurtd bash - Change to the blurtd directory
cd /blurtd - Open Wallet
cli_wallet
The following message appears
"Please use the set_password method to initialize a new wallet before continuing".
Now you think of a great password. Special characters like exclamation marks are not allowed.
- set_password followed by the desired password
set_password yourpassword - Unlock wallet
unlock yourpassword - Generate new keys
suggest_brain_key
Save the now generated keys well. You will need them in a moment.
wif_priv_key = your just generated private witness key
import_key wif_priv_keypriv_activ_key = your private ActiveKey (from the account you want to witness)
import_key priv_activ_keypress "ctrl+d" to exit the wallet
type "exit" to get back to the bash of the Pi
Now we open the config.ini to enter the Witness data.
nano /var/lib/docker/volumes/blurtd/_data/config.ini
Here we have to use the down arrow key to go very far down until we find the right spots.
- Enter witness account and private witness key in config.ini.
witness = Your account name (without @) that you want to use as witness.
private-key = The Brain wif_priv_key you created earlier.
Important: Put witness account in "quotes", remove # at the beginning of the line if necessary.
Should look like the picture, but with your name and key!

Save with CTRL+o and Enter
Close editor with CTRL+x.
Write changes to blurtd and restart container
docker restart blurtd
Check with docker logs blurtd -f if everything is running correctly
We activate the Witness (Optional)
Once the Witness account is created, we only need to activate it in the Blurt network.
- Switch to the bash of the blurtd container
docker exec -it blurtd bash - Change to the blurtd directory
cd /blurtd - Open Wallet
cli_wallet - Unlock wallet
unlock yourpassword - WITNESS_PUBLIC_KEY = your Witness public Key, usually starts with BLT... And sure, gamer0815 must be replaced with your account name and the blog URL with your own!
update_witness "gamer0815" "https://blurtter.com/@gamer0815" "WITNESS_PUBLIC_KEY" {"account_creation_fee":"10.000 BLURT","maximum_block_size":65536} true
- Exit Wallet with CTRL+d
- With "exit" back to the bash of the Pi
Done!
Additional settings (UFW Firewall)
The UFW (firewall) of the RasPi is not active in the basic installation. Therefore it is recommended to set it up and activate it. (For this a thank you goes to @saboin and @yehey)
Who uses the newest image of me (from 2021-05-13) only needs to enter the command
bash ufw.shand has everything done.
All those who use an older version must do the following:
Enter each line individually!
ufw reset
ufw allow ssh
ufw allow 1776
ufw default deny
ufw default allow outgoing
ufw reload
ufw enable
Future hardforks (New script).
I have also added a new script, which is included from the version of 2021-05-13. This will perform the update that is necessary if there has been a hardfork.
.
You start this script withbash update.sh.
That was it. :)
Member of Opfergnome-Witness-Team on Blurt

Herzlichen Dank für die vielen Stunden, die du für dieses Projekt opferst! Langsam schwant mir, warum ihr euren Witness Opfergnome genannt habt ;-)
Aber, es macht ja auch Spaß und das ist die Hauptsache, wenn dann noch so etwas nützliches dabei rauskommt um so besser.
Danke auch für die Hilfe und für den Testlauf.
Ja, so langsam kann ich mich mit den Witness Maskottchen identifizieren. :D
Der Spaß ist auf jedem Fall gegeben und man lernt immer mehr über die Materie. Auch wenn es zeitweise nur neue Schimpfworte sind. :)
Worked perfectly for me, @kamikaze is now a Raspberry Pi witness.
Very glad to hear. Then joyful blocks digging. :)
Hi Dotwin. Danke für das neue Image. Ich habe kleine Unstimmigkeiten entdeckt, die noch bearbeitet werden müssen. Falls du die noch nicht auf deinem Radar hast, schau Mal in die Reihenfolge beim Setup der Firewall (ufw). Ich meine, die letzten zwei Befehle sind besser in umgekehrter Reihenfolge zu notieren. Folge ich deiner Anleitung, meldet die Konsole bei
ufw reloadFirewall not enabled (skipping reload)
Ich denke umgekehrt wird ein Schuh daraus:
[root@cryptopie ~]# ufw enableFirewall is active and enabled on system startup
[root@cryptopie ~]# ufw reload
Firewall reloaded
Des Weiteren empfehle ich, das Zerotier Setup einfach aus dem Stake der Prozeduren zu entfernen. Ein VPN wird zur Zeit von den Raspis nicht mehr verlangt. Dann musst du auch später für das cli_wallet nicht mehr erklären, wie man das VPN entfernt.
Du hast eine so gute, wie wichtige Arbeit geliefert. Ich freue mich, dass um deine Raspis herum ein neuer Stern am Entwicklerhimmel aufgeht. Ich gehe stark davon aus, dass deine Übungen erst den Beginn deines tieferen Verständnisses der Materie darstellen und wünsche weiterhin viel Erfolg.
Hallöchen.
Oh stimmt, dass bei der Firewall ist falschrum. Da habe ich geschludert.
Werde in der nächsten Version des Images die Firewall Config in eine eigene .sh packen, dass man nur ein Befehl eingibt und sie ist eingerichtet und gestartet.
Auch werde ich eine .sh anlegen für Updates / Hardforks.
Der RasPi Nutzer soll es so einfach bekommen wie nur möglich.
Die Config änderung vom Zero Tier ist ja schon weg in dieser Anleitung. Wie ich das Programm aus dem Image bekomme, bin ich noch dran, hab noch nicht die Stelle gefunden, wo es gestartet wird, bzw. wo die configuration davon liegt. Aber ich bin dran.
Im nächsten Image wird auch die blurtd config.ini mit dabei sein, die schon komplett umgestellt ist.
Bin da immer dran. :)
Congratulations, your post has been upvoted by @r2cornell, which is the curating account for @R2cornell's Discord Community.
Retweeted @dotwin1981
Thanks