Schönen guten Hallo.
Es hat jetzt doch länger gedauert als ich dachte, aber nun kommt die Anleitung, wie man ein eigenes Backup-Image der bereits laufenden Blurt Node / Witness erstellt, um im Falle eines Stromausfalles den RasPi wieder schnell im Betrieb nehmen zu können. Denn wie Einige schon feststellen durften, funktioniert nach einem Stromausfall die Blockchain Synchronisation nicht mehr und man müsste den RasPi von 0 an neu Synchronisieren (Dauer über 70 Stunden), oder wieder komplett neu Flashen und auch den Witness wieder neu einrichten.
Was wird benötigt?
Als Windows User ist das Image erstellen sehr einfach und benötigt nur die Freeware „Roadkil's Disk Image“. Diese wird leider seit Jahren nicht mehr weiter Entwickelt, aber die Version für Windows XP läuft auch perfekt auf Windows 10.
Was ist zu tun?
- Du musst dich zuerst auf den RasPi per SSH einloggen, um mit dem Befehl
docker stop blurtddie Blockchain Synchronisation anzuhalten um dann anschließend mitshutdown nowden RasPi sauber herunterzufahren. Die SSH Verbindung trennt sich dann direkt von selber und man kann den RasPi vom Strom abziehen. - Du entnimmst die SD-Karte und schließt sie mit dem Kartenleser am PC an.
- Du startest das Programm Roadkil's Disk Image.
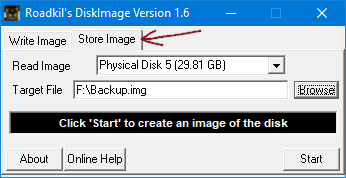
- Klicke auf "Store Image".
- Bei "Read Image" musst du die Physical Disk auswählen, welches die SD-Karte ist. Meist leicht zu identifizieren, an der Disk Größe neben der Disk Nummer.
- Bei "Target File" gibst du über den Browse Button an, wo das Image gespeichert werden soll und wie die Image Datei heißt.
- Wenn das alles erledigt ist, klicke auf "Start"
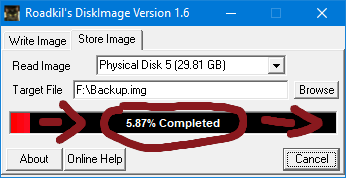
- Nun wird das Backup Image erstellt. Dies kann je nach SD-Karten Größe etwas länger dauern.
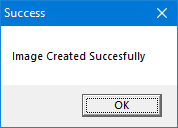
- Sobald das Success Fenster aufgeht, kann das Programm geschlossen werden. Somit ist das Image fertig und kann ggf. noch mit 7-Zip zu einer .XZ Datei gepackt werden, damit es weniger Platz auf der Festplatte verbraucht. Dies zeige ich aber nicht, da es nebensächlich ist.
- Zum Schluss stecken wir wieder die SD-Karte zurück in den RasPi und stecken den Strom wieder ein.
- Jetzt wieder per SSH auf den RasPi einloggen und den Befehl
docker start blurtdeingeben und schon läuft die Synchronisation wieder.
Dies muss dann auch gemacht werden, wenn das eben erstellte Image geflasht wird!
Schlusswort
Dieses Image ist eine 1:1 Abbildung der benutzten SD-Karte und kann somit nicht auf kleinere Karten geflasht werden. Das Image wird dann wie in dem "Neuinstallation-Guide" mit Etcher auf die SD-Karte geflasht, sobald der RasPi mal ausgefallen ist. Eine Linux Anleitung zum Image erstellen folgt noch.
English Version
Beautiful good hello.
It has now taken longer than I thought, but now comes the tutorial on how to create your own backup image of the already running Blurt Node / Witness to be able to quickly put the RasPi back in operation in the event of a power failure. Because as some have already discovered, after a power failure, the blockchain synchronization no longer works and you would have to resynchronize the RasPi from 0 (duration over 70 hours), or completely reflash and also set up the Witness again.
What is required?
As a Windows user, creating the image is very simple and only requires the freeware "Roadkil's Disk Image". This is unfortunately no longer developed for years, but the version for Windows XP also runs perfectly on Windows 10.
What to do?
- You first have to log in to the RasPi via SSH to stop the blockchain synchronization with the command
docker stop blurtdand then shut down the RasPi cleanly withshutdown now. The SSH connection then disconnects itself directly and you can unplug the RasPi from the power. - You take out the SD card and connect it with the card reader to the PC.
- You start the program Roadkil's Disk Image.

- Click on "Store Image".
- At "Read Image" you have to select the physical disk, which is the SD card. Mostly easy to identify by the disk size next to the disk number.
- At "Target File" use the Browse button to specify where the image should be stored and the name of the image file.
- When all this is done, click on "Start".

- Now the backup image is created. This may take a little longer depending on the SD card size.

- As soon as the Success window opens, the program can be closed. Now the image is ready and can be packed with 7-Zip to a .XZ file, so that it consumes less space on the hard disk. But I don't show this, because it is not important.
- Finally, we put the SD card back into the RasPi and plug the power back in.
- Now again log in to the RasPi via SSH and enter the command
docker start blurtdand the synchronization is running again.
This must then also be done when the just created image is flashed!
Note
This image is a 1:1 image of the used SD card and can not be flashed to smaller cards. The image is then flashed to the SD card with Etcher as in the "New installation guide", as soon as the RasPi has failed. A Linux tutorial to create the image will follow.
Member of Opfergnome-Witness-Team on Blurt

Voted! Blurt Better :-)
I would add a step at the start to either sign your witness on a backup machine or disable your witness with the below command to avoid continually missing blocks
Great, thanks for the support for all RasPi witnesses.
Hi, @dotwin1981,
great post
This is the best news you can give on this day, already many will be able to sleep a little better knowing that they don't need to re-sync the blockchain.
Wunderbar! Ich habe alles sofort verstanden und traue mir das locker zu.
Herzlichen Dank!
Immer gerne.
Congratulations, your post has been curated by @dsc-r2cornell. You can use the tag #R2cornell. Also, find us on Discord
Felicitaciones, su publicación ha sido votada por @ dsc-r2cornell. Puedes usar el tag #R2cornell. También, nos puedes encontrar en Discord