[DE]
English further below
Vorwort
Jetzt, da ich wieder einen Raspberry Pi als Blurt Witness am Laufen habe, möchte ich euch zeigen, wie einfach es mittlerweile ist, eine Blurt Node einzurichten. Falls ihr selbst eine betreiben oder sogar Witness werden möchtet, ist der Einstieg einfacher denn je!
Für alle, die mich schon länger kennen: Ihr wisst, dass ich das bereits einmal gemacht habe. Doch inzwischen hat sich einiges geändert. Das alte Flash-Image gibt es nicht mehr – stattdessen nutzen wir jetzt das reguläre Raspberry Pi OS in der Lite-Version und den offiziellen Flasher.
Was wird benötigt?
- Ein Raspberry Pi (bisher getestet mit RasPi 3, 4 und 5)
- Eine 32 GB Micro SD-Karte (64 GB oder mehr ist besser)
- Ein Kartenleser für den PC
- Das Raspberry Pi Flash Programm: Link zum Download
Schritt 1:
Das beschreiben der SD-Karte
- Nach dem Download des Raspberry Pi Imager startet ihr diesen.
- Die SD Karte steckt ihr in eueren Karten Leser.
- Den Imager stellt ihr Folgendermaßen ein:
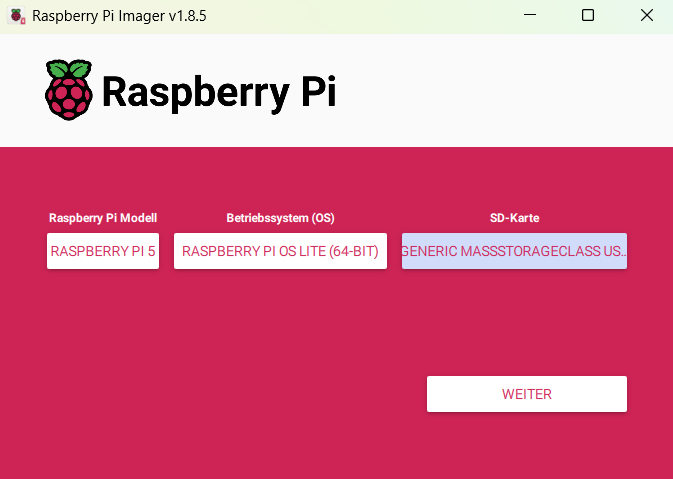
- Raspberry Pi Model: Hier nehmt ihr das Model, welches ihr auch benutzt.
- Betriebssystem (OS): Hier geht ihr über "Raspberry Pi OS (other)" zu "Raspberry Pi OS Lite (64-Bit)".
- SD-Karte: Hier wählt ihr euere SD Karte aus. Diese wird bei dem Prozess auch komplett gelöscht.
Somit wenn Daten drauf sind die benötigt werden vorher sichern!
- Mit einen Klick auf "Weiter" geht es weiter. 😅
- Es geht ein kleines Menü auf das so ausschaut:

- Einige Einstellungen müssen mit einen Klick auf "Einstellungen Bearbeiten" geändert werden.
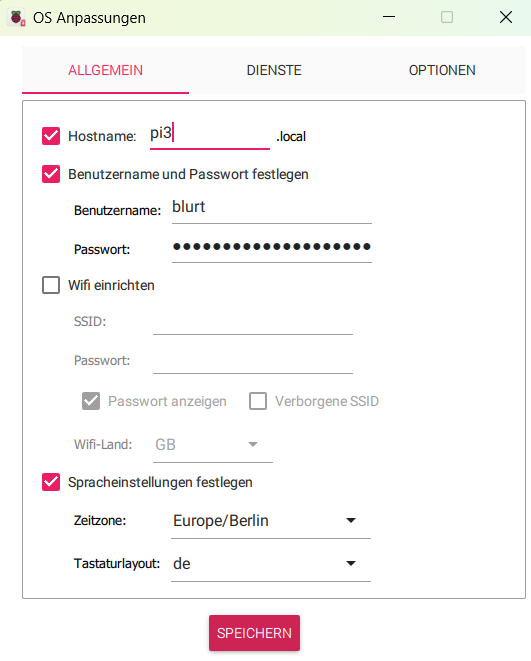
ALLGEMEIN:
- Hostname: Hier gebt ihr eueren RasPi einen Namen im Netzwerk, welcher für ein Login benötigt wird.
- Benutzername und Passwort festlegen: Ihr benötigt einen Benutzernamen und ein Passwort um auf eueren RasPi einzuloggen. Beides legt ihr hier fest.
Der Benutzernamen darf NICHT "root" sein!
Wenn ihr den Benutzernamen "root" wählt ist dann kein Login möglich!
- Spracheinstellungen festlegen: Hier gebt ihr nur euere Zeitzone und euer Tastaturlayout ein.
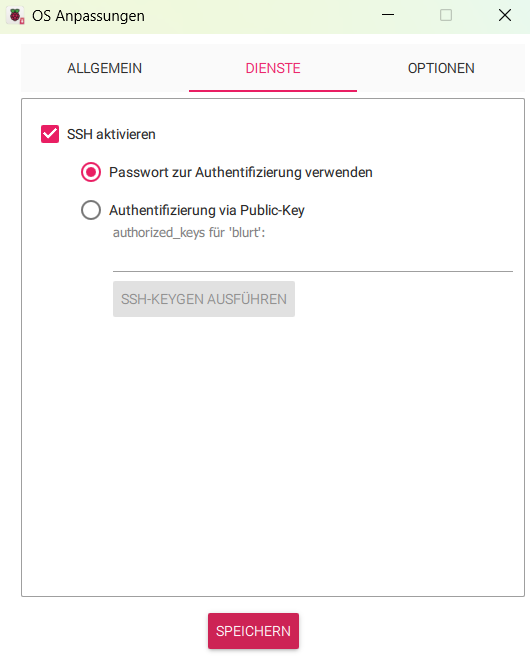
DIENSTE:
- SSH aktivieren
- "Passwort zur Authentifizierung verwenden" auswählen
- Mit einen Klick auf "Speichern" werden die Einstellungen gespeichert. 😅
- Nun erscheint wieder das kleine Pop-Up mit der Frage ob wir die OS Anpassungen anwenden wollen. Dieses Mal klicken wir auf "JA"!
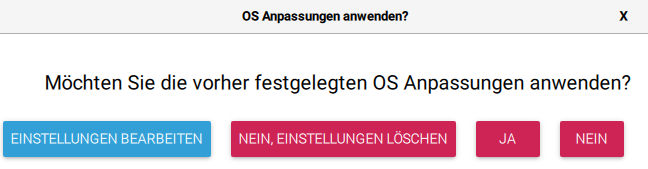
- Natürlich erscheint jetzt erst noch mal der Hinweis, den ich euch vorhin schon angekündigt habe, dass beim Fortsetzen alle Daten auf der SD Karte gelöscht werden.
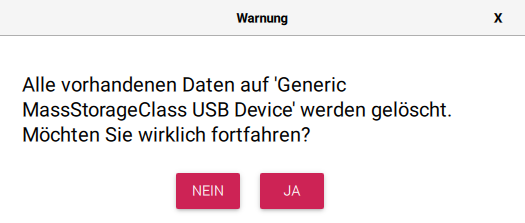
- Mit einen Klick auf "JA" startet der Flash-Prozess der einige Minuten dauert.
Schritt 2:
Der erste Login auf den RasPi
- Sobald der Raspberry Pi Imager mit dem Beschreiben der SD-Karte fertig ist, können wir den Kartenleser abziehen und die SD-Karte in den RasPi stecken und diesen mit Strom versorgen.
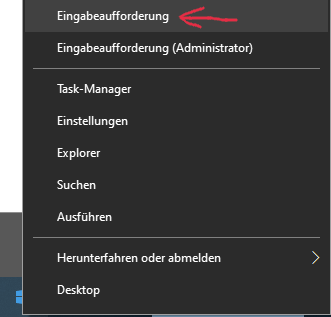
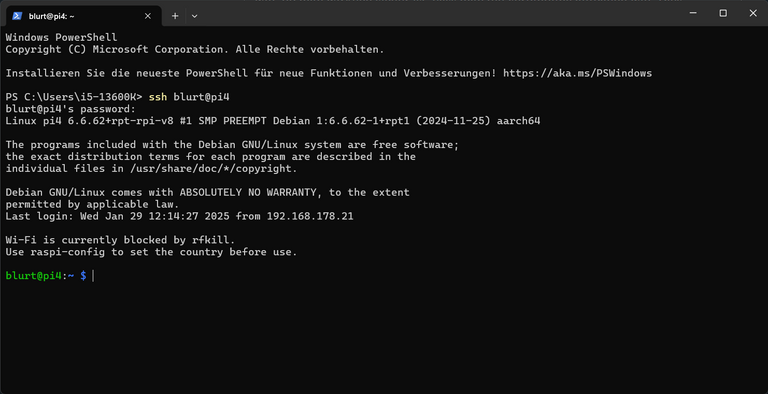
- Nach kurzer Zeit schon, können wir die Windows Eingabeaufforderung in Windows 10 den Terminal in Windows 11 oder den PowerShell starten. Dazu klicken wir mit der rechten Maustaste auf das Windows-Logo in der Taskleiste und klicken auf "Eingabeaufforderung". Siehe Bild:
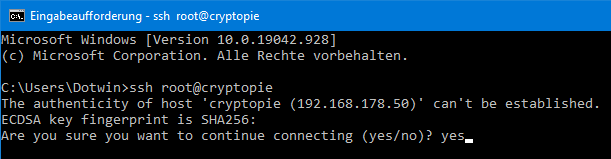
- Hier geben wir nun den Befehl ein:
ssh BENUTZERNAME@HOSTNAME
Den Benutzer- und den Hostnamen habt ihr oben im Flashprogramm angegeben.
Bei der ersten Verbindung kann es vorkommen, dass Windows noch eine Bestätigung will, ob man wirklich sicher ist, dass man die Verbindung aufbauen will. Dies bestätigt ihr mit der Eingabe von "yes".
- Nun müsst ihr euer vorhin hinterlegtes Kennwort eingeben.
Schritt 3:
Noch benötigte Software Installieren
- Nun Updaten wir erst noch die bereits installierte Software und Installieren ein paar Programme die wir brauchen.
- System Updaten:
sudo apt-get update -y && sudo apt-get dist-upgrade -y - Nach den Updates Neustarten:
sudo reboot - Wie oben beschrieben wieder auf den RasPi einloggen.
- LZ4 Installieren:
sudo apt install lz4 -y - Docker Installieren:
curl -sSL https://get.docker.com | sh - Blurt Docker Image Pullen:
sudo docker pull registry.gitlab.com/blurt/blurt/megadrive:dev
- Nun ist die benötigte Software drauf, die benötigt wird. Nun geht es weiter mit der Einrichtung der Blurt Node.
Schritt 4:
Das Blurt Blockchain Presync herunterladen
- Zuerst müssen wir in den Permanenten SUDO Modus, da wir gleich auf ein Verzeichnis zugreifen müssen, wo wir normal kein Zugriff darauf haben:
sudo -s - Nun erstellen wir das Docker Volume:
docker volume create blurtd - Wir gehen in besagtes Verzeichnis:
cd /var/lib/docker/volumes/blurtd/_data/ - Wir laden das Presync herunter und entpacken es direkt:
wget --show-progress -qO- http://dotwin1981.nerdtopia.de/witness-0.8.2-arm64-latest.tar.lz4 | lz4 -d | tar xf -
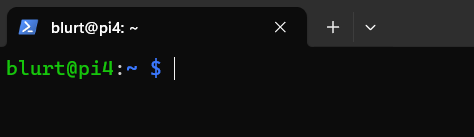
Dies wird je nach Laune des RasPi und meiner Leitung ein bisschen länger dauern. Wenn dies erledigt ist, verlassen wir den Permanenten SUDO Modus wieder mit:
exitWenn es nun bei euch wieder so ausschaut (Grüner Zeilenanfang) geht es gleich weiter.
Schritt 5:
Blurt Node starten
- Nun ist es fast geschafft. Jetzt gibt es nur noch ein Befehl um die Blurt Node zu starten:
sudo docker run -d --net=host -v blurtd:/blurtd --restart=unless-stopped --name blurtd registry.gitlab.com/blurt/blurt/megadrive:dev /usr/bin/blurtd --data-dir /blurtd --plugin "witness account_by_key account_by_key_api condenser_api database_api network_broadcast_api transaction_status transaction_status_api rc_api"
Es werden nun noch ein paar Tage / Wochen nachsynchronisiert, je nachdem von wann das Pre-Sync-File war.
Gebt nun folgenden Befehl ein um zu schauen wie der Status eurer Blurt Node ist:
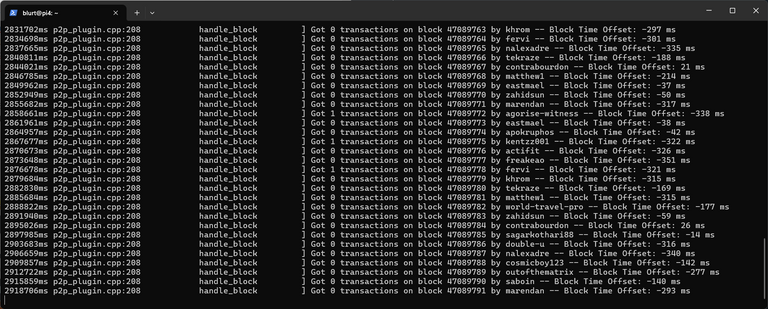
sudo docker logs blurtd -f --tail 100Wenn es so ausschaut, hat alles geklappt und euere Blurt Node läuft:
Info:
Die Docker Logs Anzeige könnt ihr mit STRG + C verlassen.
RasPi absichern mit einer Firewall (Optional)
- Ein bisschen mehr Sicherheit ist immer gut. Daher richten wir nun eine Firewall ein. Dies ist sehr einfach. Jede Zeile bitte auch gesondert in den RasPi eingeben.
sudo apt-get install ufw -y
sudo ufw reset
sudo ufw allow ssh
sudo ufw allow 1776
sudo ufw default deny
sudo ufw default allow outgoing
sudo ufw enable
sudo ufw reload
Info:
Ab hier folgt eine 1:1-Übernahme meines letzten Beitrags, in dem ich die Einrichtung einer Blurt Node zum Witness erkläre. Die verwendeten Screenshots zeigen daher noch die Eingabeaufforderung statt des Terminals – an der Umsetzung ändert sich dadurch jedoch nichts.
Nun werden wir ein Witness (Optional)
Für den Abschnitt geht der Dank an @michelangelo3. Ich habe mich da an seinem Beitrag bedient.
Hier muss man eigentlich nur noch einiges an Befehlen eingeben und sich Keys notieren.
- Wechsel auf die Bash des Blurtd-Containers
sudo docker exec -it blurtd bash - Ins Verzeichnis blurtd wechseln
cd /blurtd - Wallet aufrufen
cli_wallet
Es kommt die Meldung
"Please use the set_password method to initialize a new wallet before continuing".
Jetzt denkt ihr euch ein tolles Passwort aus. Sonderzeichen sind nicht gestattet wie z.B. Ausrufezeichen.
- set_password gefolgt vom gewünschten Passwort
set_password yourpassword - Wallet entsperren
unlock yourpassword - Neue Schlüssel generieren
suggest_brain_key
Die nun generierten Keys speicherst dir gut ab. Diese wirst du gleich noch brauchen.
wif_priv_key = dein eben generierter privater Witness-Key
import_key wif_priv_keypriv_activ_key = dein privater AktivKey (Vom Account der Witness werden soll)
import_key priv_activ_key"strg+d" drücken um die Wallet zu beenden
"exit" eingeben um zurück auf die Bash des Pi zu gelangen
Jetzt öffnen wir die config.ini um die Witness Daten einzutragen.
sudo nano /var/lib/docker/volumes/blurtd/_data/config.ini
Hier müssen wir mit der Pfeil nach unten Taste sehr weit nach unten, bis wir die passenden Stellen finden.
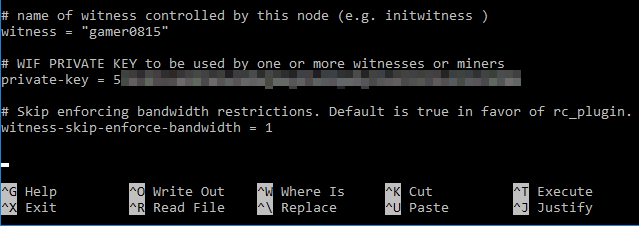
- Witness-Account und privaten Witness-Key in der config.ini eintragen.
witness = Euer Account-Name (ohne @) den ihr als witness nutzen wollt.
private-key = Der vorhin erstellte Brain wif_priv_key.
Wichtig: Witness-Account in “Anführungszeichen” setzten, # am Zeilenbeginn entfernen.
Sollte wie auf dem Bild aussehen, nur eben mit eueren Namen und Key!
Mit STRG+o und Enter speichern
Mit STRG+x Editor schließen.
Änderungen nach blurtd schreiben und Container neu starten
sudo docker restart blurtd
Kontrolle mit sudo docker logs blurtd -f --tail 100 ob alles korrekt läuft
Wir Aktivieren den Witness (Optional)
Wenn der Witness Account soweit angelegt ist, müssen wir den jetzt nur noch im Blurt Netzwerk Aktivieren.
- Wechsel auf die Bash des Blurtd-Containers
sudo docker exec -it blurtd bash - Ins Verzeichnis blurtd wechseln
cd /blurtd - Wallet aufrufen
cli_wallet - Wallet entsperren
unlock yourpassword - WITNESS_PUBLIC_KEY = dein Witness public Key, beginnt i.d.R. mit BLT…
Und klar, gamer0815 muss mit deinem Accountnamen und die Blog-URL durch deine eigene ersetzt werden!
update_witness "gamer0815" "https://blurt.blog/@gamer0815" "WITNESS_PUBLIC_KEY" {"account_creation_fee":"300.000 BLURT","maximum_block_size":65536} true
- Mit STRG+d Wallet beenden
- Mit "exit" zurück auf die Bash des Pi
Ändern der Gebühren (Optional)
Ähnlich wie auch beim Aktivieren des Witness, können die Gebühren geändert werden.
- Wechsel auf die Bash des Blurtd-Containers
sudo docker exec -it blurtd bash - Ins Verzeichnis blurtd wechseln
cd /blurtd - Wallet aufrufen
cli_wallet - Wallet entsperren
unlock yourpassword - WITNESS_PUBLIC_KEY = dein Witness public Key, beginnt i.d.R. mit BLT…
Und klar, gamer0815 muss mit deinem Accountnamen ersetzt werden!
update_witness_properties "gamer0815" {"key":"WITNESS_PUBLIC_KEY", "account_creation_fee":"300.000 BLURT","maximum_block_size":65536,"account_subsidy_budget": 797, "account_subsidy_decay": 347321, "operation_flat_fee":"0.069 BLURT","bandwidth_kbytes_fee":"0.690 BLURT"} true
- Mit STRG+d Wallet beenden
- Mit "exit" zurück auf die Bash des Pi
So das war nun alles. Ich wünsche viel Spaß mit eueren RasPi, der Blurt Node und ggf. eueren Witness.
Lieben Gruß
Euer Doti
Please give my Blurt witnesses (@gamer0815) your vote
[EN]
The screenshots are unfortunately in German. I hope you can still manage.
Introduction
Now that I have a Raspberry Pi running as a Blurt Witness again, I’d like to show you how easy it has become to set up a Blurt Node. If you’re interested in running one yourself or even becoming a Witness, getting started is now easier than ever!
For those who have known me for a while: You know that I’ve done this before. However, some things have changed since then. The old flash image is no longer available – instead, we now use the standard Raspberry Pi OS in the Lite version along with the official flasher.
What You Need
- A Raspberry Pi (tested with RasPi 3, 4, and 5)
- A 32 GB microSD card (64 GB or more is recommended)
- A card reader for your PC
- The Raspberry Pi Flash program: Download Link
Step 1:
Writing the SD card
- After downloading the Raspberry Pi Imager, start it.
- Insert the SD card into your card reader.
- Set up the imager as follows
- Raspberry Pi Model: Select the model you are using.
- Operating System (OS): Navigate to "Raspberry Pi OS (other)" and choose "Raspberry Pi OS Lite (64-Bit)."
- SD Card: Select your SD card.
Warning: This process will completely erase the card, so be sure to back up any important data beforehand!
- With a click on "Next," you can proceed.
- A small menu opens that looks like this:
- Some settings must be changed by clicking on “Edit settings”.
GENERAL:
- Hostname: Here you give your RasPi a name in the network, which is required for a login.
- Set username and password: You need a user name and a password to log in to your RasPi. You can set both here.
The user name may NOT be “root”!
If you choose the user name “root” then no login is possible!
- Define language settings: Here you only enter your time zone and keyboard layout.
SERVICES:
- Activate SSH
- Select “Use password for authentication”
- Click on “Save” to save the settings.
- Now the small pop-up appears again asking if we want to apply the OS customizations. This time we click on “YES”!
- Of course, you will now see the notice I announced earlier that all data on the SD card will be deleted when you continue.
- Click on “YES” to start the flash process, which takes a few minutes.
Step 2:
The first login to the RasPi
- As soon as the Raspberry Pi Imager has finished writing to the SD card, we can remove the card reader and insert the SD card into the RasPi and supply it with power.
- After a short time, we can start the Windows command prompt in Windows 10, the terminal in Windows 11 or the PowerShell. To do this, we right-click on the Windows logo in the taskbar and click on “Command Prompt”. See picture:
- Here we now enter the command:
ssh USERNAME@HOSTNAME
You have entered the user and host name in the Flash program above.
When connecting for the first time, Windows may ask you to confirm whether you are really sure that you want to establish the connection. Confirm this by entering “yes”.
- Now you have to enter the password you entered earlier.
Step 3:
Install software still required
- Now we update the already installed software and install a few programs that we need.
- Update system:
sudo apt-get update -y && sudo apt-get dist-upgrade -y - Restart after the updates:
sudo reboot - Log back into the RasPi as described above.
- LZ4 Install:
sudo apt install lz4 -y - Install Docker:
curl -sSL https://get.docker.com | sh - Blurt Docker Image Pullen:
sudo docker pull registry.gitlab.com/blurt/blurt/megadrive:dev
- The required software is now installed. The next step is to set up the Blurt Node.
Step 4:
Download the Blurt Blockchain Presync
- First we have to enter the permanent SUDO mode, because we have to access a directory where we normally do not have access:
sudo -s - Now we create the Docker volume:
docker volume create blurtd - We go to the said directory:
cd /var/lib/docker/volumes/blurtd/_data/ - We download the presync and unpack it directly:
wget --show-progress -qO- http://dotwin1981.nerdtopia.de/witness-0.8.2-arm64-latest.tar.lz4 | lz4 -d | tar xf -
Depending on the mood of the RasPi and my internet connection, this will take a little longer. When this is done, we will leave the permanent SUDO mode again:
exitIf it now looks like this again (green line start), continue straight away.
Step 5:
Start Blurt Node
- Now it's almost done. Now there is only one command left to start the Blurt Node:
sudo docker run -d --net=host -v blurtd:/blurtd --restart=unless-stopped --name blurtd registry.gitlab.com/blurt/blurt/megadrive:dev /usr/bin/blurtd --data-dir /blurtd --plugin "witness account_by_key account_by_key_api condenser_api database_api network_broadcast_api transaction_status transaction_status_api rc_api"
A few more days / weeks will now be synchronized, depending on when the pre-sync file was from.
Now enter the following command to see the status of your Blurt Node:
sudo docker logs blurtd -f --tail 100If it looks like this, everything went well and your Blurt Node is running:
Info:
You can exit the Docker Logs display with CTRL + C.
Secure RasPi with a firewall (optional)
- A little more security is always good. That's why we are now setting up a firewall. This is very simple. Please enter each line separately in the RasPi.
sudo apt-get install ufw -y
sudo ufw reset
sudo ufw allow ssh
sudo ufw allow 1776
sudo ufw default deny
sudo ufw default allow outgoing
sudo ufw enable
sudo ufw reload
Info:
From this point on, this is a direct reproduction of my previous post, where I explain how to set up a Blurt Node as a Witness. The screenshots still show the command prompt instead of the terminal, but this does not affect the setup process.
Now we will create a Witness (Optional)
Thanks go to @michelangelo3 for the section. I have used his contribution.
Here you actually only have to enter some commands and write down keys.
- Switch to the bash of the blurtd container
sudo docker exec -it blurtd bash - Change to the blurtd directory
cd /blurtd - Open Wallet
cli_wallet
The following message appears
"Please use the set_password method to initialize a new wallet before continuing".
Now you think of a great password. Special characters like exclamation marks are not allowed.
- set_password followed by the desired password
set_password yourpassword - Unlock wallet
unlock yourpassword - Generate new keys
suggest_brain_key
Save the now generated keys well. You will need them in a moment.
wif_priv_key = your just generated private witness key
import_key wif_priv_keypriv_activ_key = your private ActiveKey (from the account you want to witness)
import_key priv_activ_keypress "ctrl+d" to exit the wallet
type "exit" to get back to the bash of the Pi
Now we open the config.ini to enter the Witness data.
sudo nano /var/lib/docker/volumes/blurtd/_data/config.ini
Here we have to use the down arrow key to go very far down until we find the right spots.
- Enter witness account and private witness key in config.ini.
witness = Your account name (without @) that you want to use as witness.
private-key = The Brain wif_priv_key you created earlier.
Important: Put witness account in "quotes", remove # at the beginning of the line if necessary.
Should look like the picture, but with your name and key!
Save with CTRL+o and Enter
Close editor with CTRL+x.
Write changes to blurtd and restart container
sudo docker restart blurtd
Check with sudo docker logs blurtd -f --tail 100 if everything is running correctly.
We activate the Witness (Optional)
Once the Witness account is created, we only need to activate it in the Blurt network.
- Switch to the bash of the blurtd container
sudo docker exec -it blurtd bash - Change to the blurtd directory
cd /blurtd - Open Wallet
cli_wallet - Unlock wallet
unlock yourpassword - WITNESS_PUBLIC_KEY = your Witness public Key, usually starts with BLT...
And sure, gamer0815 must be replaced with your account name and the blog URL with your own!
update_witness "gamer0815" "https://blurt.blog/@gamer0815" "WITNESS_PUBLIC_KEY" {"account_creation_fee":"300.000 BLURT","maximum_block_size":65536} true
- Exit Wallet with CTRL+d
- With "exit" back to the bash of the Pi
Changing the fees (Optional)
Similar to the activation of the Witness, the fees can be changed.
- Switch to the bash of the blurtd container
sudo docker exec -it blurtd bash - Change to the blurtd directory
cd /blurtd - Open Wallet
cli_wallet - Unlock wallet
unlock yourpassword - WITNESS_PUBLIC_KEY = your Witness public Key, usually starts with BLT...
And sure, gamer0815 must be replaced with your account name!
update_witness_properties "gamer0815" {"key":"WITNESS_PUBLIC_KEY", "account_creation_fee":"300.000 BLURT","maximum_block_size":65536,"account_subsidy_budget": 797, "account_subsidy_decay": 347321, "operation_flat_fee":"0.069 BLURT","bandwidth_kbytes_fee":"0.690 BLURT"} true
- Exit Wallet with CTRL+d
- With "exit" back to the bash of the Pi
So that was all. Have fun with your RasPi, the Blurt Node and possibly your Witness.
Best regards
your Doti
1 votes