Lihuen has a modified version of the TuxPaint-config tool that allows you to import external images, for example from a pendrive, to edit them with Tux Paint and also allows you to export images created with Tux Paint.
Common steps.
- To open tuxpaint-config, go to the ‘Preferences’ category in the menu and open ‘Tux Paint Config’.
Open tuxpaint-config
- Inside the tool, go to the ‘Import / Export’ tab.
Tab ‘Import / Export’.
Steps to import external images.
3.1) Click on the ‘Import’ button.
Option ‘Import’.
3.2) The dialog that opens has several elements:
Dialogue to open files.
Box to navigate between folders: To enter a folder double click.
Preview box: It will show a thumbnail of the last selected image.
Current directory: The three grey bars at the top allow you to jump to previous directories, for example if you click on the second bar you jump from ‘/home/fernando’ to ‘/home’ and the first bar jumps to ‘/’.
Button to accept the selection.
3.3) You can select one or more images: To select several images, hold down the ‘Ctrl’ key while clicking on the image names. To select consecutive images you can select the first one normally and then by pressing ‘Shift’ select the last one or click and drag.
Selecting multiple files
3.4) Once the images have been imported they are available for Tux Paint, to use them simply click on the ‘Open’ button.
Steps to export images.
3.1) Click on the ‘Export’ button.
Option ‘Export’.
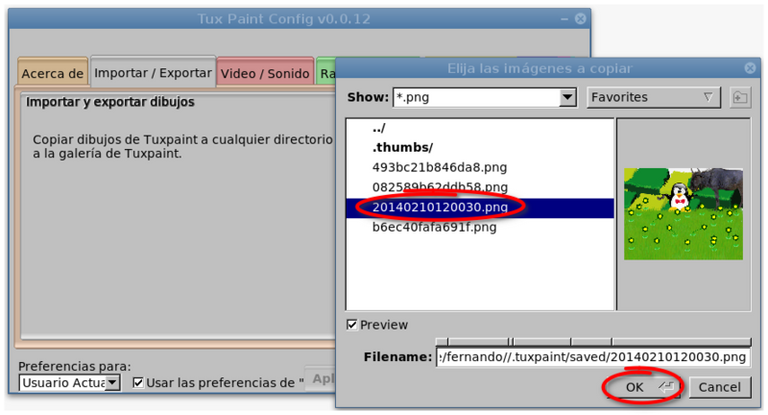
3.2) Select the image to export and click ‘OK’. To identify the images you can click on them and see a thumbnail of them in the preview box on the left.
Select image to export.
You can select one or more images: To select several images, hold down the ‘Ctrl’ key while clicking on the names of the images. To select consecutive images you can select the first one normally and then by pressing ‘Shift’ select the last one or click and drag.
3.3) Immediately after clicking on ‘OK’ a dialogue window opens to choose where to save the images.
Select target directory
Box for navigating between folders: To enter a folder, double-click on it.
Current directory: The three grey bars at the top allow you to jump to previous directories, e.g. if you click on the second bar you jump from ‘/home/fernando’ to ‘/home’ and the first bar jumps to ‘/’.
Button to create a new directory.
Button to accept the chosen options and copy the images.
Tuxpaint configuration.
Tuxpaint is configured by default, these configurations can be modified or customised using the tuxpaint-config graphical tool:
Tuxpaint configuration tool.
It modifies the default settings which are stored in the file
/etc/tuxpaint/tuxpaint.conf file.
Or you can customise it by creating a file in the personal directory of each user that you need to modify the general options, the file that you must create must be saved with the name:
/home/user/.tuxpaintrc
You can set up a personal directory to be able to access it after saving the images, and also use this directory to save images that you need to open from TuxPaint.
Configuring the directory change
Within this configured directory, inside this directory, the saved folder saves the TuxPaint files and searches to open them.
Simplification.
One of the characteristics that can be modified is the simplification of the use of the interface, in case of small children it can be difficult to draw figures, since the application allows to rotate them at the moment of the creation, in these cases configuring this option, we avoid this possible rotation, simplifying its use.
Default directory for saving.
The images are automatically saved in a pre-configured directory:
/home/user/.tuxpaint
This directory can be changed from the tool that comes with this application, tuxpaint-config, in the ‘Saving’ tab, we can specify another directory.

Lihuen cuenta con una versión modificada de la herramienta TuxPaint-config que permite importar imágenes externas, por ejemplo desde un pendrive, para editarlas con Tux Paint y también permite exportar las imágenes creadas con Tux Paint.
Pasos en común.
- Para abrir tuxpaint-config hay que ir a la categoría "Preferencias" del menú y abrir "Config. de Tux Paint".
Abrir tuxpaint-config
- Dentro de la herramienta hay que ir a la pestaña "Importar / Exportar".
Pestaña "Importar / Exportar"
Pasos para importar imágenes externas.
3.1) Hacer clic en el botón de "Importar"
Opción "Importar"
3.2) El diálogo que se abre tiene varios elementos:
Diálogo para abrir archivos.
Recuadro para navegar entre las carpetas: Para entrar en una carpeta hacer doble clic.
Recuadro de previsualización: Mostrará una miniatura de la última imagen seleccionada.
Directorio actual: Las tres barritas grises que aparecen arriba permiten ir a los directorios anteriores, por ejemplo si hacemos clic en la segunda barrita salta desde "/home/fernando" a "/home" y la primer barrita salta a "/".
Botón para aceptar la selección.
3.3) Se pueden seleccionar una o más imágenes: Para seleccionar varias imágenes mantener presionada la tecla "Ctrl" mientras se hace clic en los nombres de las imágenes. Para elegir imágenes consecutivas se puede seleccionar la primera normalmente y luego presionando "Shift" seleccionar la última o bien hacer clic y arrastrar.
Seleccionar múltiples archivos
3.4) Una vez importadas las imágenes las mismas quedan disponibles para Tux Paint, para usarlas simplemente hacer clic en el botón "Abrir".
Pasos para exportar imágenes.
3.1) Hacer clic en el botón "Exportar".
Opción "Exportar"
3.2) Seleccionar la imagen a exportar y hacer clic en "OK". Para identificar las imágenes se les puede hacer clic y ver una miniatura de las mismas en el recuadro de vista previa a la izquierda.
Seleccionar imagen a exportar.
Se pueden seleccionar una o más imágenes: Para seleccionar varias imágenes mantener presionada la tecla "Ctrl" mientras se hace clic en los nombres de las imágenes. Para elegir imágenes consecutivas se puede seleccionar la primera normalmente y luego presionando "Shift" seleccionar la última o bien hacer clic y arrastrar.
3.3) Inmediatamente después de hacer clic en "OK" se abre una ventana de diálogo para elegir donde guardar las imágenes.
Seleccionar directorio destino
Recuadro para navegar entre las carpetas: Para entrar en una carpeta hacer doble clic.
Directorio actual: Las tres barritas grises que aparecen arriba permiten ir a los directorios anteriores, por ejemplo si hacemos clic en la segunda barrita salta desde "/home/fernando" a "/home" y la primer barrita salta a "/".
Botón para crear un nuevo directorio.
Botón para aceptar las opciones elegidas y copiar las imágenes.
Configuración de Tuxpaint.
Tuxpaint trae configurado por defecto, dichas configuraciones pueden modificarse o personalizarse a través de la herramienta gráfica tuxpaint-config:
Herramienta de configuración de Tuxpaint.
El mismo modifica las opciones por defecto que son guardadas en el archivo
/etc/tuxpaint/tuxpaint.conf
O bien se puede personalizar generando un archivo en el directorio personal de cada usuario que necesitemos modificar las opciones generales, el archivo que debemos crear se debe guardar con el nombre:
/home/usuario/.tuxpaintrc
Se puede configurar un directorio personal para poder acceder luego que guardemos las imágenes, y también utilizar dicho directorio para guardar imágenes que necesitemos abrir desde TuxPaint.
Configuración del cambio de directorio
Dentro de ese directorio configurado, dentro del mismo la carpeta saved guarda los archivos TuxPaint y busca para abrir.
Simplificación.
Una de las características que se puede modificar es la simplificación del uso de la interfaz, en caso de chicos pequeños puede resultar dificultoso el dibujo de figuras, ya que la aplicación permite rotarlas al momento de la creación, en estos casos configurando esta opción, evitamos esta posible rotación, simplificando su uso.
Directorio por defecto para guardar.
Las imagenes se guardan automáticamente en un directorio pre-configurado:
/home/usuario/.tuxpaint
Este directorio se puede cambiar desde la herramienta que acompaña a esta aplicación, tuxpaint-config, en la solapa "Guardado", podemos especificar otro directorio.
| Blogs, Sitios Web y Redes Sociales / Blogs, Webs & Social Networks | Plataformas de Contenidos/ Contents Platforms |
|---|---|
| Mi Blog / My Blog | Los Apuntes de Tux |
| Mi Blog / My Blog | El Mundo de Ubuntu |
| Mi Blog / My Blog | Nel Regno di Linux |
| Mi Blog / My Blog | Linuxlandit & The Conqueror Worm |
| Mi Blog / My Blog | Pianeta Ubuntu |
| Mi Blog / My Blog | Re Ubuntu |
| Mi Blog / My Blog | Nel Regno di Ubuntu |
| Red Social Twitter / Twitter Social Network | @hugorep |

| Blurt Official | Blurt.one | BeBlurt | Blurt Buzz |
|---|---|---|---|
 |  |  |  |

 |  |  |  |
|---|