Inkscape is an open source vector graphics editor, with capabilities similar to Illustrator, Freehand, CorelDraw or Xara X, using the W3C standard: Scalable Vector Graphics (SVG) file format.
Supported features include: shapes, strokes, text, markers, clones, alpha channel blends, transforms, gradients, patterns, and groupings.
Inkscape also supports Creative Commons metadata, node editing, layers, complex path operations, vectorization of graphic files, text to path, text alignment, direct XML editing, and much more. It can import formats like Postscript, JPEG, PNG, and TIFF and export PNG as well as many vector-based formats.
Inkscape's main goal is to create a powerful and comfortable drawing tool, fully compliant with XML, SVG and CSS standards. They also want to maintain a thriving community of users and developers by using an open, community-driven development system, and making sure Inkscape is easy to learn, easy to use, and easy to improve.
The first part of this guide was dedicated to the basics, the first steps to take before starting to use Inkscape.
In this second part we will deal with advanced instruments.
Gluing techniques.
After you copy some object(s) by Ctrl+C or cut by Ctrl+X, the regular Paste command (Ctrl+V) pastes the copied object(s), under the mouse cursor or cursor or if the cursor is outside the window, in the center of the document window. However, the object(s) on the clipboard still remember the original place where they were copied, and you can copy them back to that place using Paste in Place (Ctrl+Alt+V).
Another command, Paste Style (Shift+Ctrl+V), applies the style of the (first) object on the clipboard to the current selection. So the pasted "style" includes the fill, stroke, and font settings, but not the shape, size, or specific parameters of a shape type, such as the number of points on a star.
Drawing freehand and regular strokes.
The easiest way to create arbitrary shapes is to draw using the Pencil tool (draw freehand lines)
If you want more regular shapes, use the Pen (Bezier) tool (Shift+F6):
With the pen tool, each click creates a node without any curve handle, so a series of clicks produces a sequence of straight line segments. Click and drag creates a smooth Bezier node with two opposite collinear handles. Press Shift while dragging a handle to rotate only one handle and fix the other. As usual, Ctrl limits the direction of the current line segment or the Bezier handle's increment to 15 degrees. Pressing Enter ends the line, Esc cancels it. To cancel just the last unfinished segment of a line, press Spacebar.
In both tools, the currently selected path shows a small square anchor at both ends. These anchors allow you to continue this path (by dragging from one of the anchors) or close it (by dragging from one anchor to the other) instead of creating a new one.
Editing strokes.
Unlike the shapes created with the Shape tool, the Pen and Pencil tools create what are called strokes. A stroke is a sequence of straight line segments and/or like Bezier curves, like any other Inkscape object, it can have arbitrary fill and border properties. But unlike a shape, a path can be edited by free dragging any of its nodes (and not just by default handles). Select this path and activate the Node Tool (F2):
Paths are edited by dragging their nodes and handle nodes. (Try dragging some nodes and handles from the next path.) Ctrl usually works by constraining movement and rotation. The keys: arrows, Tab, [, ], <, > and their modifiers work like the selector does, but apply to nodes instead of objects. You can delete (Del) or duplicate (Shift+D) selected nodes. The path can be broken (Shift+B) at the selected nodes, or if you select two end nodes on a path, you can group them together using (Shift+J).
A node can be made sharp (Shift+C), which indicates that its two handles can move independently at any angle for each other; smooth (Shift+S), which indicates that its handles are always on the same straight line (collinear); and symmetric (Shift+Y), which is the same as smooth, but the handles are also the same length.
You can also fully retract a node's handle by Ctrl+clicking on it. If two adjacent nodes have their handles retracted, the path segment between them is a straight line. To exit the retracted node, Shift+drag away from the node.
Substrokes and combination.
A path object can contain more than one subpath. A subtrace is a sequence of connected nodes. (Thus, if a path has more than one subpath, not all nodes are connected.) Bottom left, three subpaths belong to a simple compound path; the same three subpaths on the right are independent path objects:
Note that a compound path is not the same as a group. It is a single object which is only selectable as an integer. If you select the object on the left below and take the node tool, you can see the nodes shown in the three subpaths. On the right, you can only edit-nodes on a single path at a time.
Inkscape can Merge Paths into a Compound Path (Ctrl+K) and Separate a Compound Path into separate paths (Shift+Ctrl+K). Try these commands on the examples below. Since an object only has a fill and stroke style, a new compound path takes the style of the first (lower in z-order) object being combined.
When you combine overlapping strokes with a fill, the fill can usually disappear in the areas where the stroke overlaps:
This is the easiest way to create objects with holes in them. For more powerful stroke commands, see "Boolean Operations" below.
Converting to path.
Any shape or text object can be converted to path (Shift+Ctrl+C). This operation does not change the appearance of the object but removes all capabilities specific to its type (e.g. you can't round the corners of a rectangle or edit the text anymore); instead, you can now edit its nodes. Here are two stars - the left one is kept a shape and the right one is converted to path. Switch to node tool and compare their editability when selected:
In addition, you can stroke ("outline") the Edge of any object. Next, the first object is the original stroke (no fill, black border), while the second is the result of the Edge to Stroke command (black fill, no border):
Boolean operations.
The commands on the Stroke menu allow you to combine two or more objects using Boolean operations:
The keyboard shortcuts for these commands hint at the arithmetic analogs of Boolean operations (union is addition, difference is subtraction, etc.). The Difference and Exclusion commands can only be applied to two selected objects; others can process any number of objects at once. The result is always styled as the background object.
The result of the Exclusion command is similar to Merge (see below), but it is different from Exclusion in that the latter adds nodes where the original path intersections were. The difference between Split and Cut Stroke is that the former completely cuts the background object by the top object's path, while the latter only cuts the edge of the background object and removes any fill (this is convenient for cut into unstuffed edge pieces).
Reduce and enlarge.
Inkscape can expand and contract shapes not only by scaling, but also by offsetting an object's path, i.e. moving it perpendicular to the trace of each point. The corresponding commands are called Zoom In (Ctrl+() and Zoom Out (Ctrl+)). Shown below as the original stroke (red) and a number of strokes enlarged and reduced from the original:
The Enlarge and Reduce direct commands produce paths (converting the original object to a path if it is not already a path ). Often times, more convenient is Dynamic Offset (Ctrl+J) which creates an object with draggable handles (similar to the shape handle) controlling the offset distance. Select the object below, switch to the node tool and drag its handle to get an idea:
Since a dynamically offset object remembers the original path, it doesn't "degrade" when you change the offset distance over and over again. When you don't need to adjust any more, you can always convert an offset object back to a path.
Even more convenient is the Linked Offset, which is similar to the dynamic array but is connected to another path which remains editable. You can have any number of offsets linked to a source trace. Below, the source path is red, one turnout attached to it has a black border and no fill, the other has a black fill and no border.
Select the red object and edit nodes; note how both linked deviations resound. Now select any of the offsets and drag their handles to adjust the offset radius. Finally, note how moving or transforming the source moves all offset objects linked to it and how you can move or transform offset objects independently without losing their connection to the source.
Simplification.
The main use of the Simplify command (Ctrl+L) is to reduce the number of nodes in a path while almost preserving its shape. This can be useful for paths created using the Pencil tool, as the tool sometimes creates more nodes than necessary. Below, the shape on the left is created using the raised nano tool and the one on the right is a simplified copy. The original path has 28 nodes, while the simplified path has 17 (meaning it's much easier to work with with the Node tool) and is smoother.
The amount of simplification (called the threshold) depends on the size of the selection. Therefore, if you select a path along with some large object, it will be simplified more aggressively than if you select that path alone. Also, the Simplify command is sped up. This indicates that if you press Ctrl+L multiple times in rapid succession (so the call is within 0.5 sec of each other). The threshold is increased on each call. (If you do another Simplify after pausing, the threshold is returned to its default value.) By making use of speedup, it's easy to apply for the exact amount of simplification you require in each case.
Creating text.
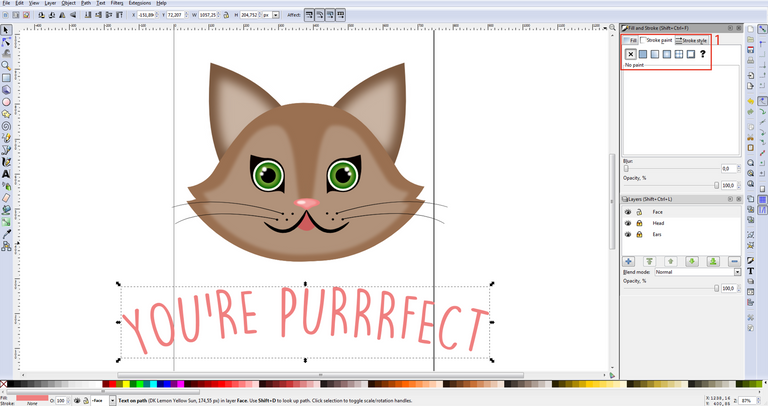
Inkscape is capable of creating long and complex texts. However, this is quite convenient for creating small text such as headers, banners, logos, diagram and caption labels, etc. This section is a very basic introduction to Inkscape's text capabilities.
Creating a text is as simple as switching to the Text tool, clicking where in the document and typing your text. To change the font family, style, size, and alignment, open the Text and Font dialog (Shift+Ctrl+T). This dialog also has a text input tab where you can edit the selected text object - in some situations, this may be more convenient than editing on the whiteboard (in particular, this tab supports as-you-write review).
One of the most common operations in text layout is adjusting the spacing between letters and lines. As always, Inkscape provides keyboard shortcuts for this. When you are editing text, the Alt+< and Alt+> keys change the letter spacing on the current line of a text object, so the total length of the lines changes by 1 pixel in the current display (compare the Selector tool where the same key does a pixel-size object scaling). As a rule of thumb, if the font size in a text object is larger than the default, you will notice a slightly tighter squeeze than the default. Here an example:
Wrapped variants look a bit better than a header, but still not perfect: distances between letters are not uniform, for example "a" and "t" are far apart while "t" and "i " they are very close. The amount of such erroneous kerning (especially visible at large font sizes) is greater in low-quality fonts than in good-quality ones; however, in any string of text and in any font, it will probably look for a couple of letters that could benefit from adjusting the spacing.
Inkscape makes these adjustments very easily. Just move your text editing cursor between the misspaced characters and use Alt+arrows to move the letters from the cursor. Here's the same header again, this time with manual adjustments for visually smooth letter placement:
Additionally, for horizontal movement of letters it is by Alt+Left or Alt+Right, you can also move them vertically by Alt+Up or Alt+Down:
Similar to letter spacing, you can also adjust line spacing in multi-line text objects. Try the Ctrl+Alt+< and Ctrl+Alt+> keys on any paragraph in this tutorial to space it in or out so the total height of the text objects changes by 1 pixel at the current zoom. As in Selection, pressing Shift with any spacing or kerning shortcut produces effects 10 times greater than without Shift.
XML editor.
The last powerful XML tool is the XML editor (Shift+Ctrl+X). This shows the entire XML tree of the document, always reflecting its current state. You can edit your drawings and observe the corresponding changes in the XML tree. Furthermore, you can edit any text, element or node attribute in the XML editor and see the result on your whiteboard. This is the best tool imaginable for interactively learning SVG and it allows you to do tricks that may be impossible with regular editing tools.

Inkscape es un editor de gráficos vectoriales de código abierto, con capacidades similares a Illustrator, Freehand, CorelDraw o Xara X, usando el estándar de la W3C: el formato de archivo Scalable Vector Graphics (SVG).
Las características soportadas incluyen: formas, trazos, texto, marcadores, clones, mezclas de canales alfa, transformaciones, gradientes, patrones y agrupamientos.
Inkscape también soporta meta-datos Creative Commons, edición de nodos, capas, operaciones complejas con trazos, vectorización de archivos gráficos, texto en trazos, alineación de textos, edición de XML directo y mucho más. Puede importar formatos como Postscript, JPEG, PNG, y TIFF y exporta PNG así como muchos formatos basados en vectores.
El objetivo principal de Inkscape es crear una herramienta de dibujo potente y cómoda, totalmente compatible con los estándares XML, SVG y CSS. También quieren mantener una próspera comunidad de usuarios y desarrolladores usando un sistema de desarrollo abierto y orientado a las comunidades, y estando seguros de que Inkscape sea fácil de aprender, de usar y de mejorar.
La primera parte de esta guía estuvo dedicada a los conceptos básicos, los primeros pasos a dar antes de comenzar a usar Inkscape.
En esta segunda parte nos ocuparemos de los instrumentos avanzados.
Técnicas de pegado.
Después de que usted copia algún(os) objeto(s) mediante Ctrl+C o corta mediante Ctrl+X, el comando regular Pegar (Ctrl+V) pega el/los objeto(s) copiados, bajo el cursor del ratón o cursor o si el cursor se encuentra fuera de la ventana, en el centro de la ventana del documento. Sin embargo, el/los objeto(s) en el portapapeles aún recuerdan el lugar original donde fue(ron) copiado(s) y usted puede copiarlos de nuevo en ese lugar mediante Pegar en el sitio (Ctrl+Alt+V).
Otro comando, Pegar estilo (Mayus+Ctrl+V), aplica el estilo del (primer) objeto en el portapapeles a la selección actual. Así el "estilo" pegado incluye la configuración de relleno, trazo y fuente, pero no la forma, tamaño o parámetros específicos de un tipo de forma, tales como el número de puntas de una estrella.

Dibujando a mano alzada y trazos regulares.
La forma más sencilla para crear formas arbitrarias es dibujar usando la herramienta Lapiz (dibujar líneas a mano alzada)
Si desea figuras más regulares, use la herramienta Pluma (Bezier) (Mayus+F6):
Con la herramienta pluma, cada click crea un nodo sin ningún manejador de curva, así una serie de clicks produce una secuencia de segmentos rectos de línea. Click y arrastrar crea un suave nodo Bezier con dos manejadores colineales opuestos . Presione Mayus mientras arrastra un manejador para rotar solo un manejador y arreglar el otro. Como usualmente, Ctrl limita la dirección o del segmento de línea actual o el incremento del manejador Bezier en 15 grados. Presionando Enter finaliza la línea, Esc la cancela. Para cancelar tan solo el último segmento de una línea sin finalizar, presione Barra espaceadora.
En ambas herramientas, el trazo actualmente seleccionado muestra una pequeña ancla cuadrada en ambos finales. Estas anclas le permiten continuar este trazo (mediante arrastrado desde uno de las anclas) o cierrelo (mediante arrastrado de una ancla a la otra) en vez de crear una nueva.
Editando trazos.
Diferente a las formas creadas con la herramienta Forma, las herramientas Pluma y Lápiz crean lo que es denominado trazos. Un trazo es una secuencia de segmentos de línea recta y/o como las curvas Bezier, como cualquier otro objeto de Inkscape, puede tener unas propiedades arbitrarias de relleno y borde. Pero diferente a una forma, un trazo puede ser editado mediante arrastrado libre de cualquiera de sus nodos (y no sólo mediante manejadores predeterminados). Seleccione este trazo y active la herramienta Nodo (F2):
Los trazos son editados mediante arrastrado de sus nodos y nodos manejadores. (Intente arrastrar algunos nodos y manejadores del siguiente trazo.) Ctrl trabaja usualmente restringiendo movimientos y rotación. Las teclas: flechas, Tab, [, ], <, > von sus modificadores trabajan como lo hace el selector, pero aplica a los nodos en vez de a los objetos. Puede borrar (Del) o duplicar (Mayus+D) los nodos seleccionados. El trazo puede ser roto (Mayus+B) en los nodos seleccionados, o si selecciona dos nodos finales en un trazo, los puede agrupar mediante (Mayus+J).
Un nodo puede hacerse agudo (Mayus+C), lo cual indica que sus dos manejadores pueden moverse independientemente den cualquier ángulo para cada uno; suave (Mayus+S), el cual indica que sus manejadores siempre están sobre la misma línea recta (colineal); y simetrico (Mayus+Y), que es lo mismo que suave, pero los manejadores también tienene la misma longitud.
Usted, también puede retraer completamente el manejador de un nodo mediante Ctrl+click sobre él. Si dos nodos adyacentes poseen sus manejadores retraidos, el segmento de trazo entre ellos es una línea recta. Para salir del nodo retraido, haga Mayus+drag lejos del nodo.
Subtrazos y combinación.
Un objeto trazo puede contener más de un subtrazo. Un subtrazo es una secuencia de nodos concetados entre si. (Por lo tanto, si un trazo tiene más de un subtrazo no todos los nodos están conectados.) Abajo a la izquierda, tres subtrazos pertenecen a un trazo simple compuesto; los mismos tres subtrazos den la derecha son objetos de trazo independientes:
Note que un trazo compuesto no es lo mismo que un grupo. Es un objeto sencillo el cual es sólo seleccionable como uno entero. Si usted selecciona el objeto de la izquierda a continuación y tome la herramienta nodo, podrá observar los nodos mostrados en los tres subtrazos. En la derecha, puede solo editar-nodos sobre un solo trazo a la vez.
Inkscape puede Combinar trazos en un trazo compuesto (Ctrl+K) y Separar un trazo compuesto en trazos separados (Mayus+Ctrl+K). Intente estos comandos sobre los ejemplos de a continuación. Desde que un objeta solo posea un relleno y estilo de trazo, un nuevo trazo compuesto toma el estilo del primer (menores en orden-z) objeto siendo combinado.
Cuando combina trazos superpuestos con relleno, usualmente el relleno puede desaparecer en las áreas donde el trazo se superpone:
Este es el modo más sencillo para crear objetos con agujeros en el. Para comandos de trazo más poderosos, observe "Operaciones Booleanas" más adelante.
Convirtiendo a trazo.
Además, usted puede convertir a trazo ("delineado") el Borde de cualquier objeto. Adelante, el primer objeto es el trazo original (sin relleno, borde negro), mientras que el segundo es el resultado del comando Borde a Trazo (relleno negro, sin borde):
Operaciones booleanas.
Los comandos en el menú Trazo le permiten combinar dos o más objetos usando operaciones booleanas:
Los atajos por teclado para estos comandos hacen alusión a los análogos aritméticos de las operaciones booleanas (union es adición, diferencia es sustracción, etc.). Los comandos Diferencia y Exclusión sólo pueden ser aplicados a dos objetos seleccionados; otros pueden procesar cualquier número de objetos a la vez. El resultado siempre recibe el estilo del objeto del fondo.
El resultado del comando Exclusión se parece a Combinar (observe adelante), pero es diferente a Exclusion en el hecho que este último agrega nodos donde estaban las intersecciones de trazos originales. La diferencia entre División y Cortar Trazo radica en que el primero de ellos corta completamente el objeto del fondo por el trazo del objeto de la parte superior, mientras el último solo corta el borde del objeto del fondo y remueve cualquier relleno (esto es conveniente para cortado en piezas de bordes sin-relleno).
Reducir y ampliar.
Inkscape puede expandir y contraer formas no solo mediante escalado, también puede mediante desvio de trazo de un objeto, i.e. desplazándolo perpendicularmente al trazo de cada punto. Los comandos correspondientes son llamados Ampliar (Ctrl+() y Reducir (Ctrl+)). Mostrados adelante como el trazo original (rojo) y un número de trazos ampliados y reducidos del original:
Los comandos directos Ampliar y Reducir producen trazos (convirtiendo el objeto original a trazo si aún no es trazo ). Muchas veces, más conveniente es Desvío Dinamico (Ctrl+J) el cual crea un objeto con manejadores arrastrables (similar al manejador de formas) contralando la distancia de desviado. Seleccione el objeto de abajo, cambie a la herramienta nodo y arrastre su manejador para obtener una idea:
Como un objeto desviado dinámicamente recuerda el trazo original, este no "degrada" cuando usted cambia la distancia de desviado una y otra vez. Cuando usted no lo requiere ajustar más, siempre puede volver a convertir un objeto desviado a trazo.
Aún más conveniente es el Desvío Enlazado, el cual es similar a la variedad dinámica pero es conectado a otro trazo el cual se mantiene editable. Usted puede tener cualquier número de desvíos enlazadas para un trazo fuente. Adelante, el trazo fuente es rojo, un desvío enlazado a este tiene borde negro y no posee relleno, el otro posee relleno negro y no tiene borde.
Seleccione el objeto rojo y edit nodos; observe como ambas desviaciones enlazadas resoinden. Ahora seleccione cualquiera de las desviaciones y arrastre sus manejadores para ajustar el radio de desviación. Finalmente, note como moviendo o transformando el fuente mueve todos los objetos desviados enlazados a el y como usted puede mover o transformar objetos desviados independientemente sin perder su conexión con el fuente.
Simplificación.
El uso principal del comando Simplificar (Ctrl+L) es reducir el número de nodos de un trazo mientras casi preserve su forma. Esto puede ser útil para trazos creados mediante la herramienta Lápiz, ya que la herramienta en ocasiones crea más nodos de los ncesarios. Adelante, la forma en la izquierda es creada mediante la herramienta nano alzada y la de la derecha es una copia pero simplifiacada. El trazo original tiene 28 nodos, mientras que el simplificado posee 17 (lo cual significa que es mucho más sencillo de trabajar con la herramienta Nodo) y es más suave.
El monto de la simplificación (llamado umbral) depende del tamaño de la selección. Por lo tanto, si usted selecciona un trazo a lo largo con algún objeto grande, este será simplificado más agresivamente que si usted selecciona ese trazo pero solo. Además, el comando Simplificar es acelerado. Esto indica que si usted presiona Ctrl+L en múltiples ocasiones en una suseción rápida (o sea que la llamada sea en 0.5 seg entre cada uno). El umbral es incrementado en cada llamado. (Si hace otro Simplificar después de una pausa, el umbral es devuelto a su valor por defecto.) Haciendo uso de la aceleración, es fácil de aplicar para el monto exacto de simplificación que usted requiere en cada caso.
Creando texto
Inkscape es capaz de crear textos largos y complejos. Sin embargo, esto el algo muy conveniente para la creación de textos pequeños como cabeceras, banners, logos, etiquetas de diagramas y captura, etc. Esta sección es una introducción muy básica acerca de las capacidades de texto de Inkscape.
Crear un texto es tan sencillo como cambiar a la herramienta de Texto, dando click donde en el documento y escribiendo su texto. Para cambiar la familia de fuente, estilo, tamaño y alineación, abra el dialogo Texto y Fuente (Mayus+Ctrl+T). Este dialogo tambien tiene una pestaña de entreda de texto donde usted puede editar el objeto de texto seleccionado - en algunas situaciones, esto puede ser más conveniente que editar sobre la pizarra (en particular, esta etiqueta soporta revisión de como-usted-escribe).
Una de las operaciones más comunes en el diseño de texto es el ajustar el espaceado entre letras y líneas. Como siempre, Inkscape provee atajos por teclado para esto. Cuando se encuentra editando texto, las teclas Alt+< y Alt+> cambian el espaceado de letras en la línea actual de un objeto de texto, así que la longitud total de las líneas cambian en 1 pixel en la visualización actual (compare con la herramienta Selector donde la misma tecla hace un excalado de objeto tamaño-pixel). Como una regla, si el tamaño de fuente en un objeto de texto es más largo que el por defecto, se notará un apretujado de letras un poco más ajustado que el por defecto. Aquí un ejemplo:
Las variantes de ajustados parecen un poco mejor que un encabezado, pero aún no es perfecto: las distancias entre letras no son uniformes, por ejemplo la "a" y la "t" están muy separadas mientra que la "t" y la "i" están muy cerca. El monto de de dicho kern erroneo (especialmente visible en tamaños de fuente grandes) es mayor en fuentes de baja calidad que en las otras de buena calidad; sin embargo, en cualquier cadena de texto y en cualquier fuente probablemente buscará un par de letras que puedan beneficiar el ajuste del espaceado.
Inkscape hace estos ajustes de una manera muy sencilla. Tan sólo mueva su cursor de edición de texto entre los caracteres mal espaceados y use Alt+flechas para mover las letras a partir del cursor. He aquí el mismo encabezado de nuevo, en esta ocasión con ajuste manuales para un posisionado de letras visualmente uniforme:
Adicionalmente, para movimiento horizontal de letras es mediante Alt+Izquierda o Alt+Derecha, también puede moverlas verticalmente mediante Alt+Arriba o Alt+Abajo:
Similar al espaceado de letras, usted también puede ajustar espaceado de línea en objetos de texto multi-línea. Intente las teclas Ctrl+Alt+< y Ctrl+Alt+> sobre cualquier parrafo en este tutorial para espacearlo dentro o fuera así que la altura total de los objetos de texto cambian en 1 pixel en el zoom actual. Como en Selección, presionando Mayus con cualquier atajo de espaceado o kern produce efectos 10 veces más grande que sin el Mayus.
Editor XML.
Las última herramienta poderosa de XML es el editor XML (Mayus+Ctrl+X). Este muestra todo el arbol XML del documento, simpre refleja su actual estado. Usted puede editar sus dibujos y observar los cambios correspondientes en el arbol XML. Además, usted puede editar cualquier texto, elemento o atributo de nodos en el editor de XML y observe el resultado en su pizarra. Esta es la mejor herramienta imaginable para aprender interactivamente SVG y este le permite hacer trucos que pueden ser imposibles con herramientas regulares de edición.