Museek es un cliente para la red de intercambio de archivos SoulSeek (P2P).
Procederemos a instalar el cliente con interfaz Qt4 (pero también tenemos la posibilidad de una interfaz PyGTK).
En Archlinux éste cliente se encuentra en los repositorios AUR aunque también podemos compilarlo desde su código fuente o desde su PKGBUILD (para Arch) o también desde su ebuild (para Gentoo) accediendo a su página oficial.
Nota: también existe un fork de Museek llamado Museek+ (o Museek-Plus) escrito en C++, su pagina oficial es http://www.museek-plus.org/
En nuestro caso utilizaremos el repositorio AUR mediante el comando yaourt.
Debemos instalar el daemon (demonio) para la red SoulSeek, y la interfaz de usuario que va a hacer uso de ese daemon.
Abrimos la terminal y ejecutamos el siguiente comando:
yaourt -S museekd-svn museeq-svn
Nota: para la distribución Chakra debe utilizarse el repositorio CCR, mediante el siguiente comando:
ccr -S museekd-svn museeq-svn
museekd-svn -- el daemon (demonio)
museeq-svn -- la interfaz Qt4 (GUI) para el daemon
Importante: Para instalar éste programa en distros como Debian, Ubuntu y Linux Mint (es decir, derivadas de Debian) debemos hacerlo con los siguientes paquetes (ya que cambian de nombre según los repositorios de cada distribución):
sudo apt-get install museekd murmur musetup-gtk
Con ese comando instalamos el programa con interfaz PyGTK.
Para realizar la configuración del daemon podemos hacerlo a través de la terminal (como voy a explicar a continuación) o sino utilizando la interfaz gráfica con musetup-gtk.
Y luego para ejecutar el programa debemos utilizar murmur, o buscarlo en el menú de aplicaciones.
Una vez todo instalado, pasamos a la configuración del daemon.
La misma puede hacerse utilizando una interfaz gráfica (musetup-gtk o musetup-qt), pero yo voy a mostrar cómo hacerlo mediante consola, ya que es muy intuitivo.
Para ello ejecutamos el siguiente comando:
musetup
y nos aparecerá el siguiente menú:
Ahora debemos ir completando los campos de cada una de las opciones, accediendo a través de los números correspondientes mostrados en el menú.
Elegimos la primer opción presionando el número 1 y luego enter. Nos aparecerá el siguiente submenú:
Como podemos ver, las opciones 1 y 2 de éste submenú ya vienen preconfiguradas... por lo que podemos cambiarlas si deseamos, pero en nuestro caso vamos a dejarlas como están.
Ahora nos queda configurar las opciones 3 y 4, que son el Nombre de Usuario y la Contraseña.
Presionamos el número 3 y luego enter; nos pedirá ingresar el nombre de usuario que deseamos y al finalizar damos enter.
Lo mismo debemos hacer para el ingreso de la contraseña.
Una vez que configuramos todo lo anterior volvemos al menú principal presionando el número 0.
Verán que el procedimiento es muy intuitivo, y debemos ir completando cada uno de los campos que sean necesarios.
Ahora que estamos en el menú principal, pasamos a la segunda opción presionando el número 2 y luego enter.
Veremos la siguiente pantalla:
Observemos que los 3 campos ya vienen preconfigurados, por lo tanto: los 2 primeros campos vamos a dejarlos con los valores por default. Y el tercer campo llamado "Connection mode" lo cambiamos de passive a active.
Las 2 primeras opciones indican el rango de puertos que se escanearán para realizar la conexión, utilizando sólo uno de ellos (generalmente el primero, en éste caso el puerto 2234).
La tercer opción configura el modo de conexión... de acuerdo a mi experiencia, tuve que cambiarlo al modo activo para que se realicen las descargas ya que en el modo passive no logré que iniciaran las descargas.
Volvemos al menú principal para seguir con la tercer opción. Presionamos el número 3 y veremos lo siguiente:
Aquí podemos observar que en la primer opción nos pide el password para la interfaz de usuario (la que utilizaremos más adelante).
Nota: La contraseña elegida NO necesariamente debe ser la misma que la ingresada en el primer paso. Pero debemos recordarla.
Accedemos a la primer opción (número 1) y procedemos a ingresar la password del modo que ya sabemos.
Las opciones 2, 3 y 4 de éste submenú las dejamos con la configuración predeterminada.
Regresamos al menú principal y elegimos la opción 4.
Como podemos ver en la siguiente captura, también podemos dejar los valores por defecto, ya que no es necesario cambiarlos.
Nuevamente nos dirigimos al menú pricipal, y seleccionamos el número 5.
Acá nos pide que ingresemos los directorios (carpetas) donde deseamos que se guarden nuestras descargas, tanto las que estan Completas como las Incompletas.
Puede usarse el mismo directorio o no... eso lo deciden ustedes.
Para el ingreso de los directorios pueden ayudarse con la siguiente captura:
Podemos ingresarlos de alguna de las siguientes maneras:
~/directorio/descargas/ /home/tu_usuario/directorio/descargas/
Una vez configurado, volvemos al menú principal y accedemos a la opción número 6:
Aquí sólo utilizaremos la opción 3, donde nos pide ingresar el directorio que queremos compartir.
Generalmente se comparten archivos de música por ser una red especializada en música, pero tambien pueden compartirse cualquier tipo de archivo.
Es por eso que debemos tener cuidado a la hora de elegir el directorio que deseamos compartir ya que se compartirá TODO lo que haya dentro de él.
En mi caso elegí la carpeta Musica que es donde tengo todos mis albumes musicales.
Accedemos a la opción número 3 e ingresamos el directorio de la forma que ya aprendimos:
Una vez ingresado presionamos enter, y debemos esperar a que se escanée dicho directorio...
Si nos equivocamos, o deseamos cambiarlo podemos hacerlo... ya que tenemos la posibilidad como pueden ver en la siguiente captura:
Regresamos al menú principal y elegimos la última opción, la número 7:
Aquí, si lo deseamos, podemos agregar un directorio para compartir con amigos.
Así es, Museek también incorpora un chat para conversar y hacer amigos, con aquellos usuarios que tienen los mismos (o similares) gustos musicales.
No es necesario configurar éste paso, yo no lo he hecho. Pero es una funcionalidad más que ofrece éste programa para aquel que lo desée.
Por lo tanto podemos salir de éste submenú con tranquilidad.
Para terminar con la configuración debemos guardar los cambios. Para ello presionamos el número 0 para salir del programa y luego se nos preguntará si deseamos guardar los cambios.
En caso afirmativo elegimos el 1 ('Save changes') y nos mostrará un mensaje como el que se ve en la siguiente captura.
Listo! ya tenemos configurado el daemon para poder conectarnos a la red.
Interfaz grafica.
Ahora pasamos a la interfaz gráfica. Lo siguiente lo realizaremos por única vez, para dejarlo funcional de manera que cada vez que ejecutemos el programa ya esté funcionando y listo para las búsquedas y descargas.
Buscamos entre nuestras aplicaciones a Museeq, o bién ejecutamos en la terminal museeq. Y aparecerá la siguiente interfaz:
Vamos a configurar para que la interfaz se conecte a la red mediante nuestro daemon. Esta configuración la realizamos por única vez.
Nos dirigimos a Configuración -> Configure...
Y nos aparecerá la siguiente ventana:
Ahora presten atención y sigan los pasos tal cual se los voy mostrando...
Primero presionamos sobre el botón 'Start daemon' para iniciar el demonio.
Luego activamos la casilla de verificación 'Auto-start museek daemon' para que cada vez que iniciemos el programa, el daemon se inicie conjunta y automáticamente.
Después hacemos clic sobre el botón 'Connect to daemon' para que la interfaz se conecte con el daemon...
y nos aparecerá una ventanita (ver la siguiente captura) donde debemos ingresar la contraseña de la interfaz... esa que elegimos mientras configuramos el daemon en la opción número 3 (cualquier duda ir más arriba para recordar ese paso).
Una vez que ingresamos la contraseña marcamos la casilla 'Save password' para que el programa recuerde la contraseña y no tengamos que volver a ingresarla. Le damos OK.
Ahora la interfaz ya se encuentra conectada al daemon, lista para ser usada.
Por último, antes de salir de la ventana, debemos marcar la casilla 'Auto-connect to daemon' para que dicha conexión se haga automáticamente al iniciar el programa.
Ahora todo debe haber quedado como en la siguiente captura. Si es así, le damos Apply y OK.
Ahora ya tenemos todo listo, todo configurado. Ya podemos empezar a utilizar y disfrutar de éste programa. Una muy buena alternativa al Ares.
SEPARADOR
Museek is a client for the SoulSeek file sharing network (P2P).
We will proceed to install the client with Qt4 interface (but we also have the possibility of a PyGTK interface).
In Archlinux this client is in the AUR repositories but we can also compile it from its source code or from its PKGBUILD (for Arch) or also from its ebuild (for Gentoo) by accessing its official page.
Note: there is also a fork of Museek called Museek+ (or Museek-Plus) written in C++, its official website is http://www.museek-plus.org/.
In our case we will use the AUR repository using the yaourt command.
We must install the daemon (daemon) for the SoulSeek network, and the user interface that will make use of that daemon.
Open the terminal and run the following command:
yaourt -S museekd-svn museekd-svn museeq-svn
Note: For the Chakra distribution, the CCR repository must be used, using the following command:
ccr -S museekd-svn museekd-svn museeq-svn
museekd-svn -- the daemon (daemon)
museeq-svn -- the Qt4 interface (GUI) for the daemon
Important: To install this program on distros like Debian, Ubuntu and Linux Mint (i.e. Debian-derived) we must install the following packages (as they change their names depending on the repositories of each distribution):
sudo apt-get install museekd murmur musetup-gtk
With this command we install the PyGTK interface program.
To configure the daemon we can do it through the terminal (as I will explain below) or using the graphical interface with musetup-gtk.
And then to run the program we must use murmur, or look for it in the applications menu.
Once everything is installed, we move on to the daemon configuration.
This can be done using a graphical interface (musetup-gtk or musetup-qt), but I am going to show you how to do it using the console, as it is very intuitive.
To do so, run the following command:
musetup
and the following menu will appear:
Now we must fill in the fields of each of the options, accessing through the corresponding numbers shown in the menu.
Choose the first option by pressing the number 1 and then enter. The following submenu will appear:
As we can see, options 1 and 2 of this submenu are already preconfigured... so we can change them if we wish, but in our case we are going to leave them as they are.
Now we have to configure options 3 and 4, which are the Username and Password.
We press number 3 and then enter; it will ask us to enter the user name we want and when we finish we press enter.
We must do the same for the password.
Once we have configured all the above we return to the main menu by pressing the number 0.
You will see that the procedure is very intuitive, and we must complete each of the necessary fields.
Now that we are in the main menu, we go to the second option by pressing the number 2 and then enter.
You will see the following screen:
Note that the 3 fields are already preconfigured, so: the first 2 fields will be left with the default values. And the third field called "Connection mode" we change it from passive to active.
The first 2 options indicate the range of ports that will be scanned to make the connection, using only one of them (generally the first one, in this case port 2234).
The third option configures the connection mode... according to my experience, I had to change it to active mode for the downloads to take place because in passive mode I couldn't get the downloads to start.
We go back to the main menu to continue with the third option. We press number 3 and we will see the following:
Here we can see that in the first option we are asked for the password for the user interface (which we will use later).
Note: The password chosen does NOT necessarily have to be the same as the one entered in the first step. But we must remember it.
Access the first option (number 1) and proceed to enter the password as you already know it.
We leave options 2, 3 and 4 of this submenu with the default configuration.
We go back to the main menu and choose option 4.
As we can see in the following screenshot, we can also leave the default values, as it is not necessary to change them.
Again we go to the main menu, and select number 5.
Here we are asked to enter the directories (folders) where we want our downloads to be saved, both Complete and Incomplete.
You can use the same directory or not... that's up to you.
To enter the directories you can help yourself with the following screenshot:
We can enter them in one of the following ways:
~/directory/downloads/ /home/your_user/directory/downloads/
Once configured, go back to the main menu and access option number 6:
Here we will only use option 3, where we are asked to enter the directory we want to share.
Generally music files are shared as it is a network specialised in music, but any type of file can also be shared.
That's why we must be careful when choosing the directory we want to share because EVERYTHING inside it will be shared.
In my case I chose the Music folder, which is where I have all my music albums.
Access option number 3 and enter the directory as we have already learnt:
Once entered we press enter, and we have to wait for the directory to be scanned....
If we make a mistake, or we want to change it, we can do it... as we have the possibility as you can see in the following screenshot:
We return to the main menu and choose the last option, number 7:
Here, if we wish, we can add a directory to share with friends.
That's right, Museek also incorporates a chat to chat and make friends, with those users who have the same (or similar) musical tastes.
It is not necessary to configure this step, I have not done it. But it is one more functionality that this program offers for those who want it.
So we can leave this submenu with peace of mind.
To finish with the configuration we have to save the changes. To do this we press the number 0 to exit the program and then we will be asked if we want to save the changes.
If you do, choose 1 ('Save changes') and you will see a message like the one shown in the following screenshot.
That's it! we have now configured the daemon to connect to the network.
Graphical interface.
Now we go to the graphical interface. The following will be done only once, to make it functional so that every time we run the program it is already working and ready for searches and downloads.
We look for Museeq among our applications, or we run museeq in the terminal. And the following interface will appear:
We are going to configure the interface to connect to the network through our daemon. This is a one-time configuration.
We go to Configuration -> Configure...
The following window will appear:
Now pay attention and follow the steps as I am going to show you...
First click on the 'Start daemon' button to start the daemon.
Then we activate the checkbox 'Auto-start museek daemon' so that every time we start the program, the daemon will start automatically.
Then we click on the 'Connect to daemon' button so that the interface connects to the daemon...
and a small window will appear (see the following screenshot) where we must enter the interface password... the one we chose while configuring the daemon in option number 3 (if you have any doubts, go above to remember this step).
Once the password is entered, check the 'Save password' box so that the program remembers the password and we don't have to enter it again. Click OK.
Now the interface is connected to the daemon, ready to be used.
Finally, before exiting the window, check the 'Auto-connect to daemon' box so that the connection is made automatically when you start the program.
Now everything should look like in the following screenshot. If so, click Apply and OK.
Now we have everything ready, everything configured. Now we can start using and enjoying this programme. A very good alternative to Ares.


Home Page oficial del proyecto: /Official home page of the project: Museek
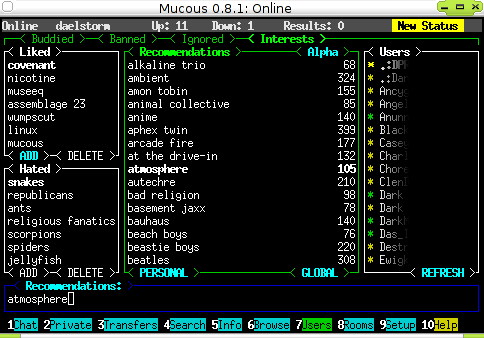
Screenshots / Capturas de pantallas:
| Blogs, Sitios Web y Redes Sociales / Blogs, Webs & Social Networks | Plataformas de Contenidos/ Contents Platforms |
|---|---|
| Mi Blog / My Blog | Los Apuntes de Tux |
| Red Social Twitter / Twitter Social Network | @hugorep |
