
Cuantas veces habrás formateado tu PC, y debes actualizar tu distro de nuevo..
Cuantas veces habrás bajado 200 y picos de megas, entre actualizaciones, drivers, codecs y programas??..
Cuantas veces le instalaste una distro de GNU/Linux a tu amig@ y no le pudiste dejar la maquina andando después de la instalación??..
A todo esto.. las respuesta es APTonCD. Y un poco de Terminal.
Explico de forma breve como funciona este método;
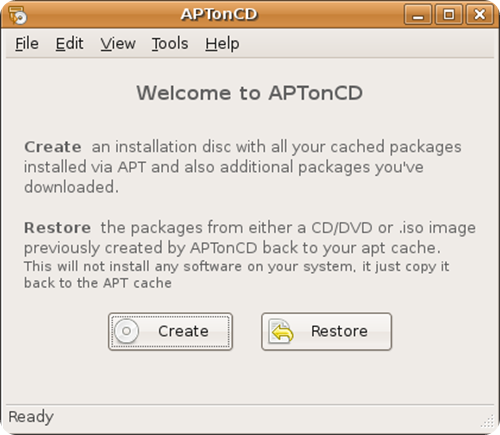
--Agarras tu PC ya actualizada, con los drivers, codecs, y programas,
--Haces una imagen iso de tus paquetes ".deb"
--Extraes esa .iso a un carpeta común.. La cual la llevas para todos lados en tu Pendrive..
--Y cuando necesitas instalarle algo a un PC, abrís la terminal, un "sudo dpkg -i *.deb" .. y ya la tenés lista..
Ahora los requisitos para poder hacer funcionar este tuto:
- Una computadora con alguna distro compatible con APT.. (en mi caso Ubuntu)
- La misma computadora de arriba con las actualizaciones, codecs, drivers, programas al día..
- La compu que acabas de formatear.. y que querés restaurar sus actualizaciones o programas..
- El programa APTonCD, lo instalas desde el Centro de software de Ubuntu, o desde Synaptic.
O con la terminal:
sudo apt-get install aptoncd
- Un Pendrive para pasar los .deb de tú maquina a la maquina desactualizada..
- Conocimientos mínimos sobre: Que es un ".deb", que es una imagen ".iso", y como usas la terminal..
- Y un poco de paciencia no viene mal..
Paso a Paso..
Paso 1)
[AP] Haz un Backup y Restaura tus ".deb"
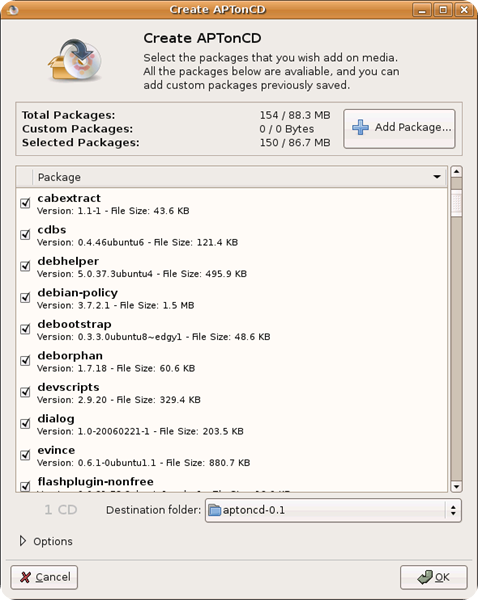
Abrimos APTonCD..
Una vez instalado, lo encontramos en Sistema > Administración > APTonCD
Como muestra la imagen
Paso 2)
a) Una vez abierto APTonCD, nuestro siguiente paso será apretar el boton "Crear"..
b) Luego esperamos a que cargue..
c) Nos vamos hasta la pestaña editar, y seleccionamos la opción "Autoseleccionar dependencias"..
d) Ahora hacemos clic con el botón secundario (el botón derecho del mouse) sobre la lista, y le damos "Marcar Todo"
e) Por ultimo, hacemos clic en el boton "Grabar"
Paso 3)
[AP] Haz un Backup y Restaura tus ".deb"
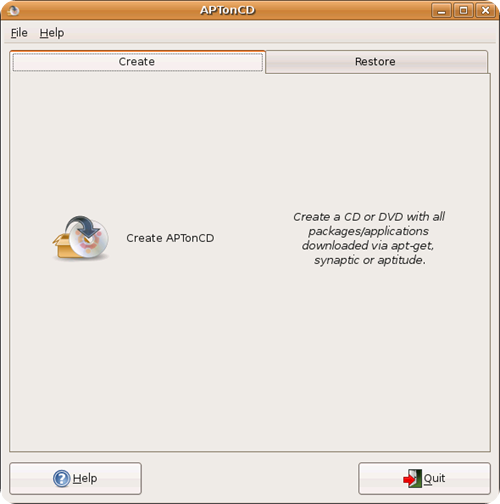
Ahora explicaré que es esta ventana..
Sus opciones son:
- Elegir si queremos guardar la .iso como un CD o DVD.. en caso de que supere los 700 MB, lo recomendable es guardarla en un DVD, pero sino eligen CD..
- Acá eligen en donde quieren guardar la .iso
- Acá le colocan el nombre.. por ej: actualización-04-07-11
- Que es el meta-paquete??
Es un archivo .deb, si seleccionas esta opción tendrás este paquete .deb que te permite instalar todos los paquetes al mismo tiempo.. pero yo prefiero no usarlo, ya que muchas veces da problema con dependencias, y por eso uso otro método..
En conclusión.. si vas a seguir mi tuto.. desactiva esta opción..
a) Bueno.. ahora dale clic al botón "Aplicar"
Paso 4)
[AP] Haz un Backup y Restaura tus ".deb"
a) Luego de haber apretado el botón "Aplicar".. solo tienes que esperar a que termine el proceso..
Guíate por la barrita de progreso.. y los check que va haciendo..
Paso 5)
[AP] Haz un Backup y Restaura tus ".deb"
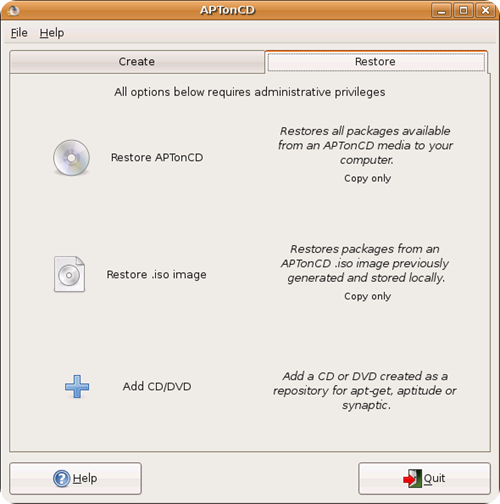
Una vez que el proceso haya terminado te aparecerá una ventanita que te pregunta si quieres grabar la .iso en un cd virgen..
a)Lo que tu debes hacer es darle clic a "NO" .. porque no usaremos ese método..lo haremos con un usb
Ya puedes cerrar el APTonCD.. no nos hará más falta..
Paso 6)
[AP] Haz un Backup y Restaura tus ".deb"
Acá está nuestro resultado.. esta es la famosa imagen ".iso"
Paso 7)
[AP] Haz un Backup y Restaura tus ".deb"
a)Ahora le hacemos clic con el botón secundario, y le damos extraer aquí..
Una ves que finalice la extracción.. veras que hay una carpeta con el mismo nombre de la imagen .iso
b)Ahora ya no necesitamos la imagen .iso, con la carpeta ya estamos hechos..
Asi que podemos borrar la imagen .iso
Paso 8)
[AP] Haz un Backup y Restaura tus ".deb"
Esa carpeta que nos quedó..contiene todo lo que guardamos.. nuestras actualizaciones, programas..etc.. todo en paquetes ".deb"
Entonces cada vez que necesitemos "actualizar" una maquina por ejemplo..
a) Nos metemos a la carpeta generada, y copiamos la carpeta que dice "packages"
b)La pegamos en nuestro pendrive, y la llevamos para todos lados..
Paso 9)
[AP] Haz un Backup y Restaura tus ".deb"
Ahora te diré como instalar esa carpeta en otra maquina..
a)Una vez que hayas puesto tu pendrive en otra maquina..
Abres tu pendrive, y entras a la carpeta "packages".
b)Una vez ahí dentro.. apretás las teclas: Ctrl + L (la tecla "más" no, solo la tecla control y L)
Verás que aparece una barrita con una dirección..
c)Tienes que copiar esa dirección..
Paso 10)
[AP] Haz un Backup y Restaura tus ".deb"
a)Ahora abrimos una terminal..
La encontramos en:
Aplicaciones > Accesorios > Terminal
b)Escribimos:
cd
(es la tecla C minúscula, más la D minúscula, y un espacio en blanco)
c)Ahora te vas a la pestaña editar y le haces click a "Pegar"
d)Y recién ahora presionas la tecla "Enter"
NO CIERRES LA TERMINAL
(fijate en la imagen si no entendiste)
[AP] Haz un Backup y Restaura tus ".deb"
El último paso..
a)Ahora escribes en la terminal:
sudo dpkg -i *.deb
(la palabra sudo, espacio, las letras D P K G en minúsculas, espacio, guión medio y la I en minúscula, espacio, asterisco punto D E B en minúsculas)
b)Y presionas "enter"
c)Te pedirá la contraseña de tu cuenta..
Tecleas tu contraseña..
d) Solo queda esperar a que termine de instalarse..
SEPARADOR
How many times have you formatted your PC, and you must update your distro again...
How many times have you downloaded 200 or so megabytes, between updates, drivers, codecs and programs??..
How many times have you installed a GNU/Linux distro on your friend and you couldn't get the machine running after the installation?
To all this... the answer is APTonCD. And a little Terminal.
I briefly explain how this method works;
--You grab your PC already updated, with the drivers, codecs, and programs,
--You make an iso image of your ".deb" packages
--You extract that .iso to a common folder.. Which you carry everywhere on your Pendrive..
--And when you need to install something on a PC, you open the terminal, a "sudo dpkg -i *.deb" .. and you have it ready..
Now the requirements to be able to make this tutorial work:
- A computer with a distro compatible with APT... (in my case Ubuntu)
- The same computer as above with up-to-date updates, codecs, drivers, programs...
- The computer that you just formatted... and that you want to restore its updates or programs...
- The APTonCD program, you install it from the Ubuntu Software Center, or from Synaptic.
Or with the terminal:
sudo apt-get install aptncd
- A Pendrive to transfer the .deb files from your machine to the outdated machine.
- Minimum knowledge about: What a ".deb" is, what an ".iso" image is, and how to use the terminal.
- And a little patience doesn't hurt...
Step by Step..
Step 1)
[AP] Make a Backup and Restore your ".deb"
We open APTonCD..
Once installed, we find it in System > Administration > APTonCD
As the image shows
Step 2)
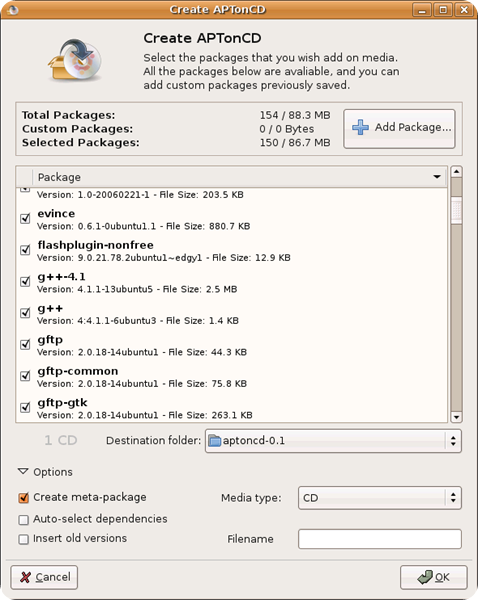
a) Once APTonCD is open, our next step will be to press the "Create" button.
b) Then we wait for it to load.
c) We go to the edit tab, and select the "Autoselect dependencies" option.
d) Now we click with the secondary button (the right mouse button) on the list, and click "Mark All"
e) Finally, we click on the "Record" button
Step 3)
[AP] Make a Backup and Restore your ".deb"
Now I will explain what this window is.
Your options are:
- Choose whether we want to save the .iso as a CD or DVD... if it exceeds 700 MB, it is advisable to save it on a DVD, but otherwise choose CD...
- Here you choose where you want to save the .iso
- Here they put the name.. for example: update-04-07-11
- What is the meta-package?
It is a .deb file, if you select this option you will have this .deb package that allows you to install all the packages at the same time... but I prefer not to use it, since it often causes problems with dependencies, and that is why I use another method...
In conclusion.. if you are going to follow my tutorial.. deactivate this option..
a) Well.. now click on the "Apply" button
Step 4)
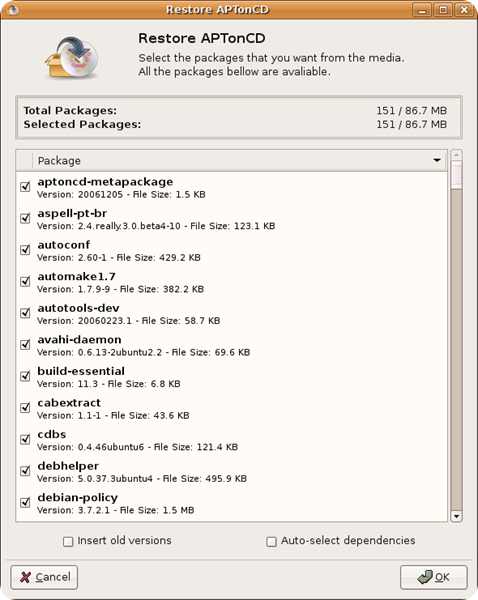
[AP] Make a Backup and Restore your ".deb"
a) After you have pressed the "Apply" button... you just have to wait for the process to finish.
Guide yourself by the progress bar... and the checks it makes...
Step 5)
[AP] Make a Backup and Restore your ".deb"
Once the process has finished, a small window will appear asking you if you want to burn the .iso to a blank CD.
a) What you should do is click "NO".. because we will not use that method... we will do it with a USB
You can now close the APTonCD... we won't need it anymore...
Step 6)
[AP] Make a Backup and Restore your ".deb"
Here is our result.. this is the famous ".iso" image
Step 7)
[AP] Make a Backup and Restore your ".deb"
a)Now we right-click on it, and click extract here.
Once the extraction is finished... you will see that there is a folder with the same name as the .iso image
b)Now we no longer need the .iso image, we are done with the folder.
So we can delete the .iso image
Step 8)
[AP] Make a Backup and Restore your ".deb"
That folder that we had left... it contains everything we saved... our updates, programs... etc... all in ".deb" packages
So every time we need to "update" a machine for example...
a) We go to the generated folder, and copy the folder that says "packages"
b)We stick it on our pendrive, and we carry it everywhere..
Step 9)
[AP] Make a Backup and Restore your ".deb"
Now I will tell you how to install that folder on another machine.
a)Once you have put your pendrive in another machine..
You open your pendrive, and go to the "packages" folder.
b)Once inside... you press the keys: Ctrl + L (not the "plus" key, only the control key and L)
You will see that a bar appears with an address.
c)You have to copy that address..
Step 10)
[AP] Make a Backup and Restore your ".deb"
a)Now we open a terminal..
We find it in:
Applications > Accessories > Terminal
b) We write:
CD
(it's the lowercase C key, plus the lowercase D, and a blank space)
c)Now you go to the edit tab and click "Paste"
d)And just now you press the "Enter" key
DO NOT CLOSE THE TERMINAL
(Look at the image if you didn't understand)
Step 11)
[AP] Make a Backup and Restore your ".deb"
The last step..
a)Now you write in the terminal:
sudo dpkg -i *.deb
(the word sudo, space, the letters D P K G in lowercase, space, hyphen and the I in lowercase, space, asterisk dot D E B in lowercase)
b)And press "enter"
c)It will ask you for your account password.
You type your password.
d) All you have to do is wait for it to finish installing.
Capturas de pantallas / Screenshots:
Descargas / Donwload.
https://aptoncd.sourceforge.net/download.html
| Blogs, Sitios Web y Redes Sociales / Blogs, Webs & Social Networks | Plataformas de Contenidos/ Contents Platforms |
|---|---|
| Mi Blog / My Blog | Los Apuntes de Tux |
| Mi Blog / My Blog | El Mundo de Ubuntu |
| Mi Blog / My Blog | Nel Regno di Linux |
| Mi Blog / My Blog | Linuxlandit & The Conqueror Worm |
| Mi Blog / My Blog | Pianeta Ubuntu |
| Mi Blog / My Blog | Re Ubuntu |
| Mi Blog / My Blog | Nel Regno di Ubuntu |
| Red Social Twitter / Twitter Social Network | @hugorep |

| Blurt Official | Blurt.one | BeBlurt | Blurt Buzz |
|---|---|---|---|
 |  |  |  |
 |  |  |  |
|---|

Upvoted. Thank You for sending some of your rewards to @null. Read my last posts to make sure that BLURT burning is profitable for you. Before using this bot please make sure your account has at least 100 BP. Get more BLURT:
@ mariuszkarowski/how-to-get-automatic-upvote-from-my-accounts@ blurtbooster/blurt-booster-introduction-rules-and-guidelines-1699999662965@ nalexadre/blurt-nexus-creating-an-affiliate-account-1700008765859@ kryptodenno - win BLURT POWER delegation@ ctime/burn-bot-liquid-blurtThanks for the initiative @ctime.