
Series introduction
Hello everyone, I'm thrilled to introduce you to a new series focused on bringing to light some programs, most of them running on Linux exclusively and sometimes MacOS as well. Those are applications most of us use every day, like Spotify and others, but instead of running the official client, I'll show you some lighter terminal alternatives for them.
Why would we need light alternatives? Well, if you're a software developer or media creator or even a hardcore gamer, you'll probably want as many resources such as RAM and CPU power to be allocated to your work instead of "background" apps like Spotify or the file manager. Sure, you want them open, but why should the consume hundreds of MB of RAM and tons of CPU cycles for something you don't want or need to see?
Spotify-tui.
It's no coincidence, mentioning Spotify so many times. Our first application in this series is a Spotify alternative, called spotify-tui. This program is written in Rust, so it should be memory efficient and very fast. Here is the official repository where you can download the program and its source code: https://github.com/Rigellute/spotify-tui
Spotify-tui is licensed under the MIT license so you can do whatever you want with the code, no questions asked. The project is maintained and developed continually with the latest version being released in July this year.
Spotifyd
I know you're ready to just listen to some tunes in your terminal, but we have to set the whole thing up first. Spotify-tui is just a terminal frontend for Spotify so we are still lacking a backend program to communicate with the Spotify servers and get us the music.
We could use the official Spotify client as the back-end, but that would defy the purpose of having a lightweight alternative. Spotifyd comes to the rescue as it is a daemon that can connect to the servers and play music for us as long as we have a premium account.
This piece of software is also written using Rust, but it's licensed under the GPL-3.0 which will prevent you from releasing modifications under a different license. You can still modify, redistribute, and so on, but you must do that also using the GPL-3.0. The repository can be found here: https://github.com/Spotifyd/spotifyd
Installing spotifyd
The project developers provide pre-compiled binaries on their GitHub releases page. Here is the latest release for the date when this article was written: https://github.com/Spotifyd/spotifyd/releases/tag/v0.2.24
You should download the archive titled "spotifyd-linux-full.tar.gz" if you're using Linux. Extract the archive and open a terminal, navigating to the folder where you have extracted the spotifyd binary.
To start the daemon you can now simply type:
./spotifyd -u <your spotify email> -p <your spotify password>
Installing spotify-tui
I'll guide you through installing this program on Arch-based systems, Fedora and Ubuntu. Ubuntu has a snap version available, but I don't recommend nor do I condone the use of snap packages due to Ubuntu's excessively aggressive promotion of this format.
1. Ubuntu:
Nonetheless, the steps for installing spotify-tui on Ubuntu are pretty simple. All you have to do is run snap install spt in a terminal.
2. Fedora:
There is a copr repository available for Fedora containing the latest release of spotify-tui. A copr repository is like a community repository where software can be automatically built for different versions of Fedora. It is an official solution provided by the Fedora team and is tightly integrated into the Fedora ecosystem.
To install spotify-tui on Fedora you can run: sudo dnf copr enable atim/spotify-tui -y && sudo dnf install spotify-tui.
3. Arch Linux:
Spotify-tui can be found in the AUR which is this massive collection of software that the community puts together for Arch systems. To get a package from the AUR, you first must install an AUR manager. I recommend yay, but there are other alternatives around.
To install yay, you can run sudo pacman -S yay. Once installed you can use yay to install spotify-tui: yay -S spotify-tui-bin.
Configuring spotify-tui
Since spotify-tui is an unofficial client, we'll be using it as a development application. This means we'll have to pretend like we're developing an app in order for Spotify to give us a client ID and a secret key to connect to their services.
The process is very painless and doesn't require any technical knowledge. We start by navigating to the Spotify dashboard, which you can access at this URL: https://developer.spotify.com/dashboard/login

Once you're logged in you should see a dashboard that has a green button that reads "Create an app". I want you to press it and give this app a name and a description. For example, I chose spotify-tui as the name.
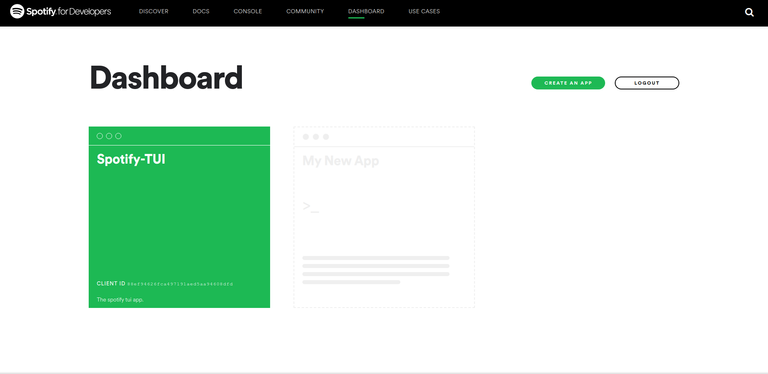
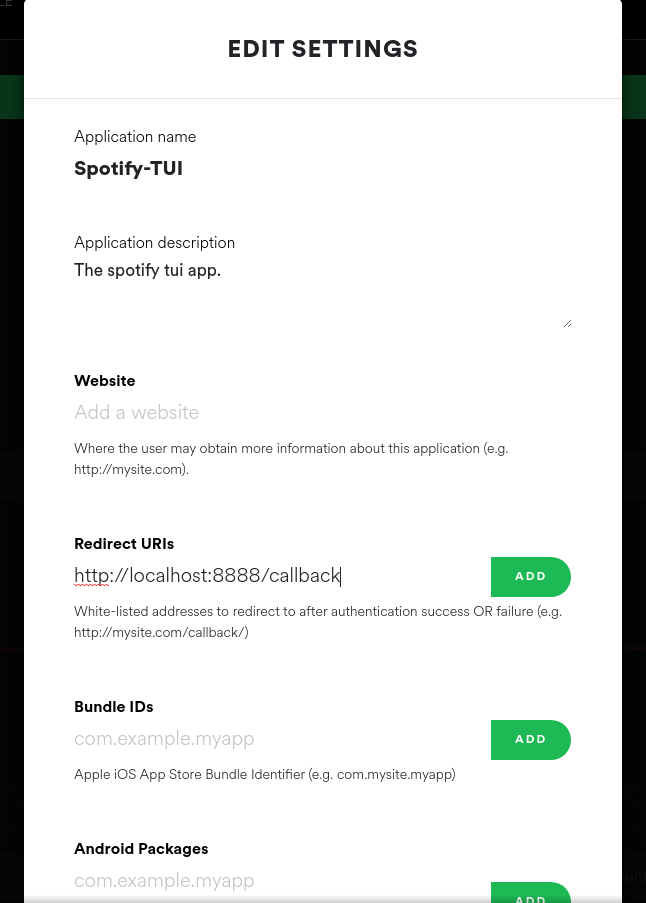
The next thing we're going to do is set a redirection URI in the dashboard. To do so you can click on "Edit Settings" once inside the app dashboard. Paste http://localhost:8888/callback as a redirect URI.
Inside the dashboard, you'll need to copy the client ID, and then let's open a terminal and type spt to start spotify-tui.
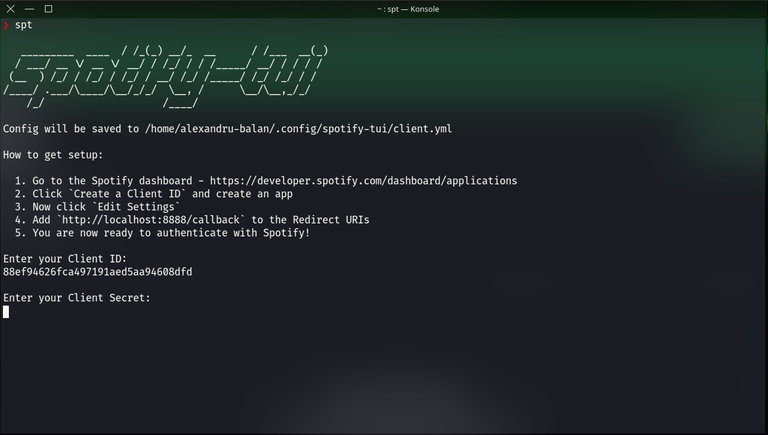
You'll be greeted by a setup screen that guides you through all the necessary steps to get the client up and running. The first step is to paste the client ID and hit Enter. After inserting the client ID, you'll be asked for the client secret which you can reveal in the dashboard. Paste that in the terminal and hit Enter once again.
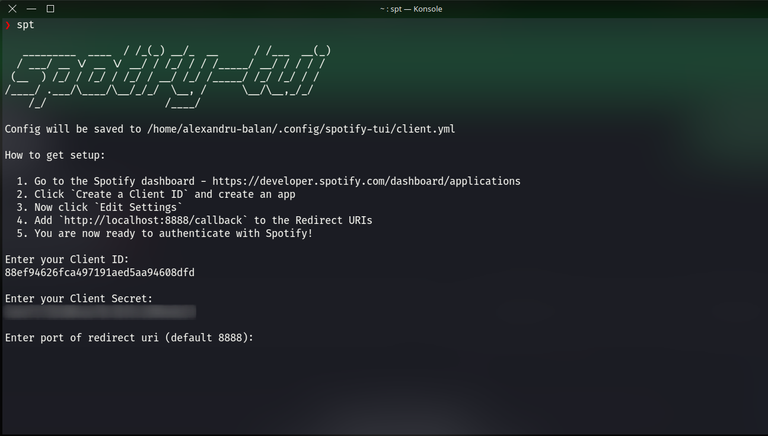
When asked for the port, just hit Enter to use the default port 8888. And that's it! Congratulations, you just started spotify-tui. If you started the Spotify daemon earlier you should now press d and select the Spotifyd device.
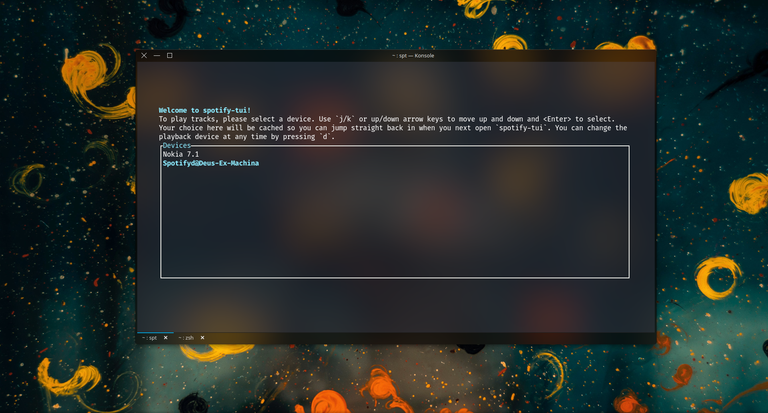
Perfect! Now everything is set up and you can listen to music while maximizing your computer's efficiency.
Quick navigation guide
For all key bindings, you should press ?. This will reveal a menu with all shortcuts and an explanation of what they do. I'll just briefly mention a couple of shortcuts I use the most:
/- use this to search for songs, artists, playlists, etc.n- use this to play the next songp- play the previous songspace- pause and resumeenter- to select stuffCTRL + s- to toggle shuffleCTRL + r- to toggle repeat (controls both repeat all songs and repeat one song)+and-to control volume
Extra tip: If you select the section where the play bar is located you can press s to add the song to favorites.
Why would I run that?
As I've mentioned before, this series is for people that are looking to use their computers most efficiently. An application as big as Spotify is far from being characterized as efficient.
"How efficient can this be?"
Well, let's take a look at how much my system consumes when idle:
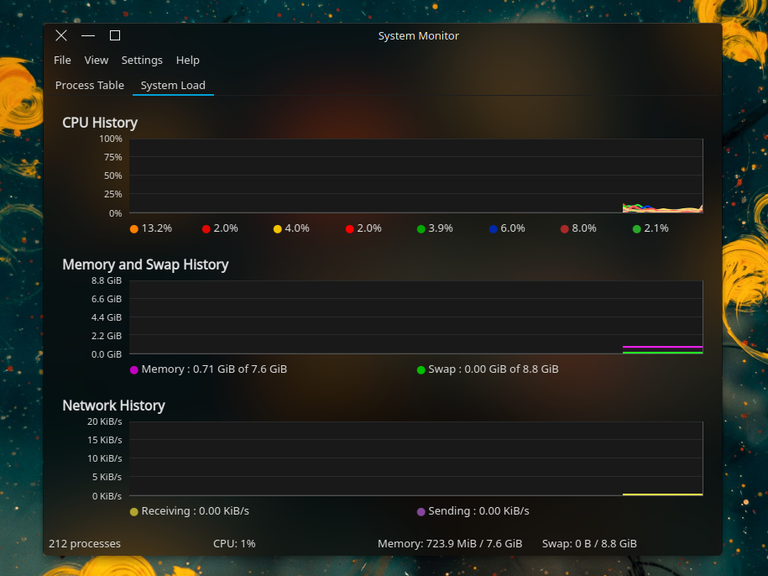
Even though this screenshot was not taken right after my laptop booted up, we can say that my system consumes 710MB while doing nothing(rejoice Windows users). Starting the normal Spotify application will make the memory consumption go up significantly:
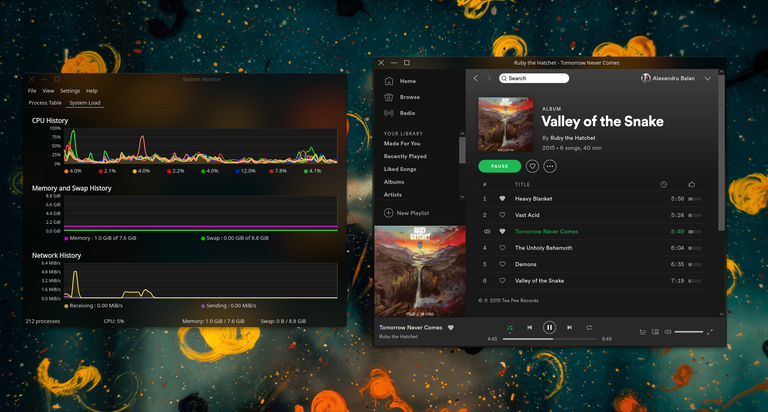
As we can see, the RAM sits now at the 1.0GB mark which means that I'm consuming around 300MB just to listen to music. Well, that's no good. Seeing how my system has only 8GB of RAM, I can't be that careless with the programs I run.
Substituting the official Spotify client with the spotifyd + spotify-tui combination gives me quite a pleasant result:
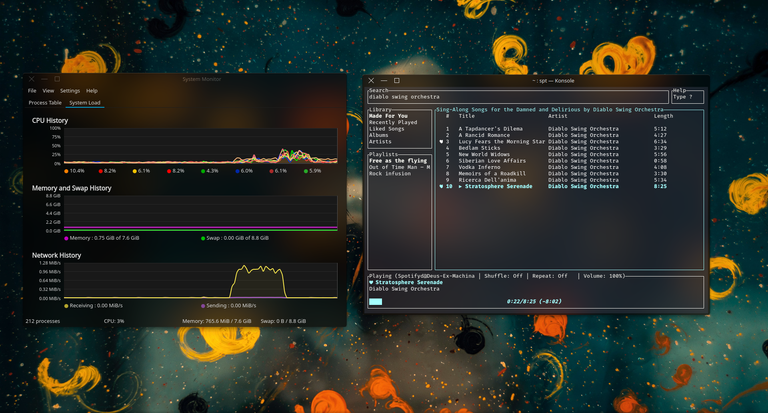
The system monitor reads 750MB memory consumption. This means that now I'm using only 40MB to listen to music which is 7.5 times more memory that I can use for something else.
Drawbacks
It's not all sunshine and rainbows though. Using those programs means that you'll give up the Spotify podcasts for now since they are not implemented in the spotify-tui interface. It's only a matter of time until this feature lands, but in the meantime, it's worth mentioning that if you rely on Spotify for podcasts, this solution might not be for you.
Also, while I've done my best to explain all the steps clearly, I have to admit that the process of setting this up is not for the beginner. It doesn't require a great amount of technical knowledge, but I think it requires more effort than the average user is willing to put in, especially if he's in the possession of a 16 or 32GB machine.
Positive side
1. Low memory consumption
On the other hand, if you're a bit of a tinkerer, I think you're going to like this program. If you're also a developer and run memory-intensive programs all the time, just like me, I think you'll like listening to music in a more lightweight manner.
2. You'll look like a hacker
You want to impress your friends or that geeky girl you've had your eyes on since forever now? Well, look no further. Just listen to music with spotify-tui and you'll seem like the most alpha hacker there is. You'll be the center of attention 1000% guaranteed.
3. Nice graphics
Who needs album covers when you have some mad visuals to show. Look at this:
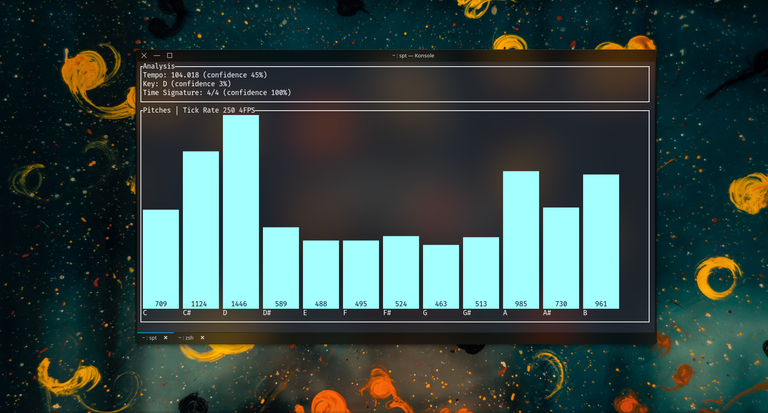
You can just press v 😏 to get this awesome-looking song analytics.
Ending thoughts:
I hope you found spotify-tui interesting at least a little bit and maybe you'll consider it if you don't want to sacrifice your musing while developing your next Android project on a 4GB RAM machine.
I'll try to come up with new interesting terminal programs every two weeks and if you want you can make suggestions in the comments. If you also run terminal apps that are alternatives to official solutions please let me know and explain why did you choose to go this route?
Have a nice week, everyone! See you next time.