Hola amigos. Una vez más por aquí 🙋 me alegro de saludarlos y compartir un nuevo tutorial desde esta hermosa plataforma. Muchísimas gracias por la receptividad, sus visitas y comentarios son bienvenidos. 🤗
Hello friends. Once again over here 🙋 I'm glad to greet you and share a new tutorial from this beautiful platform. Thank you very much for the receptivity, your visits and comments are welcome. 🤗

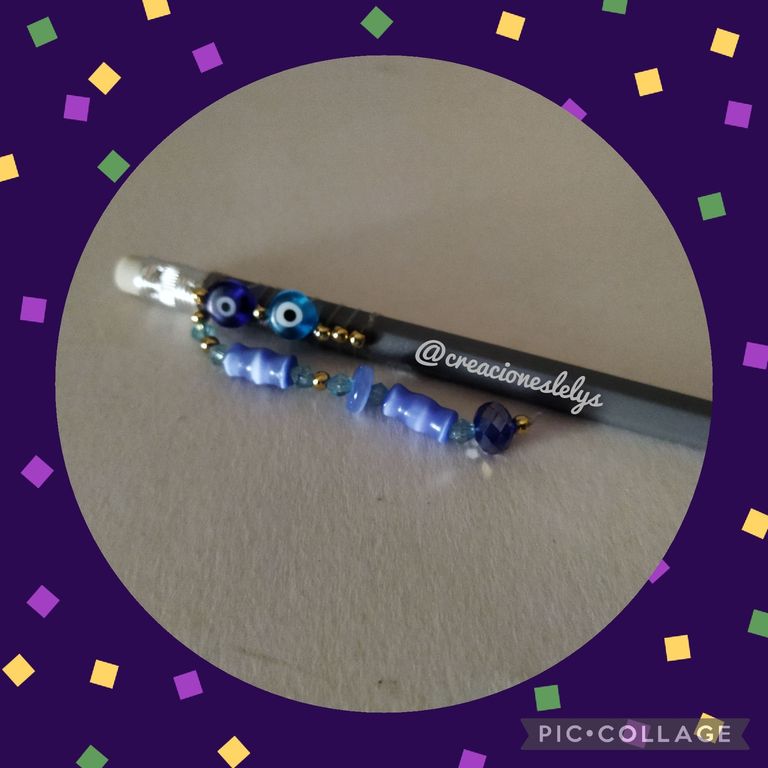
Desde hace unos días ando con el plan de poner coquetos algunos de mis lápices. Recordando mi época de juventud en la que todos mis útiles escolares estaban forrados y muy bonitos. Está de moda decorarlos en casa, especialmente los lapiceros. Para mostrarles ubiqué algunos materiales que tengo a la disposición y les preparé un tutorial. Son libres de crear los diseños a su gusto. Hoy en día hay infinidad de adornos, abalorios, figuras, perlas y demás apliques que podemos usar. ¡Empecemos!
Since a few days ago I've been planning to put some of my pencils in a flirtatious way. Remembering my youth when all my school supplies were lined and very pretty. It is fashionable to decorate them at home, especially the pencils. To show you some of the materials I have at my disposal and I prepared a tutorial for you. You are free to create the designs as you like. Nowadays there are plenty of ornaments, beads, figures, pearls and other appliqués that we can use. Let's get started!
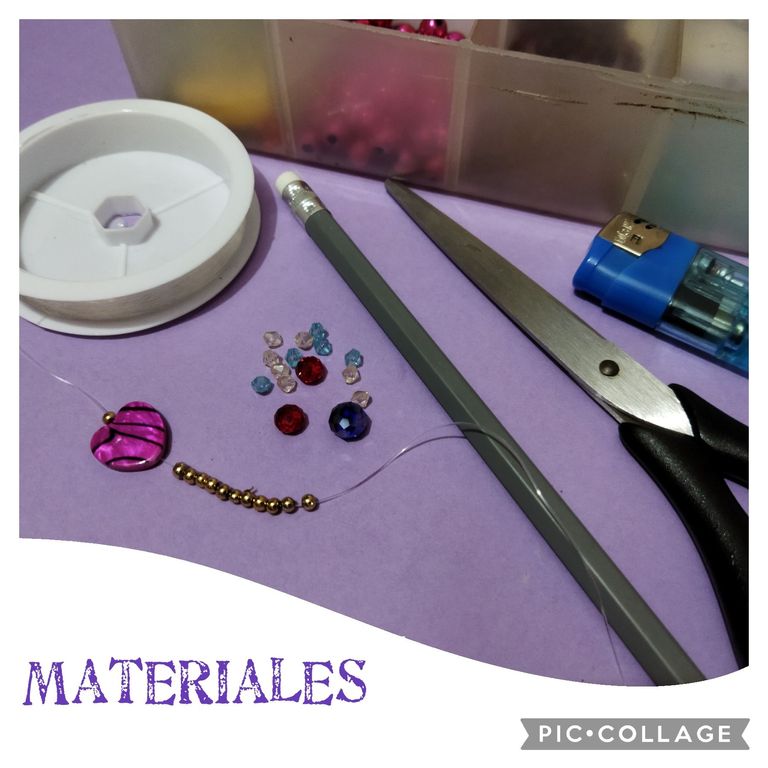
Los materiales que usé son los siguientes:
- Lápiz de grafito para decorarlo.
- Hilo naylon elástico del más delgado. Deben pasar por él todos los apliques.
- Tijeras.
- Abalorios y cuentas.
The materials I used are as follows:
- Graphite pencil to decorate it.
- Elastic naylon thread of the thinnest. All the appliqués must pass through it.
- Scissors.
- Beads and beads.

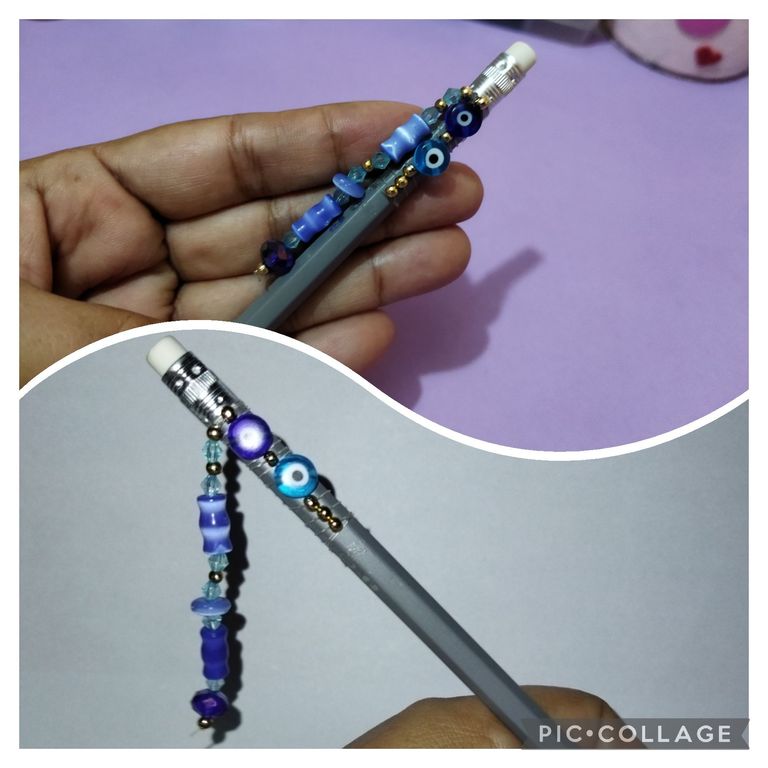
Hacerlos es muy sencillo. Lo más importante es concentrarse en el diseño que queremos y ajustar bien los abalorios. Empezamos cortando la medida del hilo que usaremos. Debe ser el doble de lo que mida el lápiz. Medimos 12 cm desde una de las puntas, dejamos libre, a partir del cm 13 vamos a usar para decorar el lápiz SIN CORTAR EL HILO NUEVAMENTE. En este hilo metemos todas las perlitas o cuentas que vayas a usar. Yo le coloqué cuentas doradas muy pequeñas y ojos turcos.
Hacemos un nudo doble en la primera vuelta, luego hacemos dos más estirando el hilo y presionando para que el hilo que dejamos libre no se suelte. Para la cuarta vuelta ponemos la primera cuenta, sosteniendo para que quede fija mientras damos otras dos vueltas al hilo. En la tercera vuelta posicionamos la otra cuenta y así sucesivamente.
Making them is very simple. The most important thing is to concentrate on the design we want and adjust the beads well. We start by cutting the size of the thread we will use. It should be twice the length of the pencil. We measure 12 cm from one of the ends, we leave free, from cm 13 we will use to decorate the pencil WITHOUT CUTTING THE THREAD AGAIN. In this thread we put all the pearls or beads that you are going to use. I put very small golden beads and Turkish eyes.
We make a double knot in the first loop, then we make two more stretching the thread and pressing so that the thread that we leave free does not come loose. For the fourth turn we place the first bead, holding it so that it remains fixed while we make two more turns of the thread. In the third turn we place the other bead and so on.
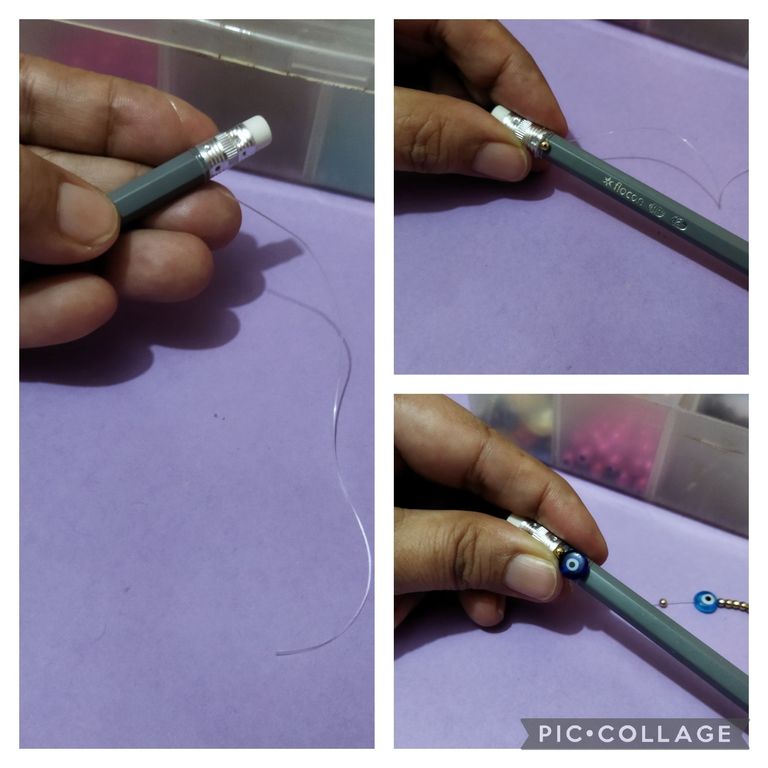
Al finalizar de meter las cuentas hacemos triple nudo para que no se salgan.
Continuamos colocando más abalorios y cuentas en el hilo que dejamos libre. Creando el diseño que más te guste y alternando colores. Yo usé solo las que tengo disponibles de color azul, además de unos swarosky en azul claro. Alguna de las últimas perlas debe ser pesada para que le dé la caída al hilo y luzca bien. Al terminar hacemos triple nudo para asegurar.
When we finish placing the beads, we tie a triple knot so that they do not come off.
We continue placing more beads and beads on the thread that we left free. Creating the design you like and alternating colors. I used only the ones I have available in blue, plus some swarosky in light blue. Some of the last beads should be heavy to give the thread a fall and look good. When finished we tie a triple knot to secure.

Me encanta el lápiz decorado. Espero poder conseguir fimmos y letras para hacerlos personalizados. Quedan geniales.
I love the decorated pencil. I hope I can get fimmos and lettering to make them personalized. They look great.
Estoy segura que tú también puedes hacerlos. Anímate. Los lapiceros decorados están de moda.
Todas las fotos son de mi autoría. Editadas con Polish y PicCollage. Usé el traductor de Deepl. Gracias por leerme.
I'm sure you can make them too. Cheer up. Decorated pencils are in fashion.
All photos are by me. Edited with Polish and PicCollage. I used Deepl translator. Thanks for reading.
Te invitamos a usar el tag #blurthispano. Nos puedes encontrar en Discord.
Curado manualmente por Geeklania.
Te invitamos a votar por @blurthispano como Witness.
Posted from https://blurtlatam.com
Agradezco su apoyo a mis post. 🤗 Éxitos.