
Advertisers' requirements are increasing. Most agencies want to measure the effectiveness of their activities, including the publication of articles. This requires embedding the appropriate code, which is not always easy. In this article, we will show you how to do it and what problems we can encounter. We will do this on the example of Content Management Systems commonly used in the administration panels of websites and portals.
Traffic tracking and analytics codes do not differ in the way they are inserted. Such code can be a script that counts traffic based on Google Analytics , an internal WhitePress® statistics system, or another proprietary solution. It is becoming increasingly popular for the code to enable remarketing activities.
We want to show you, step by step, how to copy and paste the tracking script to the articles ordered by Advertisers. Since this code is always in java script, you can use some tips to implement the code correctly.

Los requisitos de los anunciantes están aumentando. La mayoría de las agencias quieren medir la eficacia de sus actividades, incluida la publicación de artículos. Esto requiere incrustar el código apropiado, lo que no siempre es fácil. En este artículo, le mostraremos cómo hacerlo y qué problemas podemos encontrar. Lo haremos sobre el ejemplo de los Sistemas de Gestión de Contenidos comúnmente utilizados en los paneles de administración de sitios web y portales.
Los códigos de seguimiento y análisis de tráfico no difieren en la forma en que se insertan. Dicho código puede ser un script que cuente el tráfico basado en Google Analytics , un sistema interno de estadísticas WhitePress® u otra solución propietaria. Cada vez es más popular que el código permita actividades de remarketing.
Queremos mostrarte, paso a paso, cómo copiar y pegar el script de seguimiento a los artículos pedidos por los Anunciantes . Dado que este código siempre está en java script, puede usar algunos consejos para implementar el código correctamente.
1. Copy the tracking code / Copie el código de seguimiento.
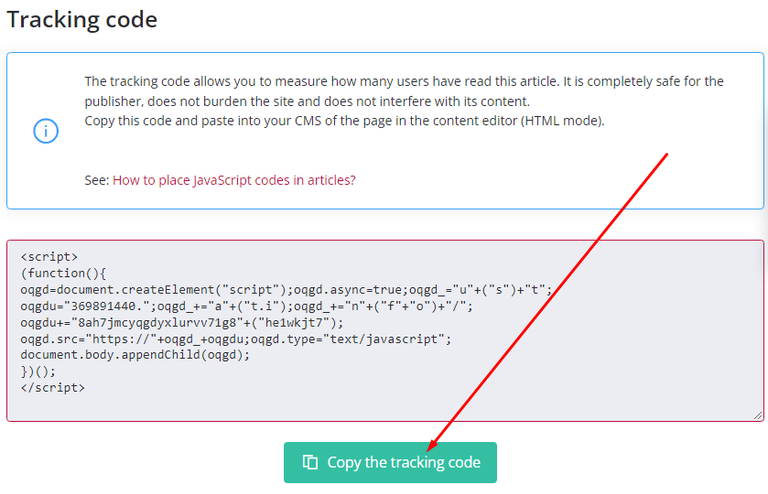
If you are a publisher on WhitePress® and have article offers with a tracking option, you will likely receive a request like this from time to time. In an article like this, you will see the tracking code to copy, located at the bottom of the text:
Si usted es un editor en WhitePress® y tiene ofertas de artículos con una opción de seguimiento, es probable que a veces reciba un pedido de este tipo. En un artículo como este, verá el código de seguimiento para copiar, ubicado en la parte inferior del texto:
Traffic tracking and analytics codes do not differ in the way they are inserted. Such code can be a script that counts traffic based on Google Analytics, an internal WhitePress® statistics system, or another proprietary solution. It is becoming increasingly popular for the code to enable remarketing activities.
We want to show you, step by step, how to copy and paste the tracking script to the articles ordered by Advertisers. Since this code is always in java script, you can use some tips to implement the code correctly.
Copy this script by clicking the button and open your article website in another window.
Los códigos de seguimiento y análisis de tráfico no difieren en la forma en que se insertan. Dicho código puede ser un script que cuente el tráfico basado en Google Analytics , un sistema interno de estadísticas WhitePress® u otra solución propietaria. Cada vez es más popular que el código permita actividades de remarketing.
Queremos mostrarte, paso a paso, cómo copiar y pegar el script de seguimiento a los artículos pedidos por los Anunciantes . Dado que este código siempre está en java script, puede usar algunos consejos para implementar el código correctamente.
Copie este script haciendo clic en el botón y abra el sitio web de su artículo en otra ventana.
2. Convert your article editor view to HTML / Convierta la vista de su editor de artículos en HTML
All websites are run on the basis of an HTML editor. To correctly place the javascript code in the body of the article, you must first switch to HTML editing mode , i.e. the document source .
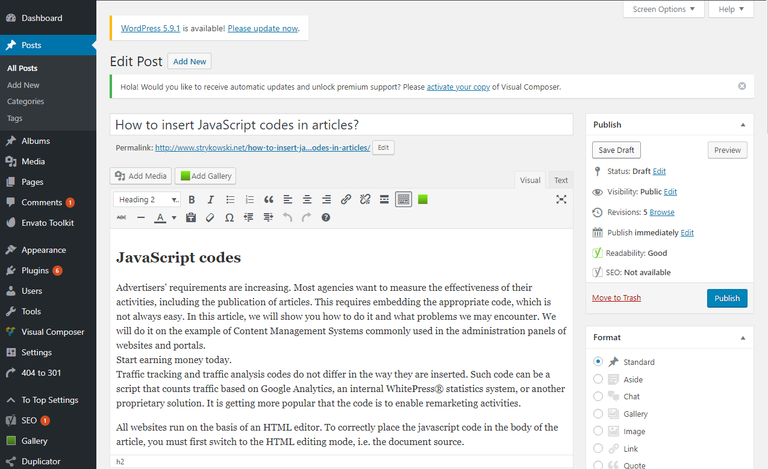
As you probably know, the HTML view is very different from the regular view; for example, in the WordPress blog, the visual view of the article looks like this:
Todos los sitios web se ejecutan sobre la base de un editor HTML. Para colocar correctamente el código javascript en el cuerpo del artículo, primero debe cambiar al modo de edición HTML , es decir, la fuente del documento .
Como probablemente sepa, la vista HTML es muy diferente de la vista habitual; por ejemplo, en el blog de WordPress, la vista visual del artículo se ve así:
While the HTML view, which is placed below the “Text” button, looks like this:
Mientras que la vista HTML, que se coloca debajo del botón «Texto», se ve así:
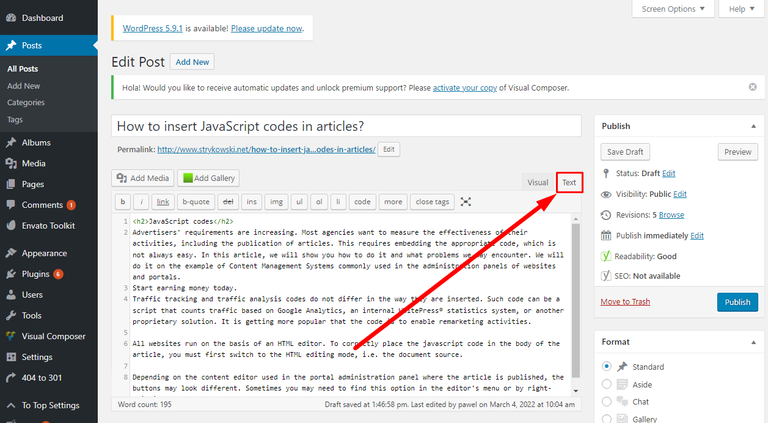
Depending on the content editor used in the admin panel of the portal where the article is published, the buttons may look different . Sometimes you may need to find this option in the editor menu or by right-clicking.
Dependiendo del editor de contenido que se utilice en el panel de administración del portal donde se publique el artículo, los botones pueden verse diferentes . En ocasiones, es posible que necesite encontrar esta opción en el menú del editor o haciendo clic con el botón derecho.

After changing, we should see the HTML tags. We don't need to understand them, just make sure there are sharp brackets <> present in the text.
In the next step, move the HTML text to the end. This is where the script should be pasted:
Después de cambiar, deberíamos ver las etiquetas HTML. No necesitamos entenderlos, solo asegúrese de que haya corchetes agudos <> presentes en el texto.
En el siguiente paso, desplace el texto HTML hasta el final. Este es el lugar donde se debe pegar el script:
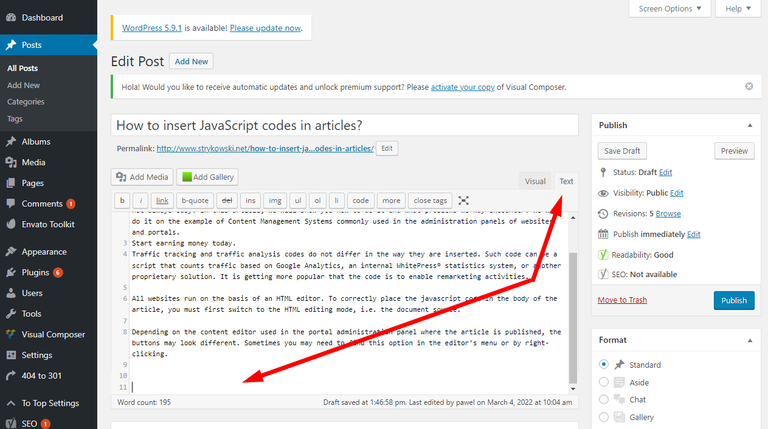
The last step is to paste the traffic tracking code. The correctly pasted code looks like this:
El último paso es pegar el código de seguimiento de tráfico. El código pegado correctamente se ve así:
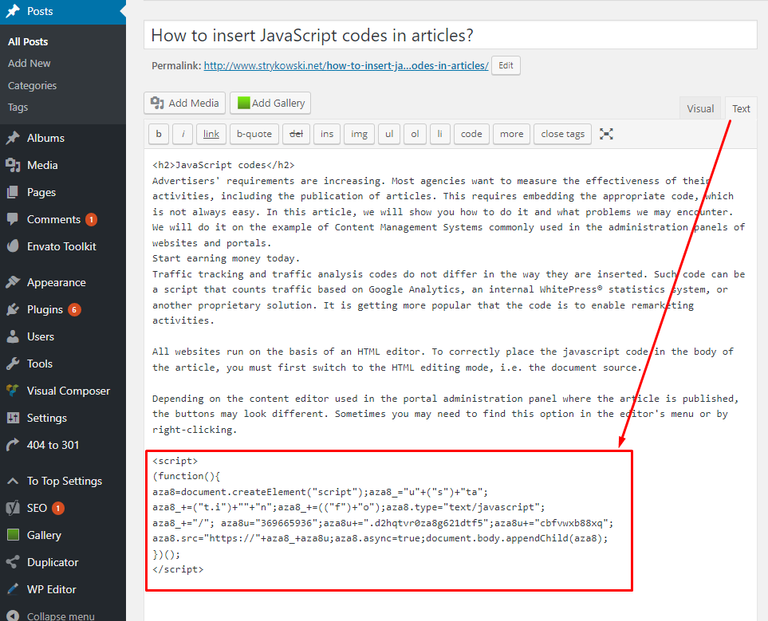
After inserting the code, we can turn off the HTML source and save our article. If everything went well, the traffic tracking code will be included in the body of the article and the statistics should count.
Después de insertar el código, podemos apagar la fuente HTML y guardar nuestro artículo. Si todo salió bien, el código de seguimiento de tráfico se incluirá en el cuerpo del artículo y las estadísticas deberían contar.
3. Common technical problems / Problemas técnicos comunes
Possible problems that should be discussed with the technical manager of the website:
On the WordPress page, the pasted code changes after saving . It happens a lot – JavaScript is not supported by some WordPress versions, so you need to find a way to place the code outside the text view. One of the solutions is to use a special plugin – Embed Code . Download the plugin to your WordPress and place the tracking code in the custom fields – for more specific instructions, read the plugin description .
Code pasting is disabled in the editor ; the appropriate parameter must be set in the editor settings.
The editor does not have any font switching button ; an appropriate parameter must be added in the editor settings.
After saving, the code is not inserted into the article . Perhaps the editor has a restriction on placing <"script"> tags in the content. You will need to change the options in the editor that allow placing these tags.
After saving, the code looks the same, the quotes are changed (the editor may have a function to replace quotes and angle brackets with entities that are only printable, but do not serve any function. You need to disable the parameter responsible for converting special characters to entities in the editor settings).

Posibles problemas que conviene consultar con el responsable técnico de la web:
- En la página de WordPress, el código pegado cambia después de guardar . Sucede mucho: JavaScript no es compatible con algunas versiones de WordPress, por lo que debe encontrar una manera de colocar el código fuera de la vista de texto. Una de las soluciones es utilizar un complemento especial: el código incrustado . Descargue el complemento en su WordPress y coloque el código de seguimiento en los campos personalizados ; para obtener instrucciones más específicas, lea la descripción del complemento.
- El pegado de código está deshabilitado en el editor ; se debe establecer el parámetro apropiado en la configuración del editor.
- El editor no tiene ningún botón de cambio de fuente ; se debe agregar un parámetro apropiado en la configuración del editor.
- Después de guardar, el código no se inserta en el artículo . Quizás el editor tenga una restricción para colocar etiquetas <"script"> en el contenido. Deberá cambiar las opciones en el editor que permiten colocar estas etiquetas).
- Después de guardar, el código se ve igual, se cambian las comillas (el editor puede tener la función de reemplazar las comillas y corchetes angulares con entidades que solo son imprimibles, pero no cumplen ninguna función. Debe deshabilitar el parámetro encargado de convertir caracteres especiales a entidades en la configuración del editor).
Te recomiendo leer también: Cómo ganar dinero a través de NeoBux, guía completa, estrategia y trucos.
Source images / Fuente imágenes: El Cofre del Tesoro.
Disclaimer: The information provided in this article is for informational purposes only and should not be considered legal or tax advice. Please consult a qualified tax professional for specific guidance tailored to your circumstances.
Descargo de responsabilidad: La información proporcionada en este artículo tiene fines informativos únicamente y no debe considerarse asesoramiento legal o fiscal. Consulte a un profesional de impuestos calificado para obtener orientación específica adaptada a sus circunstancias.
Source image / Fuente imagen: Madeira Corporate Services.

Fuentes consultadas (de mi propiedad) para la elaboración del presente artículo. Algunos párrafos pueden estar reproducidos textualmente.
| Argentina Discovery. |  |
|---|---|
| Galería Fotográfica de Argentina. |  |
| Viaggio in Argentina. |  |
Upvoted. Thank You for sending some of your rewards to @null. Get more BLURT:
@ mariuszkarowski/how-to-get-automatic-upvote-from-my-accounts@ blurtbooster/blurt-booster-introduction-rules-and-guidelines-1699999662965@ nalexadre/blurt-nexus-creating-an-affiliate-account-1700008765859@ kryptodenno - win BLURT POWER delegationNote: This bot will not vote on AI-generated content
Thanks!!